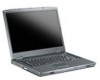

8511418 - Component Replacement Manual
Page 5
...other grounded object. Warning To avoid exposure to the back of Gateway, Inc. Before working with your workbench or other brands and product names are extremely sensitive to replace the hard drive. Never slide components over so the bottom is attached to ..."Preventing static electricity discharge." 3 Turn off your notebook. The hard drive is facing up, then remove the battery. Contact Gateway Customer Care at most electronics stores) and attach it . www.gateway.com © 2006 Gateway, Inc. Gateway and eMachines are ready to a bare metal part of your notebook...
...other grounded object. Warning To avoid exposure to the back of Gateway, Inc. Before working with your workbench or other brands and product names are extremely sensitive to replace the hard drive. Never slide components over so the bottom is attached to ..."Preventing static electricity discharge." 3 Turn off your notebook. The hard drive is facing up, then remove the battery. Contact Gateway Customer Care at most electronics stores) and attach it . www.gateway.com © 2006 Gateway, Inc. Gateway and eMachines are ready to a bare metal part of your notebook...

8511418 - Component Replacement Manual
Page 6
... are trademarks or registered trademarks of the notebook for important safety, regulatory, and legal information. 2 www.gateway.com © 2006 Gateway, Inc. Replacing the Hard Drive Kit 10 Place the new drive, label side up, onto the cover so the screw holes line up. 11 Replace the four screws...Screws 9 Remove the cover from Gateway with the operating system, applications, and drivers installed, you will see the Windows startup screen. -ORIf you from the old drive. 8 Remove the four screws that secure the cover to the drive. 12 Slide the new hard drive kit into your notebook, then ...
... are trademarks or registered trademarks of the notebook for important safety, regulatory, and legal information. 2 www.gateway.com © 2006 Gateway, Inc. Replacing the Hard Drive Kit 10 Place the new drive, label side up, onto the cover so the screw holes line up. 11 Replace the four screws...Screws 9 Remove the cover from Gateway with the operating system, applications, and drivers installed, you will see the Windows startup screen. -ORIf you from the old drive. 8 Remove the four screws that secure the cover to the drive. 12 Slide the new hard drive kit into your notebook, then ...
8511369 - Gateway Notebook Hardware Reference
Page 4
Contents www.gateway.com Chapter 3: Maintaining and Upgrading Your Notebook 31 Preventing static electricity discharge 32 Adding or replacing memory 32 Replacing the DVD drive 35 Replacing the hard drive kit 38 Replacing the keyboard 40 Removing the keyboard 40 Installing the keyboard 45 Appendix A: Safety, Regulatory, and Legal Information 47 Index 59 ii
Contents www.gateway.com Chapter 3: Maintaining and Upgrading Your Notebook 31 Preventing static electricity discharge 32 Adding or replacing memory 32 Replacing the DVD drive 35 Replacing the hard drive kit 38 Replacing the keyboard 40 Removing the keyboard 40 Installing the keyboard 45 Appendix A: Safety, Regulatory, and Legal Information 47 Index 59 ii
8511369 - Gateway Notebook Hardware Reference
Page 6
... if you call for informational purposes only. For all other software ■ Controlling audio and video settings ■ Using the Internet ■ Protecting your hard drive. Label information varies by model, features ordered, and location. Gateway Customer Care will need this guide, the online User Guide has been included on the bottom of...
... if you call for informational purposes only. For all other software ■ Controlling audio and video settings ■ Using the Internet ■ Protecting your hard drive. Label information varies by model, features ordered, and location. Gateway Customer Care will need this guide, the online User Guide has been included on the bottom of...
8511369 - Gateway Notebook Hardware Reference
Page 14
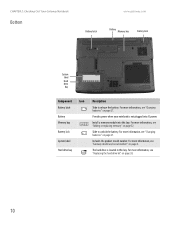
...power. Slide to release the battery. For more information, see "Changing batteries" on page 2. The hard drive is not plugged into this bay. For more information, see "Gateway model and serial number" on page 27. Includes the product model number. For more information, see "...Replacing the hard drive kit" on page 32. CHAPTER 2: Checking Out Your Gateway Notebook Bottom www.gateway.com Battery latch Battery Memory bay Battery lock System label Hard drive bay Component Icon Battery latch Battery Memory bay Battery lock System label Hard drive bay Description Slide to ...
...power. Slide to release the battery. For more information, see "Changing batteries" on page 2. The hard drive is not plugged into this bay. For more information, see "Gateway model and serial number" on page 27. Includes the product model number. For more information, see "...Replacing the hard drive kit" on page 32. CHAPTER 2: Checking Out Your Gateway Notebook Bottom www.gateway.com Battery latch Battery Memory bay Battery lock System label Hard drive bay Component Icon Battery latch Battery Memory bay Battery lock System label Hard drive bay Description Slide to ...
8511369 - Gateway Notebook Hardware Reference
Page 21
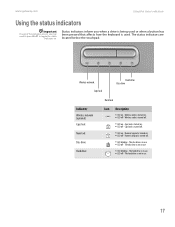
... A ■ LED off . ■ LED blinking - The hard drive is turned on . ■ LED off - Caps lock is not in use . 17 The disc drive is used. The status indicators are on . www.gateway.com Using the status indicators Using the status indicators Important If none... of the indicators are located below the touchpad. Wireless network Caps lock Hard drive Disc drive Num lock Indicator Wireless network (optional) Caps lock Num lock Disc drive Hard drive Icon Description ■...
... A ■ LED off . ■ LED blinking - The hard drive is turned on . ■ LED off - Caps lock is not in use . 17 The disc drive is used. The status indicators are on . www.gateway.com Using the status indicators Using the status indicators Important If none... of the indicators are located below the touchpad. Wireless network Caps lock Hard drive Disc drive Num lock Indicator Wireless network (optional) Caps lock Num lock Disc drive Hard drive Icon Description ■...
8511369 - Gateway Notebook Hardware Reference
Page 35
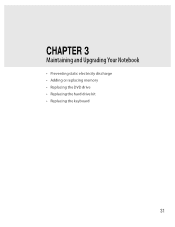
CHAPTER 3 Maintaining and Upgrading Your Notebook • Preventing static electricity discharge • Adding or replacing memory • Replacing the DVD drive • Replacing the hard drive kit • Replacing the keyboard 31
CHAPTER 3 Maintaining and Upgrading Your Notebook • Preventing static electricity discharge • Adding or replacing memory • Replacing the DVD drive • Replacing the hard drive kit • Replacing the keyboard 31
8511369 - Gateway Notebook Hardware Reference
Page 42
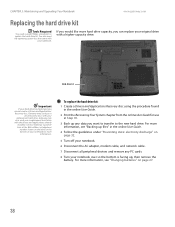
... discs with the drivers and applications already installed. Gateway may send you want to transfer to replace the hard drive kit. For more hard drive capacity, you can replace your notebook. Hard drive kit Important If your hard drive has failed and you cannot create a Drivers and... Applications Recovery disc, Gateway may also send you would like more information, ...
... discs with the drivers and applications already installed. Gateway may send you want to transfer to replace the hard drive kit. For more hard drive capacity, you can replace your notebook. Hard drive kit Important If your hard drive has failed and you cannot create a Drivers and... Applications Recovery disc, Gateway may also send you would like more information, ...
8511369 - Gateway Notebook Hardware Reference
Page 43
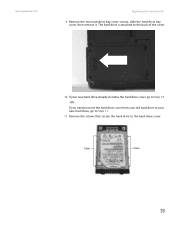
The hard drive is attached to the back of the cover. 10 If your new hard drive, go to the hard drive cover. Screws Screws 39 www.gateway.com Replacing the hard drive kit 9 Remove the two hard drive bay cover screws, slide the hard drive bay cover, then remove it. If you need to move the hard drive cover from your old hard drive to your new hard drive already includes the hard drive cover, go to Step 11. 11 Remove the screws that secure the hard drive to Step 15. -OR-
The hard drive is attached to the back of the cover. 10 If your new hard drive, go to the hard drive cover. Screws Screws 39 www.gateway.com Replacing the hard drive kit 9 Remove the two hard drive bay cover screws, slide the hard drive bay cover, then remove it. If you need to move the hard drive cover from your old hard drive to your new hard drive already includes the hard drive cover, go to Step 11. 11 Remove the screws that secure the hard drive to Step 15. -OR-
8511369 - Gateway Notebook Hardware Reference
Page 44
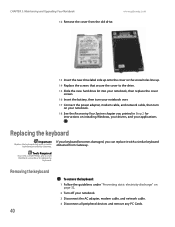
...discharge" on page 32. 2 Turn off your applications. Tools Required You need a small Phillips and a small flat-blade screwdriver to the drive. 15 Slide the new hard drive kit into your notebook, then replace the cover screws. 16 Insert the battery, then turn your notebook over. 17 Connect the power adapter... notebook. 3 Disconnect the AC adapter, modem cable, and network cable. 4 Disconnect all peripheral devices and remove any PC Cards. www.gateway.com 13 Insert the new drive label side up onto the cover so the screw holes line up. 14 Replace the screws that secure the cover to replace the...
...discharge" on page 32. 2 Turn off your applications. Tools Required You need a small Phillips and a small flat-blade screwdriver to the drive. 15 Slide the new hard drive kit into your notebook, then replace the cover screws. 16 Insert the battery, then turn your notebook over. 17 Connect the power adapter... notebook. 3 Disconnect the AC adapter, modem cable, and network cable. 4 Disconnect all peripheral devices and remove any PC Cards. www.gateway.com 13 Insert the new drive label side up onto the cover so the screw holes line up. 14 Replace the screws that secure the cover to replace the...
8511369 - Gateway Notebook Hardware Reference
Page 63
...indicator 6 charging 12 installing 27 latch 10 locating 10 purchasing 29 recalibrating 29 recharging 12 release latch 10 replacing 27 bays battery 27 hard drive 10 memory 10, 32 BIOS Setup utility 29 Bluetooth 19 brightness adjusting 20 brightness keys 20 C cable lock 7 cable modem 14 Caps...RW 7, 24 hard drive 10, 38 identifying drive types 24 multi-format DVD±RW 7, 24 replacing hard drive 38 types 24 DSL modem 14 DVD drive 24 inserting 25 DVD drive identifying 24 installing 35 locating 7 replacing 35 using 24 DVD/CD-RW drive See DVD drive DVD±RW drive See DVD drive E electrostatic ...
...indicator 6 charging 12 installing 27 latch 10 locating 10 purchasing 29 recalibrating 29 recharging 12 release latch 10 replacing 27 bays battery 27 hard drive 10 memory 10, 32 BIOS Setup utility 29 Bluetooth 19 brightness adjusting 20 brightness keys 20 C cable lock 7 cable modem 14 Caps...RW 7, 24 hard drive 10, 38 identifying drive types 24 multi-format DVD±RW 7, 24 replacing hard drive 38 types 24 DSL modem 14 DVD drive 24 inserting 25 DVD drive identifying 24 installing 35 locating 7 replacing 35 using 24 DVD/CD-RW drive See DVD drive DVD±RW drive See DVD drive E electrostatic ...

8511369 - Gateway Notebook Hardware Reference
Page 64
Index opening 22 finding specifications 3 Firewire port 8 Fn key 19 folders opening 22 function keys 18 G Gateway model number 2, 10 serial number 2, 3 Support 3 H hard drive bay 10 indicator 17 installing 38 replacing 38 headphone jack 6 hot-swapping 26 I i.Link port 8 IEEE 1394 port 8 indicators See status... hard drive 38 keyboard 40 memory 32 PC Card 26 J jacks See connections K Kensington cable lock lock slot 7 key combinations 19 keyboard buttons 18 connecting 18 features 18 locating 11 replacing 40 USB port 8 keys application 18 60 www.gateway.com arrow 18 battery status 19 brightness 20...
Index opening 22 finding specifications 3 Firewire port 8 Fn key 19 folders opening 22 function keys 18 G Gateway model number 2, 10 serial number 2, 3 Support 3 H hard drive bay 10 indicator 17 installing 38 replacing 38 headphone jack 6 hot-swapping 26 I i.Link port 8 IEEE 1394 port 8 indicators See status... hard drive 38 keyboard 40 memory 32 PC Card 26 J jacks See connections K Kensington cable lock lock slot 7 key combinations 19 keyboard buttons 18 connecting 18 features 18 locating 11 replacing 40 USB port 8 keys application 18 60 www.gateway.com arrow 18 battery status 19 brightness 20...
8511369 - Gateway Notebook Hardware Reference
Page 65
www.gateway.com Index Standby mode 15, 19 status box 19 status indicator 6 turning off notebook 15 turning on notebook 15 printer inkjet 30 laser 30 USB ...-in 6 jack 6 Standby mode 15, 19 system key 19 starting notebook 15 programs 22 static electricity 32 status indicators battery charge 6 Caps Lock 17 drive activity 17 hard drive 17 location 11 numeric keypad 17 Pad Lock 17 power 6 toggle on or off 19 Support getting specifications 3 surge protector 13 Suspend 19 S-Video...
www.gateway.com Index Standby mode 15, 19 status box 19 status indicator 6 turning off notebook 15 turning on notebook 15 printer inkjet 30 laser 30 USB ...-in 6 jack 6 Standby mode 15, 19 system key 19 starting notebook 15 programs 22 static electricity 32 status indicators battery charge 6 Caps Lock 17 drive activity 17 hard drive 17 location 11 numeric keypad 17 Pad Lock 17 power 6 toggle on or off 19 Support getting specifications 3 surge protector 13 Suspend 19 S-Video...


