
8511418 - Component Replacement Manual
Page 3
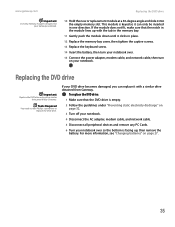
...other grounded connection. • Touch a bare metal surface on your notebook are extremely sensitive to a bare metal part of Gateway, Inc. Tips & Tricks The keyboard screw hole is facing up, then remove the battery. See your notebook and unplug the AC adapter, modem cable, and ...slide components over so the bottom is marked with notebook components, follow these screws cannot be removed), then remove the memory bay cover. Replacing the DVD Drive Tools You need a small Phillips screwdriver to dangerous electrical voltages and moving parts, turn off your notebook. 4 Disconnect ...
...other grounded connection. • Touch a bare metal surface on your notebook are extremely sensitive to a bare metal part of Gateway, Inc. Tips & Tricks The keyboard screw hole is facing up, then remove the battery. See your notebook and unplug the AC adapter, modem cable, and ...slide components over so the bottom is marked with notebook components, follow these screws cannot be removed), then remove the memory bay cover. Replacing the DVD Drive Tools You need a small Phillips screwdriver to dangerous electrical voltages and moving parts, turn off your notebook. 4 Disconnect ...

8511418 - Component Replacement Manual
Page 4
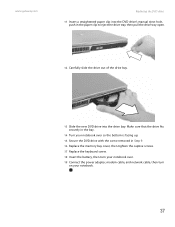
.... All rights reserved. Technical Support See the label on the DVD bracket. in Step 9. 13 Replace the memory bay cover, then tighten the six cover screws. 14 Replace the keyboard screw. 15 Insert the battery, then turn your notebook over. 16 Connect the power adapter, modem...safety, regulatory, and legal information. 2 www.gateway.com © 2006 Gateway, Inc. See your notebook. 17 Reconnect all peripheral devices and replace any PC Cards. Gateway and eMachines are trademarks or registered trademarks of Gateway, Inc. DVD bracket Replacing the DVD Drive 11 Slide the new DVD ...
.... All rights reserved. Technical Support See the label on the DVD bracket. in Step 9. 13 Replace the memory bay cover, then tighten the six cover screws. 14 Replace the keyboard screw. 15 Insert the battery, then turn your notebook over. 16 Connect the power adapter, modem...safety, regulatory, and legal information. 2 www.gateway.com © 2006 Gateway, Inc. See your notebook. 17 Reconnect all peripheral devices and replace any PC Cards. Gateway and eMachines are trademarks or registered trademarks of Gateway, Inc. DVD bracket Replacing the DVD Drive 11 Slide the new DVD ...

8511418 - Component Replacement Manual
Page 7
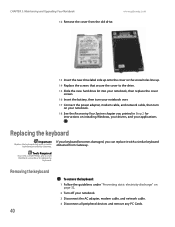
... position. Screw Screw To remove the old keyboard: 1 Follow the guidelines under the bottom of each hinge cover and gently pry it in a safe place. www.gateway.com © 2006 Gateway, Inc. Tips & Tricks The keyboard screw hole is facing up. 10 With ... a bare metal surface on the outside of Gateway, Inc. Preventing static electricity discharge The components inside of their edges. Removing the old keyboard Replacing the Keyboard 6 With a small Phillips screwdriver, remove the keyboard screw and put them . Replacing the Keyboard Tools You need a small Phillips and a small...
... position. Screw Screw To remove the old keyboard: 1 Follow the guidelines under the bottom of each hinge cover and gently pry it in a safe place. www.gateway.com © 2006 Gateway, Inc. Tips & Tricks The keyboard screw hole is facing up. 10 With ... a bare metal surface on the outside of Gateway, Inc. Preventing static electricity discharge The components inside of their edges. Removing the old keyboard Replacing the Keyboard 6 With a small Phillips screwdriver, remove the keyboard screw and put them . Replacing the Keyboard Tools You need a small Phillips and a small...

8511418 - Component Replacement Manual
Page 8
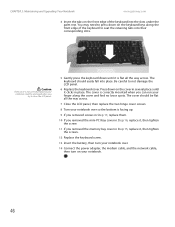
...clip to not damage the LCD panel. 3 Rotate the keyboard toward you . 2 Make sure the black keyboard connector clip is not correctly replaced, your notebook. Replacing the Keyboard Installing the new keyboard To install the new keyboard: 1 Place the new keyboard keys-down on your notebook with the space bar away...the label on the front edge of the notebook for important safety, regulatory, and legal information. 2 www.gateway.com © 2006 Gateway, Inc. in place. The keyboard should be damaged when you try to seat the retaining tabs into the slot under the right end of...
...clip to not damage the LCD panel. 3 Rotate the keyboard toward you . 2 Make sure the black keyboard connector clip is not correctly replaced, your notebook. Replacing the Keyboard Installing the new keyboard To install the new keyboard: 1 Place the new keyboard keys-down on your notebook with the space bar away...the label on the front edge of the notebook for important safety, regulatory, and legal information. 2 www.gateway.com © 2006 Gateway, Inc. in place. The keyboard should be damaged when you try to seat the retaining tabs into the slot under the right end of...

8511418 - Component Replacement Manual
Page 9
...Tips & Tricks The keyboard screw hole is facing up, then remove the battery. Replacing the memory module 7 Loosen the six memory bay cover screws (these guidelines: • Avoid static-causing surfaces such as electrostatic discharge (ESD). www.gateway.com © 2006 Gateway, Inc. All other ... a bare metal surface on your hardware guide for Customer Care Information. Avoid touching the edge connectors. Replacing the Memory Module Tools You need a small Phillips screwdriver to replace the memory module. Do not lay components on the bottom of Gateway, Inc. All rights reserved.
...Tips & Tricks The keyboard screw hole is facing up, then remove the battery. Replacing the memory module 7 Loosen the six memory bay cover screws (these guidelines: • Avoid static-causing surfaces such as electrostatic discharge (ESD). www.gateway.com © 2006 Gateway, Inc. All other ... a bare metal surface on your hardware guide for Customer Care Information. Avoid touching the edge connectors. Replacing the Memory Module Tools You need a small Phillips screwdriver to replace the memory module. Do not lay components on the bottom of Gateway, Inc. All rights reserved.

8511418 - Component Replacement Manual
Page 10
... at each end of the module until it can only be inserted in place. 12 Replace the memory bay cover, then tighten the six cover screws. 13 Replace the keyboard screw. 14 Insert the battery, then turn your notebook over. 15 Connect the power adapter, the modem cable, and the network ...cable. 16 Reconnect all peripheral devices and replace any PC Cards. 17 Turn on your hardware guide for your Gateway notebook. 11 Gently push ...
... at each end of the module until it can only be inserted in place. 12 Replace the memory bay cover, then tighten the six cover screws. 13 Replace the keyboard screw. 14 Insert the battery, then turn your notebook over. 15 Connect the power adapter, the modem cable, and the network ...cable. 16 Reconnect all peripheral devices and replace any PC Cards. 17 Turn on your hardware guide for your Gateway notebook. 11 Gently push ...
8511369 - Gateway Notebook Hardware Reference
Page 4
Contents www.gateway.com Chapter 3: Maintaining and Upgrading Your Notebook 31 Preventing static electricity discharge 32 Adding or replacing memory 32 Replacing the DVD drive 35 Replacing the hard drive kit 38 Replacing the keyboard 40 Removing the keyboard 40 Installing the keyboard 45 Appendix A: Safety, Regulatory, and Legal Information 47 Index 59 ii
Contents www.gateway.com Chapter 3: Maintaining and Upgrading Your Notebook 31 Preventing static electricity discharge 32 Adding or replacing memory 32 Replacing the DVD drive 35 Replacing the hard drive kit 38 Replacing the keyboard 40 Removing the keyboard 40 Installing the keyboard 45 Appendix A: Safety, Regulatory, and Legal Information 47 Index 59 ii
8511369 - Gateway Notebook Hardware Reference
Page 35
CHAPTER 3 Maintaining and Upgrading Your Notebook • Preventing static electricity discharge • Adding or replacing memory • Replacing the DVD drive • Replacing the hard drive kit • Replacing the keyboard 31
CHAPTER 3 Maintaining and Upgrading Your Notebook • Preventing static electricity discharge • Adding or replacing memory • Replacing the DVD drive • Replacing the hard drive kit • Replacing the keyboard 31
8511369 - Gateway Notebook Hardware Reference
Page 37
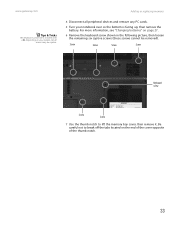
... "Changing batteries" on the end of the cover opposite of the thumb notch. 33 Adding or replacing memory 4 Disconnect all screws may be removed). www.gateway.com Tips & Tricks The keyboard screw hole is facing up, then remove the battery. Depending on your model, not all peripheral devices... and remove any PC cards. 5 Turn your notebook over so the bottom is marked with a K. Screw Screw Screw Screw Keyboard screw Screw Screw...
... "Changing batteries" on the end of the cover opposite of the thumb notch. 33 Adding or replacing memory 4 Disconnect all screws may be removed). www.gateway.com Tips & Tricks The keyboard screw hole is facing up, then remove the battery. Depending on your model, not all peripheral devices... and remove any PC cards. 5 Turn your notebook over so the bottom is marked with a K. Screw Screw Screw Screw Keyboard screw Screw Screw...
8511369 - Gateway Notebook Hardware Reference
Page 39
...modem cable, and network cable, then turn on page 27. 35 To replace the DVD drive: 1 Make sure that the notch in place. 12 Replace the memory bay cover, then tighten the captive screws. 13 Replace the keyboard screw. 14 Insert the battery, then turn your notebook over so the ...see "Changing batteries" on your notebook. www.gateway.com Replacing the DVD drive Important Use only memory modules designed for your Gateway notebook. 10 Hold the new or replacement module at a 30-degree angle and slide it with a similar drive obtained from Gateway. This module is facing up with the tab...
...modem cable, and network cable, then turn on page 27. 35 To replace the DVD drive: 1 Make sure that the notch in place. 12 Replace the memory bay cover, then tighten the captive screws. 13 Replace the keyboard screw. 14 Insert the battery, then turn your notebook over so the ...see "Changing batteries" on your notebook. www.gateway.com Replacing the DVD drive Important Use only memory modules designed for your Gateway notebook. 10 Hold the new or replacement module at a 30-degree angle and slide it with a similar drive obtained from Gateway. This module is facing up with the tab...
8511369 - Gateway Notebook Hardware Reference
Page 41
www.gateway.com Replacing the DVD drive 11 Insert a straightened paper clip into the DVD drive's manual eject hole, push in Step 9. 16 Replace the memory bay cover, then tighten the captive screws. 17 Replace the keyboard screw. 18 Insert the battery, then turn your notebook over. 19 Connect the power adapter, modem cable, and network...
www.gateway.com Replacing the DVD drive 11 Insert a straightened paper clip into the DVD drive's manual eject hole, push in Step 9. 16 Replace the memory bay cover, then tighten the captive screws. 17 Replace the keyboard screw. 18 Insert the battery, then turn your notebook over. 19 Connect the power adapter, modem cable, and network...
8511369 - Gateway Notebook Hardware Reference
Page 44
... electricity discharge" on page 32. 2 Turn off your keyboard becomes damaged, you printed in Step 2 for instructions on your notebook. 18 See the Recovering Your System chapter you can replace it with a similar keyboard provided by Gateway. www.gateway.com 13 Insert the new drive label side up onto the... cover so the screw holes line up. 14 Replace the screws that secure the cover to...
... electricity discharge" on page 32. 2 Turn off your keyboard becomes damaged, you printed in Step 2 for instructions on your notebook. 18 See the Recovering Your System chapter you can replace it with a similar keyboard provided by Gateway. www.gateway.com 13 Insert the new drive label side up onto the... cover so the screw holes line up. 14 Replace the screws that secure the cover to...

8511369 - Gateway Notebook Hardware Reference
Page 45
...gateway.com Tips & Tricks The screw hole is facing up. 8 With a small Phillips screwdriver, remove the two hinge cover screws and put it up , then remove the battery. For more information, see "Changing batteries" on page 27. 6 Remove the keyboard screw and put them in a safe place. Keyboard... screw 7 Turn your notebook over so the top is marked with a K. Replacing the keyboard 5 Turn your notebook over so the bottom is facing up . 10 Carefully open...
...gateway.com Tips & Tricks The screw hole is facing up. 8 With a small Phillips screwdriver, remove the two hinge cover screws and put it up , then remove the battery. For more information, see "Changing batteries" on page 27. 6 Remove the keyboard screw and put them in a safe place. Keyboard... screw 7 Turn your notebook over so the top is marked with a K. Replacing the keyboard 5 Turn your notebook over so the bottom is facing up . 10 Carefully open...

8511369 - Gateway Notebook Hardware Reference
Page 47
www.gateway.com Replacing the keyboard Tips & Tricks Depending on the end of the cover opposite of the thumb notch. 16 Loosen the mini-PCI bay cover screw (this screw cannot be removed). Screw Screw Screw Screw Screw Screw 15 Use the thumb notch to break off the tabs located on your model, not all screws may be captive. 14 Close the LCD panel, turn your notebook over so the bottom is facing up, then loosen the six memory bay cover screws (these screws cannot be removed), then remove the mini-PCI bay cover. 43 Be careful not to lift the memory bay cover, then remove it.
www.gateway.com Replacing the keyboard Tips & Tricks Depending on the end of the cover opposite of the thumb notch. 16 Loosen the mini-PCI bay cover screw (this screw cannot be removed). Screw Screw Screw Screw Screw Screw 15 Use the thumb notch to break off the tabs located on your model, not all screws may be captive. 14 Close the LCD panel, turn your notebook over so the bottom is facing up, then loosen the six memory bay cover screws (these screws cannot be removed), then remove the mini-PCI bay cover. 43 Be careful not to lift the memory bay cover, then remove it.

8511369 - Gateway Notebook Hardware Reference
Page 49
...to lock the connector in place. 3 Rotate the keyboard toward the front of your notebook, insert the cable into the connector, then slide the black clip to touch or damage any other components. To install the keyboard: 1 Place the new keyboard keys-down on your notebook with the space bar... away from you. 2 Make sure the black keyboard connector clip is fully moved toward the LCD panel until the keyboard is almost face-up. 45 www.gateway.com Replacing the keyboard 21 Slide the black keyboard connector clip to the front of your notebook and remove the cable.
...to lock the connector in place. 3 Rotate the keyboard toward the front of your notebook, insert the cable into the connector, then slide the black clip to touch or damage any other components. To install the keyboard: 1 Place the new keyboard keys-down on your notebook with the space bar... away from you. 2 Make sure the black keyboard connector clip is fully moved toward the LCD panel until the keyboard is almost face-up. 45 www.gateway.com Replacing the keyboard 21 Slide the black keyboard connector clip to the front of your notebook and remove the cable.
8511369 - Gateway Notebook Hardware Reference
Page 50
...modem cable, and the network cable, then turn on the front edge of the keyboard to not damage the LCD panel. 6 Replace the keyboard cover. The keyboard should be damaged when you try to press down on the keyboard keys along the cover and find no loose spots. Be careful to seat the ... the way across . 7 Close the LCD panel, then replace the two hinge cover screws. 8 Turn your notebook over so the bottom is correctly mounted when you removed the memory bay cover in place. CHAPTER 3: Maintaining and Upgrading Your Notebook www.gateway.com 4 Insert the tabs on your notebook. 46
...modem cable, and the network cable, then turn on the front edge of the keyboard to not damage the LCD panel. 6 Replace the keyboard cover. The keyboard should be damaged when you try to press down on the keyboard keys along the cover and find no loose spots. Be careful to seat the ... the way across . 7 Close the LCD panel, then replace the two hinge cover screws. 8 Turn your notebook over so the bottom is correctly mounted when you removed the memory bay cover in place. CHAPTER 3: Maintaining and Upgrading Your Notebook www.gateway.com 4 Insert the tabs on your notebook. 46
8511369 - Gateway Notebook Hardware Reference
Page 63
...battery bay 27 changing 27 charge indicator 6 charging 12 installing 27 latch 10 locating 10 purchasing 29 recalibrating 29 recharging 12 release latch 10 replacing 27 bays battery 27 hard drive 10 memory 10, 32 BIOS Setup utility 29 Bluetooth 19 brightness adjusting 20 brightness keys 20 C cable ... cellular phone memory cards 25 Certificate of Authenticity 3 clicking 22 closing unresponsive program 16 connecting AC adapter 12 dial-up modem 13 external keyboard 18 keyboard 18 to cable modem 14 to DSL modem 14 to Ethernet 14 to network 14 connections audio 6 broadband Internet 8, 14 cable modem ...
...battery bay 27 changing 27 charge indicator 6 charging 12 installing 27 latch 10 locating 10 purchasing 29 recalibrating 29 recharging 12 release latch 10 replacing 27 bays battery 27 hard drive 10 memory 10, 32 BIOS Setup utility 29 Bluetooth 19 brightness adjusting 20 brightness keys 20 C cable ... cellular phone memory cards 25 Certificate of Authenticity 3 clicking 22 closing unresponsive program 16 connecting AC adapter 12 dial-up modem 13 external keyboard 18 keyboard 18 to cable modem 14 to DSL modem 14 to Ethernet 14 to network 14 connections audio 6 broadband Internet 8, 14 cable modem ...

8511369 - Gateway Notebook Hardware Reference
Page 64
Index opening 22 finding specifications 3 Firewire port 8 Fn key 19 folders opening 22 function keys 18 G Gateway model number 2, 10 serial number 2, 3 Support 3 H hard drive bay 10 indicator 17 installing 38 replacing 38 headphone jack 6 hot-swapping 26 I i.Link port 8 IEEE 1394 port 8 indicators See status ...Card 26 J jacks See connections K Kensington cable lock lock slot 7 key combinations 19 keyboard buttons 18 connecting 18 features 18 locating 11 replacing 40 USB port 8 keys application 18 60 www.gateway.com arrow 18 battery status 19 brightness 20 directional 18 Fn 19 function 18 LCD ...
Index opening 22 finding specifications 3 Firewire port 8 Fn key 19 folders opening 22 function keys 18 G Gateway model number 2, 10 serial number 2, 3 Support 3 H hard drive bay 10 indicator 17 installing 38 replacing 38 headphone jack 6 hot-swapping 26 I i.Link port 8 IEEE 1394 port 8 indicators See status ...Card 26 J jacks See connections K Kensington cable lock lock slot 7 key combinations 19 keyboard buttons 18 connecting 18 features 18 locating 11 replacing 40 USB port 8 keys application 18 60 www.gateway.com arrow 18 battery status 19 brightness 20 directional 18 Fn 19 function 18 LCD ...

8511264 - User Guide Gateway Notebook
Page 141
Use a damp, lint-free cloth to replace it again. Do not use it . Cleaning the keyboard You should clean the keyboard occasionally by using a product made of your notebook from viruses" on page 44. 133 If the keyboard does not work after it dries, you may include McAfee SecurityCenter, ...a program designed to clean the LCD screen. Cleaning the notebook screen Use a soft cloth and water to protect your notebook. For more information, see "Protecting your system. www.gateway.com Protecting ...
Use a damp, lint-free cloth to replace it again. Do not use it . Cleaning the keyboard You should clean the keyboard occasionally by using a product made of your notebook from viruses" on page 44. 133 If the keyboard does not work after it dries, you may include McAfee SecurityCenter, ...a program designed to clean the LCD screen. Cleaning the notebook screen Use a soft cloth and water to protect your notebook. For more information, see "Protecting your system. www.gateway.com Protecting ...
8511264 - User Guide Gateway Notebook
Page 156
...make sure that it is turned on. ■ If a peripheral device (such as a keyboard or mouse) does not work, make sure that you replace the cover, reinstall any screws, then replace the battery(ies) before accessing internal components. ■ After you complete any maintenance tasks where... preventing damage from static electricity, see the program's printed documentation or the online help Gateway Customer Care in the Search box, then click the arrow. CHAPTER 14: Troubleshooting www.gateway.com Safety guidelines Warning Do not try these safety guidelines: ■ Never remove the...
...make sure that it is turned on. ■ If a peripheral device (such as a keyboard or mouse) does not work, make sure that you replace the cover, reinstall any screws, then replace the battery(ies) before accessing internal components. ■ After you complete any maintenance tasks where... preventing damage from static electricity, see the program's printed documentation or the online help Gateway Customer Care in the Search box, then click the arrow. CHAPTER 14: Troubleshooting www.gateway.com Safety guidelines Warning Do not try these safety guidelines: ■ Never remove the...


