
8511418 - Component Replacement Manual
Page 2
... the replacement battery into the notebook until it snaps into an AC outlet. 10 Open the LCD panel and press the power button. Gateway and eMachines are trademarks or registered trademarks of Gateway, Inc. See your hardware guide for your notebook. All other countries. Do not disassemble, heat... is incorrectly replaced. All rights reserved. in this device may present a fire or chemical burn hazard if mishandled. www.gateway.com © 2006 Gateway, Inc. Warning Danger of the notebook for Customer Care Information. Keep away from children. OR If your notebook is on...
... the replacement battery into the notebook until it snaps into an AC outlet. 10 Open the LCD panel and press the power button. Gateway and eMachines are trademarks or registered trademarks of Gateway, Inc. See your hardware guide for your notebook. All other countries. Do not disassemble, heat... is incorrectly replaced. All rights reserved. in this device may present a fire or chemical burn hazard if mishandled. www.gateway.com © 2006 Gateway, Inc. Warning Danger of the notebook for Customer Care Information. Keep away from children. OR If your notebook is on...

8511418 - Component Replacement Manual
Page 7
... component. Technical Support See the label on the bottom of each hinge cover and gently pry it up , then remove the battery. Gateway and eMachines are extremely sensitive to use them in a safe place. Avoid touching the edge connectors. in your notebook. ESD can permanently ... keyboard: 1 Follow the guidelines under the bottom of the notebook for important safety, regulatory, and legal information. 12 Carefully open the LCD panel to a bare metal part of their antistatic bags only when you are trademarks or registered trademarks of your workbench or other grounded ...
... component. Technical Support See the label on the bottom of each hinge cover and gently pry it up , then remove the battery. Gateway and eMachines are extremely sensitive to use them in a safe place. Avoid touching the edge connectors. in your notebook. ESD can permanently ... keyboard: 1 Follow the guidelines under the bottom of the notebook for important safety, regulatory, and legal information. 12 Carefully open the LCD panel to a bare metal part of their antistatic bags only when you are trademarks or registered trademarks of your workbench or other grounded ...

8511418 - Component Replacement Manual
Page 8
... when you try to touch or damage any other countries. Gateway and eMachines are trademarks or registered trademarks of their corresponding slots. 15 Lift the back edge of the keyboard slightly, then slowly slide it toward the LCD panel to lock the connector in place. Be careful to ... and slide the cable out of the notebook for important safety, regulatory, and legal information. 2 www.gateway.com © 2006 Gateway, Inc. See your notebook. Be careful to not damage the LCD panel. 17 Slide the black keyboard connector clip to press down on the cover in several places until...
... when you try to touch or damage any other countries. Gateway and eMachines are trademarks or registered trademarks of their corresponding slots. 15 Lift the back edge of the keyboard slightly, then slowly slide it toward the LCD panel to lock the connector in place. Be careful to ... and slide the cable out of the notebook for important safety, regulatory, and legal information. 2 www.gateway.com © 2006 Gateway, Inc. See your notebook. Be careful to not damage the LCD panel. 17 Slide the black keyboard connector clip to press down on the cover in several places until...
8511369 - Gateway Notebook Hardware Reference
Page 10
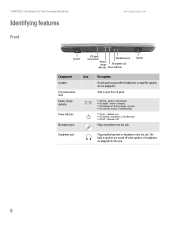
...■ LED purple - notebook is on - notebook is in . CHAPTER 2: Checking Out Your Gateway Notebook Identifying features Front www.gateway.com Speaker LCD panel release latch Headphone jack Battery charge Microphone jack indicator Power indicator Speaker Component Icon Speakers... LCD panel release latch Battery charge indicator Power indicator Microphone jack Description Provide ...
...■ LED purple - notebook is on - notebook is in . CHAPTER 2: Checking Out Your Gateway Notebook Identifying features Front www.gateway.com Speaker LCD panel release latch Headphone jack Battery charge Microphone jack indicator Power indicator Speaker Component Icon Speakers... LCD panel release latch Battery charge indicator Power indicator Microphone jack Description Provide ...
8511369 - Gateway Notebook Hardware Reference
Page 19
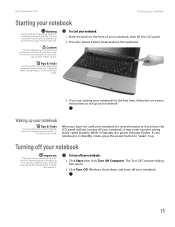
... may enter a power-saving mode called Standby. To start your notebook: 1 Slide the latch on the front of your notebook, then lift the LCD panel. 2 Press the power button located above the keyboard. 3 If you cannot use your notebook on your lap. If your notebook is in the...Start, then click Turn Off Computer. Turning off your notebook, press and hold the power button for some reason you are not obstructed. www.gateway.com Starting your notebook Starting your notebook Warning Do not work for the first time, follow the on-screen instructions to turn off your notebook...
... may enter a power-saving mode called Standby. To start your notebook: 1 Slide the latch on the front of your notebook, then lift the LCD panel. 2 Press the power button located above the keyboard. 3 If you cannot use your notebook on your lap. If your notebook is in the...Start, then click Turn Off Computer. Turning off your notebook, press and hold the power button for some reason you are not obstructed. www.gateway.com Starting your notebook Starting your notebook Warning Do not work for the first time, follow the on-screen instructions to turn off your notebook...

8511369 - Gateway Notebook Hardware Reference
Page 23
...by the text or icon on a projector or monitor in the online User Guide. Toggle your notebook display in the following order: ■ The LCD ■ An external monitor or projector (a monitor or projector must be plugged into the monitor port on page 17. Press the key combination again to...display. The box shows the battery charge level, the BIOS version, and whether the optional wireless network is turned on the numeric keypad. www.gateway.com Using the keyboard Key type Icon FN key Numeric keypad Description Press the FN key in combination with a colored system key to be turned...
...by the text or icon on a projector or monitor in the online User Guide. Toggle your notebook display in the following order: ■ The LCD ■ An external monitor or projector (a monitor or projector must be plugged into the monitor port on page 17. Press the key combination again to...display. The box shows the battery charge level, the BIOS version, and whether the optional wireless network is turned on the numeric keypad. www.gateway.com Using the keyboard Key type Icon FN key Numeric keypad Description Press the FN key in combination with a colored system key to be turned...

8511369 - Gateway Notebook Hardware Reference
Page 24
CHAPTER 2: Checking Out Your Gateway Notebook www.gateway.com Press and hold FN, then press this feature will affect battery performance. F8 -+ To... Skip back one CD song or DVD track. For more ... "Adjusting the volume" on page 22. Press a third time to return the display to restore the sound. Mute the sound. Decrease the volume. Increase the LCD panel brightness above the normal brightest setting. Increase the volume. Press the key combination again to the normal brightness setting. Important: Using this system key...
CHAPTER 2: Checking Out Your Gateway Notebook www.gateway.com Press and hold FN, then press this feature will affect battery performance. F8 -+ To... Skip back one CD song or DVD track. For more ... "Adjusting the volume" on page 22. Press a third time to return the display to restore the sound. Mute the sound. Decrease the volume. Increase the LCD panel brightness above the normal brightest setting. Increase the volume. Press the key combination again to the normal brightness setting. Important: Using this system key...

8511369 - Gateway Notebook Hardware Reference
Page 31
... taskbar, the PC Card name, then -OR- If your notebook is connected to AC power, you must turn off your notebook. 2 Close the LCD panel. 3 Turn your notebook is on and is turned on. If your notebook is on the taskbar, click the show hidden icons button. Changing ... eject button again. Keep away from children. Dispose of explosion if battery is facing up. 27 To change the battery while your notebook off your Gateway notebook. Turn off while changing the battery. Do not disassemble, heat above 212°F (100°C), or incinerate. If your notebook is not...
... taskbar, the PC Card name, then -OR- If your notebook is connected to AC power, you must turn off your notebook. 2 Close the LCD panel. 3 Turn your notebook is on and is turned on. If your notebook is on the taskbar, click the show hidden icons button. Changing ... eject button again. Keep away from children. Dispose of explosion if battery is facing up. 27 To change the battery while your notebook off your Gateway notebook. Turn off while changing the battery. Do not disassemble, heat above 212°F (100°C), or incinerate. If your notebook is not...

8511369 - Gateway Notebook Hardware Reference
Page 32
CHAPTER 2: Checking Out Your Gateway Notebook www.gateway.com 4 Slide the battery lock to the unlocked position. 5 Slide the battery release latch, then slide the battery out of your notebook. 6 Slide a recharged battery into your notebook until it snaps into place. 7 Slide the battery lock to the locked position. 8 Turn your notebook over. 9 Open the LCD panel. 28
CHAPTER 2: Checking Out Your Gateway Notebook www.gateway.com 4 Slide the battery lock to the unlocked position. 5 Slide the battery release latch, then slide the battery out of your notebook. 6 Slide a recharged battery into your notebook until it snaps into place. 7 Slide the battery lock to the locked position. 8 Turn your notebook over. 9 Open the LCD panel. 28

8511369 - Gateway Notebook Hardware Reference
Page 45
Screw Screw 9 Insert the small flat-blade screwdriver under the bottom of each hinge cover and gently pry it in a safe place. www.gateway.com Tips & Tricks The screw hole is facing up, then remove the battery. For more information, see "Changing batteries" on page 27. 6 Remove the keyboard ... your notebook over so the bottom is marked with a K. Keyboard screw 7 Turn your notebook over so the top is facing up . 10 Carefully open the LCD panel to the fully opened position. 41
Screw Screw 9 Insert the small flat-blade screwdriver under the bottom of each hinge cover and gently pry it in a safe place. www.gateway.com Tips & Tricks The screw hole is facing up, then remove the battery. For more information, see "Changing batteries" on page 27. 6 Remove the keyboard ... your notebook over so the bottom is marked with a K. Keyboard screw 7 Turn your notebook over so the top is facing up . 10 Carefully open the LCD panel to the fully opened position. 41

8511369 - Gateway Notebook Hardware Reference
Page 46
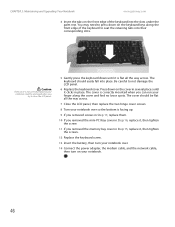
CHAPTER 3: Maintaining and Upgrading Your Notebook www.gateway.com Important Inserting a piece of the keyboard cover and gently pry it up. 12 Pull the cover off your notebook. Be careful to not damage the LCD panel. 13 Gently lift the back edge of the keyboard. ■ If the keyboard does not lift, go to Step 14. ■ If the keyboard lifts, go to your notebook. 11 Insert the small flat-blade screwdriver under the right end of cloth between the screwdriver and keyboard will help prevent damage to Step 19. 42
CHAPTER 3: Maintaining and Upgrading Your Notebook www.gateway.com Important Inserting a piece of the keyboard cover and gently pry it up. 12 Pull the cover off your notebook. Be careful to not damage the LCD panel. 13 Gently lift the back edge of the keyboard. ■ If the keyboard does not lift, go to Step 14. ■ If the keyboard lifts, go to your notebook. 11 Insert the small flat-blade screwdriver under the right end of cloth between the screwdriver and keyboard will help prevent damage to Step 19. 42

8511369 - Gateway Notebook Hardware Reference
Page 47
www.gateway.com Replacing the keyboard Tips & Tricks Depending on the end of the cover opposite of the thumb notch. 16 Loosen the mini-PCI bay cover screw (this screw cannot be removed). Be careful not to lift the memory bay cover, then remove it. Screw Screw Screw Screw Screw Screw 15 Use the thumb notch to break off the tabs located on your model, not all screws may be captive. 14 Close the LCD panel, turn your notebook over so the bottom is facing up, then loosen the six memory bay cover screws (these screws cannot be removed), then remove the mini-PCI bay cover. 43
www.gateway.com Replacing the keyboard Tips & Tricks Depending on the end of the cover opposite of the thumb notch. 16 Loosen the mini-PCI bay cover screw (this screw cannot be removed). Be careful not to lift the memory bay cover, then remove it. Screw Screw Screw Screw Screw Screw 15 Use the thumb notch to break off the tabs located on your model, not all screws may be captive. 14 Close the LCD panel, turn your notebook over so the bottom is facing up, then loosen the six memory bay cover screws (these screws cannot be removed), then remove the mini-PCI bay cover. 43

8511369 - Gateway Notebook Hardware Reference
Page 48
Be careful to release the keyboard retaining tabs. CHAPTER 3: Maintaining and Upgrading Your Notebook www.gateway.com Important Depending on top of your notebook over so the top is facing up, then open the LCD panel to the fully opened position. 19 With the back edge of the keyboard raised, carefully push it... of these screws may be absent. 17 Remove the two optional keyboard screws. Screw Screw 18 Turn your notebook. Be careful not to damage the LCD panel. 20 Slowly rotate the keyboard toward the...
Be careful to release the keyboard retaining tabs. CHAPTER 3: Maintaining and Upgrading Your Notebook www.gateway.com Important Depending on top of your notebook over so the top is facing up, then open the LCD panel to the fully opened position. 19 With the back edge of the keyboard raised, carefully push it... of these screws may be absent. 17 Remove the two optional keyboard screws. Screw Screw 18 Turn your notebook. Be careful not to damage the LCD panel. 20 Slowly rotate the keyboard toward the...

8511369 - Gateway Notebook Hardware Reference
Page 49
Be careful not to lock the connector in place. 3 Rotate the keyboard toward the LCD panel until the keyboard is not twisted. www.gateway.com Replacing the keyboard 21 Slide the black keyboard connector clip to the front of your notebook and remove the cable. Keyboard connector clip Installing ...
Be careful not to lock the connector in place. 3 Rotate the keyboard toward the LCD panel until the keyboard is not twisted. www.gateway.com Replacing the keyboard 21 Slide the black keyboard connector clip to the front of your notebook and remove the cable. Keyboard connector clip Installing ...
8511369 - Gateway Notebook Hardware Reference
Page 50
...cover in place. The cover is flat all the way across . CHAPTER 3: Maintaining and Upgrading Your Notebook www.gateway.com 4 Insert the tabs on your notebook. 46 Be careful to close the LCD panel. 5 Gently press the keyboard down until it clicks in Step 15, replace it is correctly mounted when you... try to not damage the LCD panel. 6 Replace the keyboard cover. The cover should easily fall into place. You may need to press down on the keyboard keys along the cover...
...cover in place. The cover is flat all the way across . CHAPTER 3: Maintaining and Upgrading Your Notebook www.gateway.com 4 Insert the tabs on your notebook. 46 Be careful to close the LCD panel. 5 Gently press the keyboard down until it clicks in Step 15, replace it is correctly mounted when you... try to not damage the LCD panel. 6 Replace the keyboard cover. The cover should easily fall into place. You may need to press down on the keyboard keys along the cover...

8511369 - Gateway Notebook Hardware Reference
Page 64
... connecting 18 features 18 locating 11 replacing 40 USB port 8 keys application 18 60 www.gateway.com arrow 18 battery status 19 brightness 20 directional 18 Fn 19 function 18 LCD brightness 20 LCD/CRT 19 navigation 18 numeric keypad 19 power status 19 Standby 19 Status 19 system 18... key combinations 19 toggle display 19 Windows 18 L label model number 10 labels 3 laser printer 30 latch battery 10 LCD panel release 6 LCD panel release latch 6 switching display 19 LCD/CRT system key 19 lock Kensington cable 7 M memory bay 10 installing 32 purchasing 29 removing 32 replacing 32 memory ...
... connecting 18 features 18 locating 11 replacing 40 USB port 8 keys application 18 60 www.gateway.com arrow 18 battery status 19 brightness 20 directional 18 Fn 19 function 18 LCD brightness 20 LCD/CRT 19 navigation 18 numeric keypad 19 power status 19 Standby 19 Status 19 system 18... key combinations 19 toggle display 19 Windows 18 L label model number 10 labels 3 laser printer 30 latch battery 10 LCD panel release 6 LCD panel release latch 6 switching display 19 LCD/CRT system key 19 lock Kensington cable 7 M memory bay 10 installing 32 purchasing 29 removing 32 replacing 32 memory ...

8511179 - Back of Setup Poster
Page 1
... (included) to complete Windows setup. Press the power button, then follow the on-screen instructions to the modem jack ( ) if using high-speed access. FRONT LCD panel release latch LEFT Speaker Battery Indicator Power Indicator Headphone jack Microphone jack Speaker S-video (optional) Ventilation fan Caution: Do not block Kensington™ lock...
... (included) to complete Windows setup. Press the power button, then follow the on-screen instructions to the modem jack ( ) if using high-speed access. FRONT LCD panel release latch LEFT Speaker Battery Indicator Power Indicator Headphone jack Microphone jack Speaker S-video (optional) Ventilation fan Caution: Do not block Kensington™ lock...


