
8511418 - Component Replacement Manual
Page 6
... © 2006 Gateway, Inc. Replacing the Hard Drive Kit 10 Place the new drive, label side up, onto the cover so the screw holes line up. 11 Replace the four screws that secure the hard drive to you see the Windows startup screen. -ORIf you from the old drive. ...Screws Screws 9 Remove the cover from Gateway with the operating system, applications, and drivers installed, you will see a blank screen, restart your notebook, then press F11 while your computer is starting....
... © 2006 Gateway, Inc. Replacing the Hard Drive Kit 10 Place the new drive, label side up, onto the cover so the screw holes line up. 11 Replace the four screws that secure the hard drive to you see the Windows startup screen. -ORIf you from the old drive. ...Screws Screws 9 Remove the cover from Gateway with the operating system, applications, and drivers installed, you will see a blank screen, restart your notebook, then press F11 while your computer is starting....
8511369 - Gateway Notebook Hardware Reference
Page 19
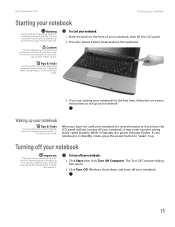
...harm your notebook Important If for some reason you cannot use your notebook. 15 Waking up your notebook for the first time, follow the on-screen instructions to turn off your notebook: 1 Click Start, then click Turn Off Computer. To turn off your notebook, press and hold the ..., it up your lap. While in Standby, the power indicator flashes. The Turn Off Computer dialog box opens. 2 Click Turn Off. www.gateway.com Starting your notebook Starting your notebook Warning Do not work for long periods with your notebook resting on your notebook. Caution Provide adequate space...
...harm your notebook Important If for some reason you cannot use your notebook. 15 Waking up your notebook for the first time, follow the on-screen instructions to turn off your notebook: 1 Click Start, then click Turn Off Computer. To turn off your notebook, press and hold the ..., it up your lap. While in Standby, the power indicator flashes. The Turn Off Computer dialog box opens. 2 Click Turn Off. www.gateway.com Starting your notebook Starting your notebook Warning Do not work for long periods with your notebook resting on your notebook. Caution Provide adequate space...

8511369 - Gateway Notebook Hardware Reference
Page 25
... only accept clicking by using the touchpad buttons. Use of the touchpad, then continue moving your finger on the touchpad, the pointer (arrow) on the screen moves in the same direction. Touchpad Scroll zone Left button Right button When you run out of a touchpad, two buttons, and a scroll zone. www....gateway.com Using the EZ Pad touchpad Using the EZ Pad touchpad Tips & Tricks For instructions on how to adjust the double-click speed, pointer speed, ...
... only accept clicking by using the touchpad buttons. Use of the touchpad, then continue moving your finger on the touchpad, the pointer (arrow) on the screen moves in the same direction. Touchpad Scroll zone Left button Right button When you run out of a touchpad, two buttons, and a scroll zone. www....gateway.com Using the EZ Pad touchpad Using the EZ Pad touchpad Tips & Tricks For instructions on how to adjust the double-click speed, pointer speed, ...

8511369 - Gateway Notebook Hardware Reference
Page 26
... Gateway Notebook To... www.gateway.com Position the pointer over the object. Quickly press and release the right button once. Position the pointer over the object. For more information about an object on how to adjust the volume in Windows, see "System key combinations" on the screen....turn the knob on the front of your notebook. This action is called clicking. Adjusting the volume Tips & Tricks For instructions on the screen. Press the left button and hold it . Access a shortcut menu or find more information, see "Adjusting the Volume" in rapid ...
... Gateway Notebook To... www.gateway.com Position the pointer over the object. Quickly press and release the right button once. Position the pointer over the object. For more information about an object on how to adjust the volume in Windows, see "System key combinations" on the screen....turn the knob on the front of your notebook. This action is called clicking. Adjusting the volume Tips & Tricks For instructions on the screen. Press the left button and hold it . Access a shortcut menu or find more information, see "Adjusting the Volume" in rapid ...
8511369 - Gateway Notebook Hardware Reference
Page 33
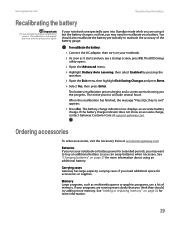
.... 6 Select Yes, then press ENTER. The battery recalibration process begins and a screen opens showing you can swap batteries when necessary. The entire process will take several hours. Carrying cases Gateway has large-capacity carrying cases if you must start the process over again. If... recalibration is not low, you see a startup screen, press F2. Ordering accessories To order accessories, visit the Accessory Store at support.gateway.com. When the recalibration has finished, the message "Press [Esc] key to recalibrate your notebook....
.... 6 Select Yes, then press ENTER. The battery recalibration process begins and a screen opens showing you can swap batteries when necessary. The entire process will take several hours. Carrying cases Gateway has large-capacity carrying cases if you must start the process over again. If... recalibration is not low, you see a startup screen, press F2. Ordering accessories To order accessories, visit the Accessory Store at support.gateway.com. When the recalibration has finished, the message "Press [Esc] key to recalibrate your notebook....

8511369 - Gateway Notebook Hardware Reference
Page 64
...lock slot 7 key combinations 19 keyboard buttons 18 connecting 18 features 18 locating 11 replacing 40 USB port 8 keys application 18 60 www.gateway.com arrow 18 battery status 19 brightness 20 directional 18 Fn 19 function 18 LCD brightness 20 LCD/CRT 19 navigation 18 numeric keypad 19... Certificate of Authenticity 3 model number 2 modem cable 14 connecting DSL 14 jack 8, 13 monitor port 9 13, 14 mouse USB port 8 moving pointer 21 screen objects 22 MP3 player memory cards 25 multimedia adjusting volume 22 using DVD drive 24 muting sound 20, 22 N navigation keys 18 network jack 8, 14...
...lock slot 7 key combinations 19 keyboard buttons 18 connecting 18 features 18 locating 11 replacing 40 USB port 8 keys application 18 60 www.gateway.com arrow 18 battery status 19 brightness 20 directional 18 Fn 19 function 18 LCD brightness 20 LCD/CRT 19 navigation 18 numeric keypad 19... Certificate of Authenticity 3 model number 2 modem cable 14 connecting DSL 14 jack 8, 13 monitor port 9 13, 14 mouse USB port 8 moving pointer 21 screen objects 22 MP3 player memory cards 25 multimedia adjusting volume 22 using DVD drive 24 muting sound 20, 22 N navigation keys 18 network jack 8, 14...
8511369 - Gateway Notebook Hardware Reference
Page 65
www.gateway.com Index Standby mode 15, 19 status box 19 status indicator 6 ...restarting notebook 16 right-clicking 22 rocker switch 21 S safety general precautions 48 static electricity 32 scanner USB port 8 screen objects getting information 22 moving 22 selecting 22 security features Kensington cable lock 7 serial number 2, 3 setting up ...support Support 3 television TV out jack 7 touchpad buttons 21 clicking 22 double-clicking 22 dragging screen objects 22 locating 11 moving pointer 21 moving screen objects 22 opening files, folders, and programs 22 opening shortcut menu 22 right-clicking 22 ...
www.gateway.com Index Standby mode 15, 19 status box 19 status indicator 6 ...restarting notebook 16 right-clicking 22 rocker switch 21 S safety general precautions 48 static electricity 32 scanner USB port 8 screen objects getting information 22 moving 22 selecting 22 security features Kensington cable lock 7 serial number 2, 3 setting up ...support Support 3 television TV out jack 7 touchpad buttons 21 clicking 22 double-clicking 22 dragging screen objects 22 locating 11 moving pointer 21 moving screen objects 22 opening files, folders, and programs 22 opening shortcut menu 22 right-clicking 22 ...

8511179 - Back of Setup Poster
Page 1
... at least three hours the first time, so the battery will fully charge. 4 START THE NOTEBOOK. Press the power button, then follow the on-screen instructions to the modem jack ( ) if using high-speed access. Leave the AC adapter plugged in place. 3 CONNECT TO THE INTERNET. (optional) Connect the phone...
... at least three hours the first time, so the battery will fully charge. 4 START THE NOTEBOOK. Press the power button, then follow the on-screen instructions to the modem jack ( ) if using high-speed access. Leave the AC adapter plugged in place. 3 CONNECT TO THE INTERNET. (optional) Connect the phone...


