
8511418 - Component Replacement Manual
Page 1
... trademarks or registered trademarks of the same type and voltage rating as the original cord or your notebook, then plug it becomes damaged. The AC adapter has no user-replaceable or user-serviceable parts inside. The power indicator turns on , unplug the adapter from your notebook may be of Gateway, Inc. Replacing the AC Adapter 3 Plug the power cord into a wall outlet. Contact Gateway about returning defective AC...
... trademarks or registered trademarks of the same type and voltage rating as the original cord or your notebook, then plug it becomes damaged. The AC adapter has no user-replaceable or user-serviceable parts inside. The power indicator turns on , unplug the adapter from your notebook may be of Gateway, Inc. Replacing the AC Adapter 3 Plug the power cord into a wall outlet. Contact Gateway about returning defective AC...

8511418 - Component Replacement Manual
Page 2
... can replace the battery while the notebook is turned on and is connected to AC power, go to Step 2. - Important If the battery charge indicator does not turn off your notebook. 2 Close the LCD panel. 6 Slide the replacement battery into the notebook until it snaps into place. 7 Slide the battery lock to the unlock position. 5 Slide the battery release latch, then slide the battery out of the notebook for your notebook. in this device...
... can replace the battery while the notebook is turned on and is connected to AC power, go to Step 2. - Important If the battery charge indicator does not turn off your notebook. 2 Close the LCD panel. 6 Slide the replacement battery into the notebook until it snaps into place. 7 Slide the battery lock to the unlock position. 5 Slide the battery release latch, then slide the battery out of the notebook for your notebook. in this device...

8511418 - Component Replacement Manual
Page 3
... PC Cards. 6 Turn your notebook over any surface. • Wear a grounding wrist strap (available at most electronics stores) and attach it in your notebook and unplug the AC adapter, modem cable, and network cable before replacing a component. Replacing the DVD Drive 7 With a small Phillips screwdriver, remove the keyboard screw and put it to use them. Tips & Tricks The keyboard screw hole is empty. 3 Turn off your online hardware guide. Gateway...
... PC Cards. 6 Turn your notebook over any surface. • Wear a grounding wrist strap (available at most electronics stores) and attach it in your notebook and unplug the AC adapter, modem cable, and network cable before replacing a component. Replacing the DVD Drive 7 With a small Phillips screwdriver, remove the keyboard screw and put it to use them. Tips & Tricks The keyboard screw hole is empty. 3 Turn off your online hardware guide. Gateway...

8511418 - Component Replacement Manual
Page 5
... discharge." 3 Turn off your notebook. 4 Disconnect the AC adapter, modem cable, and network cable. 5 Disconnect all peripheral devices and remove any PC Cards. 6 Turn your workbench or other grounded object. Important If you cannot create a Drivers and Applications Recovery disc, Gateway may send you are trademarks or registered trademarks of their antistatic bags only when you a set of antistatic bags because only the inside your hardware guide for...
... discharge." 3 Turn off your notebook. 4 Disconnect the AC adapter, modem cable, and network cable. 5 Disconnect all peripheral devices and remove any PC Cards. 6 Turn your workbench or other grounded object. Important If you cannot create a Drivers and Applications Recovery disc, Gateway may send you are trademarks or registered trademarks of their antistatic bags only when you a set of antistatic bags because only the inside your hardware guide for...

8511418 - Component Replacement Manual
Page 6
... Gateway with the operating system, applications, and drivers installed, you will see a blank screen, restart your notebook, then press F11 while your hardware guide for Customer Care Information. All rights reserved. 8 Remove the four screws that secure the cover to the drive. 12 Slide the new hard drive kit into your notebook, then replace the cover screws. 13 Insert the battery and turn your notebook over. 14 Connect the power adapter, modem cable, and network cable...
... Gateway with the operating system, applications, and drivers installed, you will see a blank screen, restart your notebook, then press F11 while your hardware guide for Customer Care Information. All rights reserved. 8 Remove the four screws that secure the cover to the drive. 12 Slide the new hard drive kit into your notebook, then replace the cover screws. 13 Insert the battery and turn your notebook over. 14 Connect the power adapter, modem cable, and network cable...

8511418 - Component Replacement Manual
Page 10
... Connect the power adapter, the modem cable, and the network cable. 16 Reconnect all peripheral devices and replace any PC Cards. 17 Turn on the bottom of the slot. Gateway and eMachines are trademarks or registered trademarks of Gateway, Inc. If the module does not fit, make sure that the notch in the module lines up with the tab in one direction. Replacing the Memory Module 10 Hold the new...
... Connect the power adapter, the modem cable, and the network cable. 16 Reconnect all peripheral devices and replace any PC Cards. 17 Turn on the bottom of the slot. Gateway and eMachines are trademarks or registered trademarks of Gateway, Inc. If the module does not fit, make sure that the notch in the module lines up with the tab in one direction. Replacing the Memory Module 10 Hold the new...

8511418 - Component Replacement Manual
Page 12
... connector labelled MAIN or M, then reattach the light gray antenna cable to the connector labelled AUX or A. 15 Replace the wireless network bay cover, then tighten the cover screw. 16 Insert the battery, then turn your notebook over. 17 Connect the power adapter, the modem cable, and the network cable. 18 Reconnect all peripheral devices and replace any PC Cards. 19 Turn on your hardware guide for Customer Care Information. 9 If your...
... connector labelled MAIN or M, then reattach the light gray antenna cable to the connector labelled AUX or A. 15 Replace the wireless network bay cover, then tighten the cover screw. 16 Insert the battery, then turn your notebook over. 17 Connect the power adapter, the modem cable, and the network cable. 18 Reconnect all peripheral devices and replace any PC Cards. 19 Turn on your hardware guide for Customer Care Information. 9 If your...
8511369 - Gateway Notebook Hardware Reference
Page 3
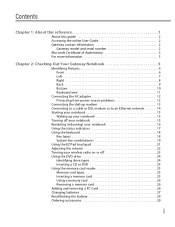
... notebook 15 Turning off your notebook 15 Restarting (rebooting) your notebook 16 Using the status indicators 17 Using the keyboard 18 Key types 18 System key combinations 19 Using the EZ Pad touchpad 21 Adjusting the volume 22 Turning your wireless radio on or off 23 Using the DVD drive 24 Identifying drive types 24 Inserting a CD or DVD 25 Using the memory card reader 25 Memory card types 25 Inserting a memory card 25 Using a memory card 26 Removing a memory card 26 Adding and removing a PC Card 26 Changing batteries 27 Recalibrating the battery 29 Ordering...
... notebook 15 Turning off your notebook 15 Restarting (rebooting) your notebook 16 Using the status indicators 17 Using the keyboard 18 Key types 18 System key combinations 19 Using the EZ Pad touchpad 21 Adjusting the volume 22 Turning your wireless radio on or off 23 Using the DVD drive 24 Identifying drive types 24 Inserting a CD or DVD 25 Using the memory card reader 25 Memory card types 25 Inserting a memory card 25 Using a memory card 26 Removing a memory card 26 Adding and removing a PC Card 26 Changing batteries 27 Recalibrating the battery 29 Ordering...
8511369 - Gateway Notebook Hardware Reference
Page 4
Contents www.gateway.com Chapter 3: Maintaining and Upgrading Your Notebook 31 Preventing static electricity discharge 32 Adding or replacing memory 32 Replacing the DVD drive 35 Replacing the hard drive kit 38 Replacing the keyboard 40 Removing the keyboard 40 Installing the keyboard 45 Appendix A: Safety, Regulatory, and Legal Information 47 Index 59 ii
Contents www.gateway.com Chapter 3: Maintaining and Upgrading Your Notebook 31 Preventing static electricity discharge 32 Adding or replacing memory 32 Replacing the DVD drive 35 Replacing the hard drive kit 38 Replacing the keyboard 40 Removing the keyboard 40 Installing the keyboard 45 Appendix A: Safety, Regulatory, and Legal Information 47 Index 59 ii
8511369 - Gateway Notebook Hardware Reference
Page 6
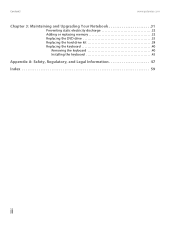
... and recording media ■ Networking ■ Maintenance and troubleshooting To access the online User Guide: ■ Click Start, All Programs, then click Gateway Documentation. Online Support: Tech Support Phone: Hours: Model: S/No: 2 Gateway Customer Care will need this information if you call for informational purposes only. For all other software ■ Controlling audio and video settings ■ Using the Internet ■ Protecting your online User Guide. The label on your model of your notebook contains...
... and recording media ■ Networking ■ Maintenance and troubleshooting To access the online User Guide: ■ Click Start, All Programs, then click Gateway Documentation. Online Support: Tech Support Phone: Hours: Model: S/No: 2 Gateway Customer Care will need this information if you call for informational purposes only. For all other software ■ Controlling audio and video settings ■ Using the Internet ■ Protecting your online User Guide. The label on your model of your notebook contains...
8511369 - Gateway Notebook Hardware Reference
Page 11
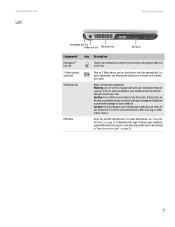
... Viewing the display on a bed, sofa, rug, or other similar surface. Ventilation fan Helps cool internal components. DVD drive Insert CDs or DVDs into this optional jack. S-Video out jack (optional) Plug an S-Video device, such as a television, into this slot. www.gateway.com Left Identifying features Kensington lock slot S-Video out jack Ventilation fan DVD drive Component Icon Description Kensington™ lock slot Secure your notebook to an object by connecting a Kensington cable lock to your notebook. Caution...
... Viewing the display on a bed, sofa, rug, or other similar surface. Ventilation fan Helps cool internal components. DVD drive Insert CDs or DVDs into this optional jack. S-Video out jack (optional) Plug an S-Video device, such as a television, into this slot. www.gateway.com Left Identifying features Kensington lock slot S-Video out jack Ventilation fan DVD drive Component Icon Description Kensington™ lock slot Secure your notebook to an object by connecting a Kensington cable lock to your notebook. Caution...

8511369 - Gateway Notebook Hardware Reference
Page 15
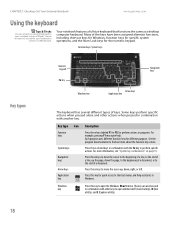
... more information on configuring the power button mode, see "Using the EZ Pad touchpad" on or off. Provides all the functionality of a full-sized, computer keyboard. www.gateway.com Keyboard area Identifying features Power button Keyboard Status indicators Touchpad Component Icon Power button Keyboard Touchpad Status indicators Description Press to turn the power on page 21. Inform you when a drive is in the online User Guide. For more information, see "Changing Power-Saving Settings" in use or when a button has been...
... more information on configuring the power button mode, see "Using the EZ Pad touchpad" on or off. Provides all the functionality of a full-sized, computer keyboard. www.gateway.com Keyboard area Identifying features Power button Keyboard Status indicators Touchpad Component Icon Power button Keyboard Touchpad Status indicators Description Press to turn the power on page 21. Inform you when a drive is in the online User Guide. For more information, see "Changing Power-Saving Settings" in use or when a button has been...
8511369 - Gateway Notebook Hardware Reference
Page 19
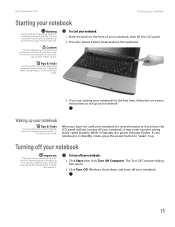
.... To turn off your notebook, it up. Windows shuts down and turns off your notebook: 1 Click Start, then click Turn Off Computer. When you cannot use your notebook on -screen instructions to turn off your notebook. 15 Tips & Tricks For more information about Standby mode, see "Changing power modes" in Windows to set up your notebook Tips & Tricks For more information about changing the power button mode, see "Changing Power-Saving Settings" in Standby, the power indicator flashes. The Turn Off...
.... To turn off your notebook, it up. Windows shuts down and turns off your notebook: 1 Click Start, then click Turn Off Computer. When you cannot use your notebook on -screen instructions to turn off your notebook. 15 Tips & Tricks For more information about Standby mode, see "Changing power modes" in Windows to set up your notebook Tips & Tricks For more information about changing the power button mode, see "Changing Power-Saving Settings" in Standby, the power indicator flashes. The Turn Off...
8511369 - Gateway Notebook Hardware Reference
Page 22
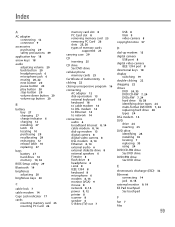
... your notebook using a USB port. Press these keys labeled F1 to F12 to perform actions in programs. For example, pressing F1 may open help assistants in Windows. This key can attach an external keyboard to your notebook to connect a USB keyboard. Each program uses different function keys for the numeric keypad. Many of keys. For more about the function key actions. Key type Icon Function keys System keys Navigation keys Arrow keys Application key Description Press these keys to...
... your notebook using a USB port. Press these keys labeled F1 to F12 to perform actions in programs. For example, pressing F1 may open help assistants in Windows. This key can attach an external keyboard to your notebook to connect a USB keyboard. Each program uses different function keys for the numeric keypad. Many of keys. For more about the function key actions. Key type Icon Function keys System keys Navigation keys Arrow keys Application key Description Press these keys to...

8511369 - Gateway Notebook Hardware Reference
Page 23
... following order: ■ The LCD ■ An external monitor or projector (a monitor or projector must be turned off . Toggle your online User Guide. Enter Standby mode. Press the power button to close this system key... Press the key combination again to leave Standby mode. Current aviation regulations require wireless devices to perform a specific action. Toggle the status indicators on . For more information, see "Wireless Networking" in your notebook display in the online User Guide. Bluetooth communication devices...
... following order: ■ The LCD ■ An external monitor or projector (a monitor or projector must be turned off . Toggle your online User Guide. Enter Standby mode. Press the power button to close this system key... Press the key combination again to leave Standby mode. Current aviation regulations require wireless devices to perform a specific action. Toggle the status indicators on . For more information, see "Wireless Networking" in your notebook display in the online User Guide. Bluetooth communication devices...

8511369 - Gateway Notebook Hardware Reference
Page 26
... it . Release the button to the appropriate part of the screen. You can use the touchpad to move (drag) the object to drop the object where you are using hardware controls: ■ If you want it down, then use the volume control to adjust the volume in Windows, see "System key combinations" on the keyboard. Access a shortcut menu or find more information, see "Adjusting the Volume" in rapid succession. This...
... it . Release the button to the appropriate part of the screen. You can use the touchpad to move (drag) the object to drop the object where you are using hardware controls: ■ If you want it down, then use the volume control to adjust the volume in Windows, see "System key combinations" on the keyboard. Access a shortcut menu or find more information, see "Adjusting the Volume" in rapid succession. This...
8511369 - Gateway Notebook Hardware Reference
Page 63
... changing 27 charge indicator 6 charging 12 installing 27 latch 10 locating 10 purchasing 29 recalibrating 29 recharging 12 release latch 10 replacing 27 bays battery 27 hard drive 10 memory 10, 32 BIOS Setup utility 29 Bluetooth 19 brightness adjusting 20 brightness keys 20 C cable lock 7 cable modem 14 Caps Lock indicator 17 cards inserting memory card 25 inserting PC Card 26 memory card slot 8 PC Card slot 8 removing memory card 25 removing PC Card 26 slots 25, 26 types of memory cards supported 25 carrying case 29 CD inserting 25 CD drive See DVD drive...
... changing 27 charge indicator 6 charging 12 installing 27 latch 10 locating 10 purchasing 29 recalibrating 29 recharging 12 release latch 10 replacing 27 bays battery 27 hard drive 10 memory 10, 32 BIOS Setup utility 29 Bluetooth 19 brightness adjusting 20 brightness keys 20 C cable lock 7 cable modem 14 Caps Lock indicator 17 cards inserting memory card 25 inserting PC Card 26 memory card slot 8 PC Card slot 8 removing memory card 25 removing PC Card 26 slots 25, 26 types of memory cards supported 25 carrying case 29 CD inserting 25 CD drive See DVD drive...

8511369 - Gateway Notebook Hardware Reference
Page 64
...6 LCD panel release latch 6 switching display 19 LCD/CRT system key 19 lock Kensington cable 7 M memory bay 10 installing 32 purchasing 29 removing 32 replacing 32 memory card reader locating 8 memory card types supported 25 using 25 microphone jack 6 Microsoft Certificate of Authenticity 3 model number 2 modem cable 14 connecting DSL 14 jack 8, 13 monitor port 9 13, 14 mouse USB port 8 moving pointer 21 screen objects 22 MP3 player memory cards 25 multimedia adjusting volume 22 using DVD drive 24 muting sound 20, 22 N navigation keys 18 network jack 8, 14 networking turning off wireless...
...6 LCD panel release latch 6 switching display 19 LCD/CRT system key 19 lock Kensington cable 7 M memory bay 10 installing 32 purchasing 29 removing 32 replacing 32 memory card reader locating 8 memory card types supported 25 using 25 microphone jack 6 Microsoft Certificate of Authenticity 3 model number 2 modem cable 14 connecting DSL 14 jack 8, 13 monitor port 9 13, 14 mouse USB port 8 moving pointer 21 screen objects 22 MP3 player memory cards 25 multimedia adjusting volume 22 using DVD drive 24 muting sound 20, 22 N navigation keys 18 network jack 8, 14 networking turning off wireless...
8511369 - Gateway Notebook Hardware Reference
Page 65
... USB port 8 screen objects getting information 22 moving 22 selecting 22 security features Kensington cable lock 7 serial number 2, 3 setting up safety precautions 48 shortcut menus accessing 22 shortcuts opening menu 22 shutting down notebook 15, 16 SO-DIMM See memory sound adjusting 20, 22 controls 22 muting 20, 22 speakers built-in 6 jack 6 Standby mode 15, 19 system key 19 starting notebook 15 programs 22 static electricity 32 status indicators battery charge 6 Caps Lock 17 drive activity...
... USB port 8 screen objects getting information 22 moving 22 selecting 22 security features Kensington cable lock 7 serial number 2, 3 setting up safety precautions 48 shortcut menus accessing 22 shortcuts opening menu 22 shutting down notebook 15, 16 SO-DIMM See memory sound adjusting 20, 22 controls 22 muting 20, 22 speakers built-in 6 jack 6 Standby mode 15, 19 system key 19 starting notebook 15 programs 22 static electricity 32 status indicators battery charge 6 Caps Lock 17 drive activity...

8511179 - Back of Setup Poster
Page 1
...fully charge. 4 START THE NOTEBOOK. BACK Power connector Monitor port RIGHT IEEE 1394 port USB ports Modem jack PC Card slot Memory card reader Ethernet jack USB ports 2 CONNECT TO AC POWER. Press the power button, then follow the on-screen instructions to the modem jack ( ) if using high-speed access. Or connect your Ethernet ( ) or USB ( ) cable (not included) if using dialup Internet access. Then lock it clicks. Leave the AC adapter plugged in place. 3 CONNECT TO THE INTERNET. (optional) Connect the phone cord (included) to complete Windows setup. FRONT LCD panel...
...fully charge. 4 START THE NOTEBOOK. BACK Power connector Monitor port RIGHT IEEE 1394 port USB ports Modem jack PC Card slot Memory card reader Ethernet jack USB ports 2 CONNECT TO AC POWER. Press the power button, then follow the on-screen instructions to the modem jack ( ) if using high-speed access. Or connect your Ethernet ( ) or USB ( ) cable (not included) if using dialup Internet access. Then lock it clicks. Leave the AC adapter plugged in place. 3 CONNECT TO THE INTERNET. (optional) Connect the phone cord (included) to complete Windows setup. FRONT LCD panel...


