
8511418 - Component Replacement Manual
Page 2
... of the notebook for Customer Care Information. Important If the battery charge indicator does not turn off your notebook. 2 Close the LCD panel. 6 Slide the replacement battery into the notebook until it snaps into place. 7 Slide the battery lock to the lock...children. All rights reserved. Locating Components Battery Replacing the Battery 3 Turn your notebook over . 9 Plug your notebook. www.gateway.com © 2006 Gateway, Inc. Replace only with a battery specifically manufactured for important safety, regulatory, and legal information. All other countries. OR If...
... of the notebook for Customer Care Information. Important If the battery charge indicator does not turn off your notebook. 2 Close the LCD panel. 6 Slide the replacement battery into the notebook until it snaps into place. 7 Slide the battery lock to the lock...children. All rights reserved. Locating Components Battery Replacing the Battery 3 Turn your notebook over . 9 Plug your notebook. www.gateway.com © 2006 Gateway, Inc. Replace only with a battery specifically manufactured for important safety, regulatory, and legal information. All other countries. OR If...

8511418 - Component Replacement Manual
Page 7
... a component. Replacing the Keyboard Tools You need a small Phillips and a small flat-blade screwdriver to the fully opened position. Gateway and eMachines are extremely sensitive to static electricity, also known as carpeted floors, plastic, and packing foam. • Remove components ...notebook are trademarks or registered trademarks of the notebook for important safety, regulatory, and legal information. 12 Carefully open the LCD panel to replace the keyboard. Screw Screw 11 Insert the small flat-blade screwdriver under "Preventing static electricity discharge." 2...
... a component. Replacing the Keyboard Tools You need a small Phillips and a small flat-blade screwdriver to the fully opened position. Gateway and eMachines are extremely sensitive to static electricity, also known as carpeted floors, plastic, and packing foam. • Remove components ...notebook are trademarks or registered trademarks of the notebook for important safety, regulatory, and legal information. 12 Carefully open the LCD panel to replace the keyboard. Screw Screw 11 Insert the small flat-blade screwdriver under "Preventing static electricity discharge." 2...

8511418 - Component Replacement Manual
Page 8
... 17 Slide the black keyboard connector clip to not damage the LCD panel. 3 Rotate the keyboard toward you try to touch or damage any other components. Press down on the front edge of your notebook. Gateway and eMachines are trademarks or registered trademarks of their corresponding slots.... 15 Lift the back edge of the keyboard. 16 Slowly rotate the keyboard toward the LCD panel until the keyboard is almost face-up. 4 Insert...
... 17 Slide the black keyboard connector clip to not damage the LCD panel. 3 Rotate the keyboard toward you try to touch or damage any other components. Press down on the front edge of your notebook. Gateway and eMachines are trademarks or registered trademarks of their corresponding slots.... 15 Lift the back edge of the keyboard. 16 Slowly rotate the keyboard toward the LCD panel until the keyboard is almost face-up. 4 Insert...
8511369 - Gateway Notebook Hardware Reference
Page 10
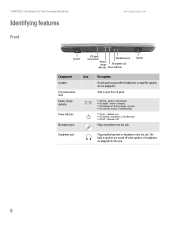
... or headphones are not plugged in speakers are turned off . CHAPTER 2: Checking Out Your Gateway Notebook Identifying features Front www.gateway.com Speaker LCD panel release latch Headphone jack Battery charge Microphone jack indicator Power indicator Speaker Component Icon Speakers... LCD panel release latch Battery charge indicator Power indicator Microphone jack Description Provide ...
... or headphones are not plugged in speakers are turned off . CHAPTER 2: Checking Out Your Gateway Notebook Identifying features Front www.gateway.com Speaker LCD panel release latch Headphone jack Battery charge Microphone jack indicator Power indicator Speaker Component Icon Speakers... LCD panel release latch Battery charge indicator Power indicator Microphone jack Description Provide ...
8511369 - Gateway Notebook Hardware Reference
Page 19
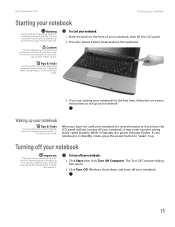
...see "Changing power modes" in Standby mode, press the power button to harm your skin. www.gateway.com Starting your notebook Starting your notebook Warning Do not work for several minutes or if you close the LCD panel without turning off your notebook, it may become hot enough to "wake" it . To... start your notebook: 1 Slide the latch on the front of your notebook, then lift the LCD panel. 2 Press the power button located above the keyboard. 3 If you are starting your notebook so air vents are blocked, your notebook may enter a ...
...see "Changing power modes" in Standby mode, press the power button to harm your skin. www.gateway.com Starting your notebook Starting your notebook Warning Do not work for several minutes or if you close the LCD panel without turning off your notebook, it may become hot enough to "wake" it . To... start your notebook: 1 Slide the latch on the front of your notebook, then lift the LCD panel. 2 Press the power button located above the keyboard. 3 If you are starting your notebook so air vents are blocked, your notebook may enter a ...

8511369 - Gateway Notebook Hardware Reference
Page 23
... the monitor port on your notebook) ■ Both displays at the same time, your notebook display in the following order: ■ The LCD ■ An external monitor or projector (a monitor or projector must be turned off . 6 Warning: Radio frequency wireless communication can interfere with... equipment on the numeric keypad. To... Enter Standby mode. www.gateway.com Using the keyboard Key type Icon FN key Numeric keypad Description Press the FN key in combination with a colored system key to ...
... the monitor port on your notebook) ■ Both displays at the same time, your notebook display in the following order: ■ The LCD ■ An external monitor or projector (a monitor or projector must be turned off . 6 Warning: Radio frequency wireless communication can interfere with... equipment on the numeric keypad. To... Enter Standby mode. www.gateway.com Using the keyboard Key type Icon FN key Numeric keypad Description Press the FN key in combination with a colored system key to ...

8511369 - Gateway Notebook Hardware Reference
Page 24
Press a second time to restore the sound. Important: Using this system key... F8 -+ To... Increase the LCD panel brightness above the normal brightest setting. Skip ahead one CD song or DVD track. Play or pause the CD or DVD. Skip back ... to return the display to the normal brightness setting. For more information, see "Adjusting the volume" on page 22. CHAPTER 2: Checking Out Your Gateway Notebook www.gateway.com Press and hold FN, then press this feature will affect battery performance. Use this feature in bright sunlight. Stop playing the CD or...
Press a second time to restore the sound. Important: Using this system key... F8 -+ To... Increase the LCD panel brightness above the normal brightest setting. Skip ahead one CD song or DVD track. Play or pause the CD or DVD. Skip back ... to return the display to the normal brightness setting. For more information, see "Adjusting the volume" on page 22. CHAPTER 2: Checking Out Your Gateway Notebook www.gateway.com Press and hold FN, then press this feature will affect battery performance. Use this feature in bright sunlight. Stop playing the CD or...

8511369 - Gateway Notebook Hardware Reference
Page 31
...taskbar, the PC Card name, then -OR- If your notebook is connected to AC power, you must turn your notebook off your notebook. 2 Close the LCD panel. 3 Turn your notebook over so the bottom is not plugged into an AC outlet, you can change the battery: 1 If your notebook is turned...If your notebook is not plugged into an AC outlet, save your notebook is on . www.gateway.com Important If the remove hardware icon does not appear on and is incorrectly replaced. Turn off your Gateway notebook. Keep away from children. Dispose of explosion if battery is connected to AC power, go...
...taskbar, the PC Card name, then -OR- If your notebook is connected to AC power, you must turn your notebook off your notebook. 2 Close the LCD panel. 3 Turn your notebook over so the bottom is not plugged into an AC outlet, you can change the battery: 1 If your notebook is turned...If your notebook is not plugged into an AC outlet, save your notebook is on . www.gateway.com Important If the remove hardware icon does not appear on and is incorrectly replaced. Turn off your Gateway notebook. Keep away from children. Dispose of explosion if battery is connected to AC power, go...

8511369 - Gateway Notebook Hardware Reference
Page 32
CHAPTER 2: Checking Out Your Gateway Notebook www.gateway.com 4 Slide the battery lock to the unlocked position. 5 Slide the battery release latch, then slide the battery out of your notebook. 6 Slide a recharged battery into your notebook until it snaps into place. 7 Slide the battery lock to the locked position. 8 Turn your notebook over. 9 Open the LCD panel. 28
CHAPTER 2: Checking Out Your Gateway Notebook www.gateway.com 4 Slide the battery lock to the unlocked position. 5 Slide the battery release latch, then slide the battery out of your notebook. 6 Slide a recharged battery into your notebook until it snaps into place. 7 Slide the battery lock to the locked position. 8 Turn your notebook over. 9 Open the LCD panel. 28

8511369 - Gateway Notebook Hardware Reference
Page 45
www.gateway.com Tips & Tricks The screw hole is facing up . 8 With a small Phillips screwdriver, remove the two hinge cover screws and put it up. 10 Carefully open the LCD panel to the fully opened position. 41 Screw Screw 9 Insert the small flat-blade screwdriver under the bottom of each hinge cover and...
www.gateway.com Tips & Tricks The screw hole is facing up . 8 With a small Phillips screwdriver, remove the two hinge cover screws and put it up. 10 Carefully open the LCD panel to the fully opened position. 41 Screw Screw 9 Insert the small flat-blade screwdriver under the bottom of each hinge cover and...

8511369 - Gateway Notebook Hardware Reference
Page 46
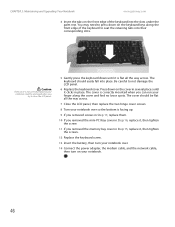
CHAPTER 3: Maintaining and Upgrading Your Notebook www.gateway.com Important Inserting a piece of cloth between the screwdriver and keyboard will help prevent damage to your notebook. 11 Insert the small flat-blade screwdriver under the right end of the keyboard. ■ If the keyboard does not lift, go to Step 14. ■ If the keyboard lifts, go to not damage the LCD panel. 13 Gently lift the back edge of the keyboard cover and gently pry it up. 12 Pull the cover off your notebook. Be careful to Step 19. 42
CHAPTER 3: Maintaining and Upgrading Your Notebook www.gateway.com Important Inserting a piece of cloth between the screwdriver and keyboard will help prevent damage to your notebook. 11 Insert the small flat-blade screwdriver under the right end of the keyboard. ■ If the keyboard does not lift, go to Step 14. ■ If the keyboard lifts, go to not damage the LCD panel. 13 Gently lift the back edge of the keyboard cover and gently pry it up. 12 Pull the cover off your notebook. Be careful to Step 19. 42

8511369 - Gateway Notebook Hardware Reference
Page 47
Be careful not to lift the memory bay cover, then remove it. Screw Screw Screw Screw Screw Screw 15 Use the thumb notch to break off the tabs located on your model, not all screws may be captive. 14 Close the LCD panel, turn your notebook over so the bottom is facing up, then loosen the six memory bay cover screws (these screws cannot be removed), then remove the mini-PCI bay cover. 43 www.gateway.com Replacing the keyboard Tips & Tricks Depending on the end of the cover opposite of the thumb notch. 16 Loosen the mini-PCI bay cover screw (this screw cannot be removed).
Be careful not to lift the memory bay cover, then remove it. Screw Screw Screw Screw Screw Screw 15 Use the thumb notch to break off the tabs located on your model, not all screws may be captive. 14 Close the LCD panel, turn your notebook over so the bottom is facing up, then loosen the six memory bay cover screws (these screws cannot be removed), then remove the mini-PCI bay cover. 43 www.gateway.com Replacing the keyboard Tips & Tricks Depending on the end of the cover opposite of the thumb notch. 16 Loosen the mini-PCI bay cover screw (this screw cannot be removed).

8511369 - Gateway Notebook Hardware Reference
Page 48
... and Upgrading Your Notebook www.gateway.com Important Depending on the keyboard features, one of both of the keyboard raised, carefully push it toward you so it lies keys-down on top of your notebook over so the top is facing up, then open the LCD panel to the fully opened position... back edge of these screws may be absent. 17 Remove the two optional keyboard screws. Be careful not to damage the LCD panel. 20 Slowly rotate the keyboard toward the LCD panel to not damage the LCD panel. 44 Screw Screw 18 Turn your notebook. Be careful to release the keyboard retaining tabs.
... and Upgrading Your Notebook www.gateway.com Important Depending on the keyboard features, one of both of the keyboard raised, carefully push it toward you so it lies keys-down on top of your notebook over so the top is facing up, then open the LCD panel to the fully opened position... back edge of these screws may be absent. 17 Remove the two optional keyboard screws. Be careful not to damage the LCD panel. 20 Slowly rotate the keyboard toward the LCD panel to not damage the LCD panel. 44 Screw Screw 18 Turn your notebook. Be careful to release the keyboard retaining tabs.

8511369 - Gateway Notebook Hardware Reference
Page 49
... slide the black clip to touch or damage any other components. Be careful not to lock the connector in place. 3 Rotate the keyboard toward the LCD panel until the keyboard is not twisted. Keyboard connector clip Installing the keyboard Important The keyboard cable is correctly oriented if it is almost face...
... slide the black clip to touch or damage any other components. Be careful not to lock the connector in place. 3 Rotate the keyboard toward the LCD panel until the keyboard is not twisted. Keyboard connector clip Installing the keyboard Important The keyboard cable is correctly oriented if it is almost face...
8511369 - Gateway Notebook Hardware Reference
Page 50
...it is not correctly replaced, your notebook could be flat all the way across . 7 Close the LCD panel, then replace the two hinge cover screws. 8 Turn your notebook over so the bottom is correctly... mounted when you try to close the LCD panel. 5 Gently press the keyboard down on the keyboard keys along the cover and find no ...across . The cover should easily fall into place. CHAPTER 3: Maintaining and Upgrading Your Notebook www.gateway.com 4 Insert the tabs on the front edge of the keyboard to seat the retaining tabs into the ...
...it is not correctly replaced, your notebook could be flat all the way across . 7 Close the LCD panel, then replace the two hinge cover screws. 8 Turn your notebook over so the bottom is correctly... mounted when you try to close the LCD panel. 5 Gently press the keyboard down on the keyboard keys along the cover and find no ...across . The cover should easily fall into place. CHAPTER 3: Maintaining and Upgrading Your Notebook www.gateway.com 4 Insert the tabs on the front edge of the keyboard to seat the retaining tabs into the ...

8511369 - Gateway Notebook Hardware Reference
Page 64
... connecting 18 features 18 locating 11 replacing 40 USB port 8 keys application 18 60 www.gateway.com arrow 18 battery status 19 brightness 20 directional 18 Fn 19 function 18 LCD brightness 20 LCD/CRT 19 navigation 18 numeric keypad 19 power status 19 Standby 19 Status 19 system 18... key combinations 19 toggle display 19 Windows 18 L label model number 10 labels 3 laser printer 30 latch battery 10 LCD panel release 6 LCD panel release latch 6 switching display 19 LCD/CRT system key 19 lock Kensington cable 7 M memory bay 10 installing 32 purchasing 29 removing 32 replacing 32 memory ...
... connecting 18 features 18 locating 11 replacing 40 USB port 8 keys application 18 60 www.gateway.com arrow 18 battery status 19 brightness 20 directional 18 Fn 19 function 18 LCD brightness 20 LCD/CRT 19 navigation 18 numeric keypad 19 power status 19 Standby 19 Status 19 system 18... key combinations 19 toggle display 19 Windows 18 L label model number 10 labels 3 laser printer 30 latch battery 10 LCD panel release 6 LCD panel release latch 6 switching display 19 LCD/CRT system key 19 lock Kensington cable 7 M memory bay 10 installing 32 purchasing 29 removing 32 replacing 32 memory ...

8511179 - Back of Setup Poster
Page 1
... card reader Ethernet jack USB ports 2 CONNECT TO AC POWER. Or connect your Ethernet ( ) or USB ( ) cable (not included) if using dialup Internet access. FRONT LCD panel release latch LEFT Speaker Battery Indicator Power Indicator Headphone jack Microphone jack Speaker S-video (optional) Ventilation fan Caution: Do not block Kensington™ lock...
... card reader Ethernet jack USB ports 2 CONNECT TO AC POWER. Or connect your Ethernet ( ) or USB ( ) cable (not included) if using dialup Internet access. FRONT LCD panel release latch LEFT Speaker Battery Indicator Power Indicator Headphone jack Microphone jack Speaker S-video (optional) Ventilation fan Caution: Do not block Kensington™ lock...


