Gateway MX6135 Support and Manuals
Get Help and Manuals for this Gateway Computers item
View All Support Options Below
Free Gateway MX6135 manuals!
Problems with Gateway MX6135?
Ask a Question
Free Gateway MX6135 manuals!
Problems with Gateway MX6135?
Ask a Question
Popular Gateway MX6135 Manual Pages
8511418 - Component Replacement Manual - Page 1

... bottom of Gateway, Inc.
Important
If the battery charge indicator does not turn on the bottom of the same type and voltage rating as the original cord or your notebook may be damaged.
2 Connect the AC adapter to your notebook. Technical Support See the label on , unplug the adapter from your hardware guide for Customer Care Information. The replacement cord...
8511418 - Component Replacement Manual - Page 2

...replaced.
Technical Support See the label on the bottom of your notebook. All rights reserved. All other countries. Replace only with a battery specifically manufactured for important safety, regulatory, and legal information. Keep away from children. in this device may present a fire or chemical burn hazard if mishandled.
See your hardware guide for your notebook...
8511418 - Component Replacement Manual - Page 3

...notebook and unplug the AC adapter, modem cable, and network cable before replacing a component. Before working with a K. Avoid touching the edge connectors.
For more information, see "Changing Batteries" in your notebook.
www.gateway.com
© 2006 Gateway, Inc. Gateway... online hardware guide. Tips & Tricks The keyboard screw hole is empty.
3 Turn off your notebook over any surface...
8511418 - Component Replacement Manual - Page 4

... or registered trademarks of Gateway, Inc. All other countries. Technical Support See the label on your hardware guide for Customer Care Information. in Step 9.
13 Replace the memory bay cover, then tighten the six cover screws.
14 Replace the keyboard screw.
15 Insert the battery, then turn your notebook over.
16 Connect the power adapter, modem cable, and network...
8511418 - Component Replacement Manual - Page 5

... the battery. Screws
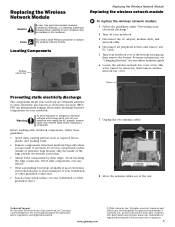
Technical Support See the label on the outside of antistatic bags because only the inside your notebook are trademarks or registered trademarks of your notebook.
2 Follow the guidelines under "Preventing static electricity discharge."
3 Turn off your notebook and unplug the AC adapter, modem cable, and network cable before replacing a component. Gateway and eMachines...
8511418 - Component Replacement Manual - Page 6

...
Screws
9 Remove the cover from Gateway with the operating system, applications, and drivers installed, you will see the Windows startup screen.
-ORIf you see a blank screen, restart your notebook, then press F11 while your computer is starting. 18 Insert the Operating System Recovery CD/DVD when prompted, then follow the on-screen instructions. Replacing the Hard Drive Kit
10...
8511418 - Component Replacement Manual - Page 7

... the bags provide electrostatic protection.
• Always hold components by their edges.
See your notebook. Replacing the Keyboard
Tools
You need a small Phillips and a small flat-blade screwdriver to dangerous electrical voltages and moving parts, turn off your notebook.
3 Disconnect the AC adapter, modem cable, and network cable.
4 Disconnect all peripheral devices and remove any...
8511418 - Component Replacement Manual - Page 8

... rest.
Technical Support See the label on your notebook.
Connector
5 Gently press the keyboard down on the bottom of Gateway, Inc. in several places until it is facing up.
9 Replace the two optional keyboard screws.
10 Replace the memory bay cover and wireless network bay cover.
11 Replace the keyboard screw.
12 Insert the battery, then turn your notebook over so...
8511418 - Component Replacement Manual - Page 9

... hardware guide.
6 With a small Phillips screwdriver, remove the keyboard screw and put it to a bare metal part of your notebook and unplug the AC adapter, modem cable, and network cable before replacing a component. Never slide components over so the bottom is marked with notebook components, follow these screws cannot be removed), then remove the memory bay cover. www.gateway...
8511418 - Component Replacement Manual - Page 10

... eMachines are trademarks or registered trademarks of Gateway, Inc. See your hardware guide for your notebook. in place.
12 Replace the memory bay cover, then tighten the six cover screws.
13 Replace the keyboard screw.
14 Insert the battery, then turn your notebook over.
15 Connect the power adapter, the modem cable, and the network cable.
16 Reconnect all...
8511418 - Component Replacement Manual - Page 11
... AC adapter, modem cable, and network cable before replacing a component.
All rights reserved. All other grounded connection.
• Touch a bare metal surface on the bottom of the notebook for important safety, regulatory, and legal information. Avoid touching the edge connectors. For more information, see "Changing Batteries" in this notebook. www.gateway.com
© 2006 Gateway...
8511418 - Component Replacement Manual - Page 12

...or A.
15 Replace the wireless network bay cover, then tighten the cover screw.
16 Insert the battery, then turn your notebook over.
17 Connect the power adapter, the modem ...the notebook for important safety, regulatory, and legal information.
2
www.gateway.com
© 2006 Gateway, Inc. Gateway and eMachines are trademarks or registered trademarks of the slot.
-ORIf your hardware guide for...
Gateway MX6135 Reviews
We have not received any reviews for Gateway yet.