
8511418 - Component Replacement Manual
Page 1
... user-replaceable or user-serviceable parts inside. Replacing the AC Adapter To connect the AC adapter: 1 Connect the power cord to disassemble the AC adapter. The power indicator turns on the bottom of the notebook for important safety, regulatory, and legal information. www.gateway.com © 2006 Gateway, Inc. All other countries. Power indicator If the power indicator does not turn blue after three hours, contact Gateway Customer Care at the Web address or telephone number...
... user-replaceable or user-serviceable parts inside. Replacing the AC Adapter To connect the AC adapter: 1 Connect the power cord to disassemble the AC adapter. The power indicator turns on the bottom of the notebook for important safety, regulatory, and legal information. www.gateway.com © 2006 Gateway, Inc. All other countries. Power indicator If the power indicator does not turn blue after three hours, contact Gateway Customer Care at the Web address or telephone number...

8511418 - Component Replacement Manual
Page 2
... the notebook. Important If the battery charge indicator does not turn off your notebook. 2 Close the LCD panel. 6 Slide the replacement battery into the notebook until it snaps into an AC outlet. 10 Open the LCD panel and press the power button. Replacing the Battery Tips & Tricks If your notebook is connected to AC power, you can replace the battery while the notebook is turned on and is not connected to AC power, save your work and turn blue...
... the notebook. Important If the battery charge indicator does not turn off your notebook. 2 Close the LCD panel. 6 Slide the replacement battery into the notebook until it snaps into an AC outlet. 10 Open the LCD panel and press the power button. Replacing the Battery Tips & Tricks If your notebook is connected to AC power, you can replace the battery while the notebook is turned on and is not connected to AC power, save your work and turn blue...

8511418 - Component Replacement Manual
Page 3
... up, then remove the battery. Screw 8 Loosen the six memory bay cover screws (these guidelines: • Avoid static-causing surfaces such as electrostatic discharge (ESD). All rights reserved. Warning To avoid exposure to dangerous electrical voltages and moving parts, turn off your notebook. 4 Disconnect the AC adapter, modem cable, and network cable. 5 Disconnect all peripheral devices and remove any PC Cards. 6 Turn your notebook over any...
... up, then remove the battery. Screw 8 Loosen the six memory bay cover screws (these guidelines: • Avoid static-causing surfaces such as electrostatic discharge (ESD). All rights reserved. Warning To avoid exposure to dangerous electrical voltages and moving parts, turn off your notebook. 4 Disconnect the AC adapter, modem cable, and network cable. 5 Disconnect all peripheral devices and remove any PC Cards. 6 Turn your notebook over any...

8511418 - Component Replacement Manual
Page 5
... recovery discs or a replacement hard drive with your workbench or other grounded object. ESD can permanently damage electrostatic discharge-sensitive components in the online User Guide. Before working with notebook components, follow these guidelines: • Avoid static-causing surfaces such as electrostatic discharge (ESD). To replace the hard drive kit: 1 If possible, create a Drivers and Applications Recovery disc. For more information, see "Creating Drivers and Applications Recovery discs" in your hardware guide...
... recovery discs or a replacement hard drive with your workbench or other grounded object. ESD can permanently damage electrostatic discharge-sensitive components in the online User Guide. Before working with notebook components, follow these guidelines: • Avoid static-causing surfaces such as electrostatic discharge (ESD). To replace the hard drive kit: 1 If possible, create a Drivers and Applications Recovery disc. For more information, see "Creating Drivers and Applications Recovery discs" in your hardware guide...

8511418 - Component Replacement Manual
Page 6
.... See your hardware guide for Customer Care Information. 8 Remove the four screws that secure the cover to the drive. 12 Slide the new hard drive kit into your notebook, then replace the cover screws. 13 Insert the battery and turn your notebook over. 14 Connect the power adapter, modem cable, and network cable. 15 Reconnect all peripheral devices and replace any PC Cards. 16 Turn on your notebook. 17 If the hard drive was sent to the hard drive cover.
.... See your hardware guide for Customer Care Information. 8 Remove the four screws that secure the cover to the drive. 12 Slide the new hard drive kit into your notebook, then replace the cover screws. 13 Insert the battery and turn your notebook over. 14 Connect the power adapter, modem cable, and network cable. 15 Reconnect all peripheral devices and replace any PC Cards. 16 Turn on your notebook. 17 If the hard drive was sent to the hard drive cover.

8511418 - Component Replacement Manual
Page 7
... electricity discharge." 2 Turn off your notebook. For more information, see "Changing Batteries" in your notebook and unplug the AC adapter, modem cable, and network cable before replacing a component. See your notebook has the two optional keyboard screws, remove them in a safe place. All rights reserved. All other countries. Avoid touching the edge connectors. Memory bay Wireless network bay Keyboard screw 7 Loosen the six memory bay cover screws and one wireless network bay screw (these...
... electricity discharge." 2 Turn off your notebook. For more information, see "Changing Batteries" in your notebook and unplug the AC adapter, modem cable, and network cable before replacing a component. See your notebook has the two optional keyboard screws, remove them in a safe place. All rights reserved. All other countries. Avoid touching the edge connectors. Memory bay Wireless network bay Keyboard screw 7 Loosen the six memory bay cover screws and one wireless network bay screw (these...

8511418 - Component Replacement Manual
Page 10
... Support See the label on your hardware guide for Customer Care Information. This module is keyed so it clicks in the United States and other brands and product names are trademarks or registered trademarks of Gateway, Inc. Important Use only memory modules designed for your notebook over. 15 Connect the power adapter, the modem cable, and the network cable. 16 Reconnect all peripheral devices and replace any PC Cards...
... Support See the label on your hardware guide for Customer Care Information. This module is keyed so it clicks in the United States and other brands and product names are trademarks or registered trademarks of Gateway, Inc. Important Use only memory modules designed for your notebook over. 15 Connect the power adapter, the modem cable, and the network cable. 16 Reconnect all peripheral devices and replace any PC Cards...

8511418 - Component Replacement Manual
Page 12
... the cover screw. 16 Insert the battery, then turn your notebook over. 17 Connect the power adapter, the modem cable, and the network cable. 18 Reconnect all peripheral devices and replace any PC Cards. 19 Turn on your notebook. This module is held by clips, press the module down until the module tilts upward. All rights reserved. Replacing the Wireless Network Module 10 Pull the module out of the way. 13 If your hardware guide...
... the cover screw. 16 Insert the battery, then turn your notebook over. 17 Connect the power adapter, the modem cable, and the network cable. 18 Reconnect all peripheral devices and replace any PC Cards. 19 Turn on your notebook. This module is held by clips, press the module down until the module tilts upward. All rights reserved. Replacing the Wireless Network Module 10 Pull the module out of the way. 13 If your hardware guide...
8511180 - Hardware Reference Gateway Notebook
Page 3
... notebook 15 Turning off your notebook 15 Restarting (rebooting) your notebook 16 Using the status indicators 17 Using the keyboard 18 Key types 18 System key combinations 19 Using the EZ Pad touchpad 21 Adjusting the volume 22 Turning your wireless radio on or off 23 Using the DVD drive 24 Identifying drive types 24 Inserting a CD or DVD 25 Using the memory card reader 25 Memory card types 25 Inserting a memory card 25 Using a memory card 26 Removing a memory card 26 Adding and removing a PC Card 26 Changing batteries 27 Recalibrating the battery 29 Ordering...
... notebook 15 Turning off your notebook 15 Restarting (rebooting) your notebook 16 Using the status indicators 17 Using the keyboard 18 Key types 18 System key combinations 19 Using the EZ Pad touchpad 21 Adjusting the volume 22 Turning your wireless radio on or off 23 Using the DVD drive 24 Identifying drive types 24 Inserting a CD or DVD 25 Using the memory card reader 25 Memory card types 25 Inserting a memory card 25 Using a memory card 26 Removing a memory card 26 Adding and removing a PC Card 26 Changing batteries 27 Recalibrating the battery 29 Ordering...

8511180 - Hardware Reference Gateway Notebook
Page 6
... Gateway model and serial number Important The label shown in -depth, easy-to-read manual that are specific to this guide, the online User Guide has been included on your online User Guide. For all other software ■ Controlling audio and video settings ■ Using the Internet ■ Protecting your files ■ Playing and recording media ■ Networking ■ Maintenance and troubleshooting To access the online User Guide: ■ Click Start, All Programs, then click Gateway Documentation. Gateway...
... Gateway model and serial number Important The label shown in -depth, easy-to-read manual that are specific to this guide, the online User Guide has been included on your online User Guide. For all other software ■ Controlling audio and video settings ■ Using the Internet ■ Protecting your files ■ Playing and recording media ■ Networking ■ Maintenance and troubleshooting To access the online User Guide: ■ Click Start, All Programs, then click Gateway Documentation. Gateway...

8511180 - Hardware Reference Gateway Notebook
Page 9
... Gateway Notebook • Identifying features • Connecting the AC adapter • Connecting the dial-up modem • Connecting to a cable or DSL modem or to an Ethernet network • Turning your notebook on and off • Using the status indicators • Using the keyboard and the EZ Pad touchpad • Adjusting the volume • Connecting to a wireless network • Using the DVD drive • Using the memory card reader • Adding and removing a PC card • Changing batteries • Recalibrating the battery • Ordering...
... Gateway Notebook • Identifying features • Connecting the AC adapter • Connecting the dial-up modem • Connecting to a cable or DSL modem or to an Ethernet network • Turning your notebook on and off • Using the status indicators • Using the keyboard and the EZ Pad touchpad • Adjusting the volume • Connecting to a wireless network • Using the DVD drive • Using the memory card reader • Adding and removing a PC card • Changing batteries • Recalibrating the battery • Ordering...

8511180 - Hardware Reference Gateway Notebook
Page 11
... the display on your lap. Helps cool internal components. Warning: Do not work for long periods with the notebook resting on a television in the online User Guide. If the air vents are not obstructed. Caution: Provide adequate space around your skin. Do not use the notebook on page 24. www.gateway.com Left Identifying features Kensington lock slot S-Video out jack Ventilation fan DVD drive Component...
... the display on your lap. Helps cool internal components. Warning: Do not work for long periods with the notebook resting on a television in the online User Guide. If the air vents are not obstructed. Caution: Provide adequate space around your skin. Do not use the notebook on page 24. www.gateway.com Left Identifying features Kensington lock slot S-Video out jack Ventilation fan DVD drive Component...

8511180 - Hardware Reference Gateway Notebook
Page 15
... on or off. You can also configure the power button for Standby/Resume mode. Provides all the functionality of a full-sized, computer keyboard. www.gateway.com Keyboard area Identifying features Power button Keyboard Status indicators Touchpad Component Icon Power button Keyboard Touchpad Status indicators Description Press to turn the power on configuring the power button mode, see "Changing Power-Saving Settings" in use or when a button has been pressed that affects how the keyboard is used. Provides all the features of a mouse.
... on or off. You can also configure the power button for Standby/Resume mode. Provides all the functionality of a full-sized, computer keyboard. www.gateway.com Keyboard area Identifying features Power button Keyboard Status indicators Touchpad Component Icon Power button Keyboard Touchpad Status indicators Description Press to turn the power on configuring the power button mode, see "Changing Power-Saving Settings" in use or when a button has been pressed that affects how the keyboard is used. Provides all the features of a mouse.
8511180 - Hardware Reference Gateway Notebook
Page 19
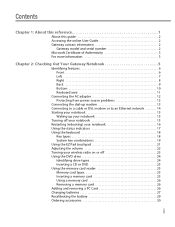
... the LCD panel without turning off your notebook so air vents are not obstructed. The Turn Off Computer dialog box opens. 2 Click Turn Off. Do not use the Turn Off Computer option in Windows to harm your notebook, it . If your notebook. Waking up your notebook, press and hold the power button for about changing the power button mode, see "Changing power modes" in Standby, the power indicator flashes. www.gateway.com Starting your notebook Starting your notebook Warning Do not work...
... the LCD panel without turning off your notebook so air vents are not obstructed. The Turn Off Computer dialog box opens. 2 Click Turn Off. Do not use the Turn Off Computer option in Windows to harm your notebook, it . If your notebook. Waking up your notebook, press and hold the power button for about changing the power button mode, see "Changing power modes" in Standby, the power indicator flashes. www.gateway.com Starting your notebook Starting your notebook Warning Do not work...

8511180 - Hardware Reference Gateway Notebook
Page 22
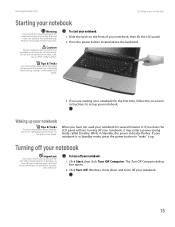
... notebook using a USB port. This key can attach an external keyboard to type numbers when the numeric keypad is turned on the numeric keypad. Some keys perform specific actions when pressed alone and other keys to open utilities like F (Search utility), R (Run utility), and E (Explorer utility). Press this key to open the Windows Start menu. Function keys/ System keys Key types 18 Numeric keypad FN key Windows key Navigation keys Arrow keys Application key The keyboard has several different types of keys. See the program documentation to connect a USB keyboard...
... notebook using a USB port. This key can attach an external keyboard to type numbers when the numeric keypad is turned on the numeric keypad. Some keys perform specific actions when pressed alone and other keys to open utilities like F (Search utility), R (Run utility), and E (Explorer utility). Press this key to open the Windows Start menu. Function keys/ System keys Key types 18 Numeric keypad FN key Windows key Navigation keys Arrow keys Application key The keyboard has several different types of keys. See the program documentation to connect a USB keyboard...
8511180 - Hardware Reference Gateway Notebook
Page 23
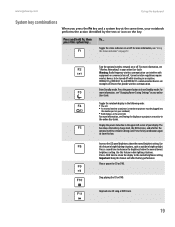
... song or DVD track. 19 Toggle the status indicators on the key. Current aviation regulations require wireless devices to the normal brightness setting. Toggle the notebook display in the following order: ■ The LCD ■ An external monitor or projector (a monitor or projector must be turned off . Use this box. Press a third time to return the display to be plugged into the monitor port on your online User Guide. Stop playing...
... song or DVD track. 19 Toggle the status indicators on the key. Current aviation regulations require wireless devices to the normal brightness setting. Toggle the notebook display in the following order: ■ The LCD ■ An external monitor or projector (a monitor or projector must be turned off . Use this box. Press a third time to return the display to be plugged into the monitor port on your online User Guide. Stop playing...
8511180 - Hardware Reference Gateway Notebook
Page 26
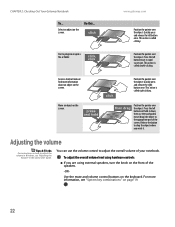
.... Start a program or open a file or folder. Press the left button and hold it . Release the button to drop the object where you are using hardware controls: ■ If you want it down, then use the volume control to adjust the volume in rapid succession. Adjusting the volume Tips & Tricks For instructions on the screen. Access a shortcut menu or find more information, see "Adjusting the Volume" in the online User Guide. www.gateway...
.... Start a program or open a file or folder. Press the left button and hold it . Release the button to drop the object where you are using hardware controls: ■ If you want it down, then use the volume control to adjust the volume in rapid succession. Adjusting the volume Tips & Tricks For instructions on the screen. Access a shortcut menu or find more information, see "Adjusting the Volume" in the online User Guide. www.gateway...
8511180 - Hardware Reference Gateway Notebook
Page 61
... external audio 6 external diskette drive 8 external speakers 6 Firewire 8 flash drive 8 headphone 6 i.Link 8 IEEE 1394 8 keyboard 8 microphone 6 modem 8, 13 monitor (VGA) 9 mouse 8 network 8, 14 power 9, 12 printer 8 scanner 8 speaker 6 S-Video (TV) out 7 USB 8 VGA 9 video camera 8 copyright notice 54 D dial-up modem 13 digital camera USB port 8 digital video camera IEEE 1394 port 8 directional keys 18 display switching 19 double-clicking 22 dragging 22 drives DVD 24, 35 DVD/CD-RW 7, 24 DVD±RW 7, 24 hard drive 10, 38 identifying drive types 24 multi-format DVD...
... external audio 6 external diskette drive 8 external speakers 6 Firewire 8 flash drive 8 headphone 6 i.Link 8 IEEE 1394 8 keyboard 8 microphone 6 modem 8, 13 monitor (VGA) 9 mouse 8 network 8, 14 power 9, 12 printer 8 scanner 8 speaker 6 S-Video (TV) out 7 USB 8 VGA 9 video camera 8 copyright notice 54 D dial-up modem 13 digital camera USB port 8 digital video camera IEEE 1394 port 8 directional keys 18 display switching 19 double-clicking 22 dragging 22 drives DVD 24, 35 DVD/CD-RW 7, 24 DVD±RW 7, 24 hard drive 10, 38 identifying drive types 24 multi-format DVD...
8511180 - Hardware Reference Gateway Notebook
Page 62
...6 switching display 19 LCD/CRT system key 19 lock Kensington cable 7 M memory bay 10 installing 32 purchasing 30 removing 32 replacing 32 memory card reader locating 8 memory card types supported 25 using 25 microphone jack 6 Microsoft Certificate of Authenticity 3 model number 2 modem cable 14 connecting 13, 14 DSL 14 jack 8, 13 monitor port 9 mouse USB port 8 moving pointer 21 screen objects 22 MP3 player memory cards 25 multimedia adjusting volume 22 using DVD drive 24 muting sound 20, 22 N navigation keys 18 network jack 8, 14 networking turning off wireless network 23 turning on wireless...
...6 switching display 19 LCD/CRT system key 19 lock Kensington cable 7 M memory bay 10 installing 32 purchasing 30 removing 32 replacing 32 memory card reader locating 8 memory card types supported 25 using 25 microphone jack 6 Microsoft Certificate of Authenticity 3 model number 2 modem cable 14 connecting 13, 14 DSL 14 jack 8, 13 monitor port 9 mouse USB port 8 moving pointer 21 screen objects 22 MP3 player memory cards 25 multimedia adjusting volume 22 using DVD drive 24 muting sound 20, 22 N navigation keys 18 network jack 8, 14 networking turning off wireless network 23 turning on wireless...
8511180 - Hardware Reference Gateway Notebook
Page 63
... USB port 8 screen objects getting information 22 moving 22 selecting 22 security features Kensington cable lock 7 serial number 2, 3 setting up safety precautions 46 shortcut menus accessing 22 shortcuts opening menu 22 shutting down notebook SO-DIMM See memory sound adjusting 20, 22 controls 22 muting 20, 22 15, 16 speakers built-in 6 jack 6 specifications 3 Standby mode 15, 19 system key 19 starting notebook 15 programs 22 static electricity 32 status indicators battery charge 6 Caps Lock 17 drive activity...
... USB port 8 screen objects getting information 22 moving 22 selecting 22 security features Kensington cable lock 7 serial number 2, 3 setting up safety precautions 46 shortcut menus accessing 22 shortcuts opening menu 22 shutting down notebook SO-DIMM See memory sound adjusting 20, 22 controls 22 muting 20, 22 15, 16 speakers built-in 6 jack 6 specifications 3 Standby mode 15, 19 system key 19 starting notebook 15 programs 22 static electricity 32 status indicators battery charge 6 Caps Lock 17 drive activity...


