8511725 - Gateway Service Guide
Page 3
... 26 Replacing the keyboard cover 29 Replacing the keyboard 31 Replacing the CMOS battery 36 Replacing the LCD panel assembly 38 Replacing the LCD panel inverter 42 Replacing the LCD panel 46 Replacing the LCD panel assembly lid 51 Replacing the palm rest 56 Replacing the modem card 59 Replacing the...
... 26 Replacing the keyboard cover 29 Replacing the keyboard 31 Replacing the CMOS battery 36 Replacing the LCD panel assembly 38 Replacing the LCD panel inverter 42 Replacing the LCD panel 46 Replacing the LCD panel assembly lid 51 Replacing the palm rest 56 Replacing the modem card 59 Replacing the...

8511725 - Gateway Service Guide
Page 5
... • Replacing the keyboard cover • Replacing the keyboard • Replacing the CMOS battery • Replacing the LCD panel assembly • Replacing the LCD panel inverter • Replacing the LCD panel • Replacing the LCD panel assembly lid • Replacing the palm rest • Replacing the modem card • Replacing the...
... • Replacing the keyboard cover • Replacing the keyboard • Replacing the CMOS battery • Replacing the LCD panel assembly • Replacing the LCD panel inverter • Replacing the LCD panel • Replacing the LCD panel assembly lid • Replacing the palm rest • Replacing the modem card • Replacing the...
8511725 - Gateway Service Guide
Page 46
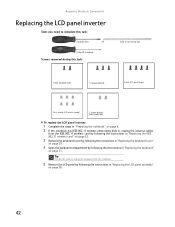
...Open the keyboard compartment by following the instructions in "Replacing the LCD panel assembly" on page 31. Replacing Notebook Components Replacing the LCD panel inverter Tools you need to complete this task: Scribe or non-marring tool 2 black (keyboard cover) 1-3 black (keyboard) 4 black (LCD ...panel hinges) 4 or 6 chrome (LCD panel assembly) 2 chrome (bracket) Select models only To replace the LCD panel inverter: 1 Complete the steps in "Preparing the notebook" on page 6. 2 If the notebook has IEEE 802.11 wireless networking built in, unplug the ...
...Open the keyboard compartment by following the instructions in "Replacing the LCD panel assembly" on page 31. Replacing Notebook Components Replacing the LCD panel inverter Tools you need to complete this task: Scribe or non-marring tool 2 black (keyboard cover) 1-3 black (keyboard) 4 black (LCD ...panel hinges) 4 or 6 chrome (LCD panel assembly) 2 chrome (bracket) Select models only To replace the LCD panel inverter: 1 Complete the steps in "Preparing the notebook" on page 6. 2 If the notebook has IEEE 802.11 wireless networking built in, unplug the ...
8511725 - Gateway Service Guide
Page 47
Screw Screw Screw Screw Screw Screw 43 Tip On select models, you may be able to access the inverter by removing only the bottom two screws. Rubber insert Rubber insert Rubber insert Rubber insert Rubber insert Rubber insert 7 Remove the four or six screws from the front of the LCD panel assembly. www.gateway.com 6 Remove the four or six rubber inserts from the front of the LCD panel assembly.
Screw Screw Screw Screw Screw Screw 43 Tip On select models, you may be able to access the inverter by removing only the bottom two screws. Rubber insert Rubber insert Rubber insert Rubber insert Rubber insert Rubber insert 7 Remove the four or six screws from the front of the LCD panel assembly. www.gateway.com 6 Remove the four or six rubber inserts from the front of the LCD panel assembly.

8511725 - Gateway Service Guide
Page 48
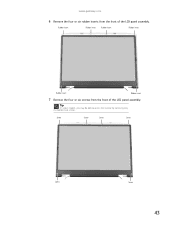
Depending on LCD panel size, it is located at the bottom or side of the LCD panel assembly, you only removed the bottom two screws in the previous step, separate only the lower half of the LCD panel assembly. If the inverter is either at the bottom of the LCD panel assembly. Screw Screw 44 Tip If you may need to remove the two screws holding the bracket to the LCD panel assembly, then remove the bracket. Replacing Notebook Components 8 Carefully separate the front and back of the LCD panel assembly. 9 Locate the inverter.
Depending on LCD panel size, it is located at the bottom or side of the LCD panel assembly, you only removed the bottom two screws in the previous step, separate only the lower half of the LCD panel assembly. If the inverter is either at the bottom of the LCD panel assembly. Screw Screw 44 Tip If you may need to remove the two screws holding the bracket to the LCD panel assembly, then remove the bracket. Replacing Notebook Components 8 Carefully separate the front and back of the LCD panel assembly. 9 Locate the inverter.

8511725 - Gateway Service Guide
Page 49
www.gateway.com 10 Unplug both cables from the front of the LCD panel assembly removed in Step 7. 16 Replace the four or six rubber inserts onto ... spots where the two halves do not meet. 15 Replace the four or six screws from the inverter. 11 Remove the old inverter, then insert the new one. 12 Connect the cables to the new inverter. 13 If you removed the bracket in Step 9, replace it, then replace the two screws. 14 Press...
www.gateway.com 10 Unplug both cables from the front of the LCD panel assembly removed in Step 7. 16 Replace the four or six rubber inserts onto ... spots where the two halves do not meet. 15 Replace the four or six screws from the inverter. 11 Remove the old inverter, then insert the new one. 12 Connect the cables to the new inverter. 13 If you removed the bracket in Step 9, replace it, then replace the two screws. 14 Press...

8511725 - Gateway Service Guide
Page 54
...the LCD panel together in several places until they click in "Replacing the keyboard cover" on page 29. 22 Plug the antenna cables into the inverter. You should find no loose spots or spots where the two halves do not meet. 17 Replace the four or six LCD panel assembly screws...panel assembly" on page 38. 20 Close the keyboard compartment by following the instructions in "Replacing the keyboard" on the old panel, then transfer the inverter to the new panel. Replacing Notebook Components 12 Unplug both cables into the IEEE 802.11 wireless card, then replace the wireless bay cover. 50
...the LCD panel together in several places until they click in "Replacing the keyboard cover" on page 29. 22 Plug the antenna cables into the inverter. You should find no loose spots or spots where the two halves do not meet. 17 Replace the four or six LCD panel assembly screws...panel assembly" on page 38. 20 Close the keyboard compartment by following the instructions in "Replacing the keyboard" on the old panel, then transfer the inverter to the new panel. Replacing Notebook Components 12 Unplug both cables into the IEEE 802.11 wireless card, then replace the wireless bay cover. 50

8511884 - Gateway Notebook Reference Guide for Windows Vista
Page 60
... under banks of power. • Recharge the battery often, take electrical adapters. The next time you cannot use an airplane/ automobile power adapter or power inverter. For more information about traveling with your notebook, see "Recharging the battery" on your notebook, it switches to support pillars, in large areas such as...
... under banks of power. • Recharge the battery often, take electrical adapters. The next time you cannot use an airplane/ automobile power adapter or power inverter. For more information about traveling with your notebook, see "Recharging the battery" on your notebook, it switches to support pillars, in large areas such as...
8512152 - Gateway Notebook Reference Guide for Windows Vista
Page 61
... -flight power receptacle, an automobile power outlet, or an automobile cigarette lighter, use an airplane/ automobile power adapter or power inverter. while your notebook, it reads the memory information from the hard drive and opens the programs and documents that were open when...8226; Hibernate - (also called save to disk) writes all current memory (RAM) information to the hard drive similar to Hibernate mode. www.gateway.com Using alternate power sources To extend battery life, use alternate power sources whenever possible. • If traveling internationally, take a single-plug ...
... -flight power receptacle, an automobile power outlet, or an automobile cigarette lighter, use an airplane/ automobile power adapter or power inverter. while your notebook, it reads the memory information from the hard drive and opens the programs and documents that were open when...8226; Hibernate - (also called save to disk) writes all current memory (RAM) information to the hard drive similar to Hibernate mode. www.gateway.com Using alternate power sources To extend battery life, use alternate power sources whenever possible. • If traveling internationally, take a single-plug ...