8511725 - Gateway Service Guide
Page 3
... battery 6 Adding or replacing memory modules 7 Replacing the DVD drive 11 Replacing the cooling assembly 14 Replacing the processor 19 Replacing the IEEE 802.11 wireless card 22 Replacing the hard drive 26 Replacing the keyboard cover 29 Replacing the keyboard 31 Replacing the CMOS battery 36 Replacing the LCD panel...
... battery 6 Adding or replacing memory modules 7 Replacing the DVD drive 11 Replacing the cooling assembly 14 Replacing the processor 19 Replacing the IEEE 802.11 wireless card 22 Replacing the hard drive 26 Replacing the keyboard cover 29 Replacing the keyboard 31 Replacing the CMOS battery 36 Replacing the LCD panel...

8511725 - Gateway Service Guide
Page 5
...; Adding or replacing memory modules • Replacing the DVD drive • Replacing the cooling assembly • Replacing the processor • Replacing the IEEE 802.11 wireless card • Replacing the hard drive • Replacing the keyboard cover • Replacing the keyboard • Replacing the CMOS battery • Replacing the LCD panel...
...; Adding or replacing memory modules • Replacing the DVD drive • Replacing the cooling assembly • Replacing the processor • Replacing the IEEE 802.11 wireless card • Replacing the hard drive • Replacing the keyboard cover • Replacing the keyboard • Replacing the CMOS battery • Replacing the LCD panel...
8511725 - Gateway Service Guide
Page 26
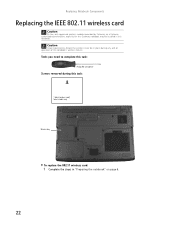
Replacing Notebook Components Replacing the IEEE 802.11 wireless card Caution By law, only approved wireless modules provided by Gateway, or a Gateway authorized representative, explicitly for this Gateway notebook may be in "Preparing the notebook" on page 6. 22 Tools you need to complete this task: Phillips #0 screwdriver Screws removed during any and all ...
Replacing Notebook Components Replacing the IEEE 802.11 wireless card Caution By law, only approved wireless modules provided by Gateway, or a Gateway authorized representative, explicitly for this Gateway notebook may be in "Preparing the notebook" on page 6. 22 Tools you need to complete this task: Phillips #0 screwdriver Screws removed during any and all ...

8511725 - Gateway Service Guide
Page 27
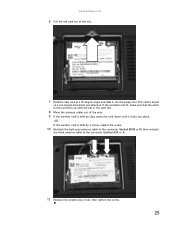
www.gateway.com 2 Loosen the wireless bay cover screw (this screw cannot be removed), then remove the wireless bay cover. Screw 3 Unplug the two antenna cables. 4 Move the antenna cables out of the way. 23
www.gateway.com 2 Loosen the wireless bay cover screw (this screw cannot be removed), then remove the wireless bay cover. Screw 3 Unplug the two antenna cables. 4 Move the antenna cables out of the way. 23
8511725 - Gateway Service Guide
Page 28
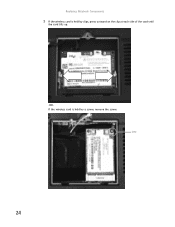
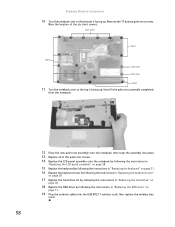
Screw 24 Replacing Notebook Components 5 If the wireless card is held by clips, press outward on the clip at each side of the card until the card tilts up. -ORIf the wireless card is held by a screw, remove the screw.
Screw 24 Replacing Notebook Components 5 If the wireless card is held by clips, press outward on the clip at each side of the card until the card tilts up. -ORIf the wireless card is held by a screw, remove the screw.
8511725 - Gateway Service Guide
Page 29
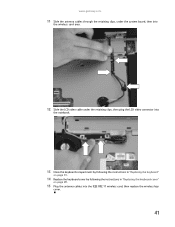
www.gateway.com 6 Pull the old card out of the way. 9 If the wireless card is held by clips, press the card down until it into the empty slot. If the card does not fit, make sure that the ... slot. 8 Move the antenna cables out of the slot. 7 Hold the new card at a 30-degree angle and slide it clicks into place. -ORIf the wireless card is held by a screw, replace the screw. 10 Reattach the light gray antenna cable to the connector labelled MAIN or M, then reattach the black...
www.gateway.com 6 Pull the old card out of the way. 9 If the wireless card is held by clips, press the card down until it into the empty slot. If the card does not fit, make sure that the ... slot. 8 Move the antenna cables out of the slot. 7 Hold the new card at a 30-degree angle and slide it clicks into place. -ORIf the wireless card is held by a screw, replace the screw. 10 Reattach the light gray antenna cable to the connector labelled MAIN or M, then reattach the black...
8511725 - Gateway Service Guide
Page 37
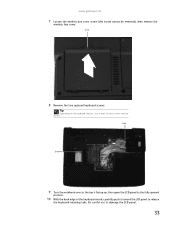
www.gateway.com 7 Loosen the wireless bay cover screw (this screw cannot be absent. Tip Depending on the keyboard features, one or both of the keyboard raised, carefully push it toward the LCD panel to release the keyboard retaining tabs. Screw 8 Remove the two optional keyboard screws. Be careful not to the fully opened position. 10 With the back edge of these screws may be removed), then remove the wireless bay cover. Screw Screw 9 Turn the notebook over so the top is facing up, then open the LCD panel to damage the LCD panel. 33
www.gateway.com 7 Loosen the wireless bay cover screw (this screw cannot be absent. Tip Depending on the keyboard features, one or both of the keyboard raised, carefully push it toward the LCD panel to release the keyboard retaining tabs. Screw 8 Remove the two optional keyboard screws. Be careful not to the fully opened position. 10 With the back edge of these screws may be removed), then remove the wireless bay cover. Screw Screw 9 Turn the notebook over so the top is facing up, then open the LCD panel to damage the LCD panel. 33
8511725 - Gateway Service Guide
Page 39
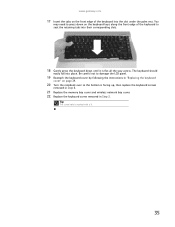
... keys along the front edge of the keyboard to damage the LCD panel. 19 Reattach the keyboard cover by following the instructions in Step 3. www.gateway.com 17 Insert the tabs on page 29. 20 Turn the notebook over so the bottom is facing up, then replace the keyboard screws removed... in Step 8. 21 Replace the memory bay cover and wireless network bay cover. 22 Replace the keyboard screw removed in "Replacing the keyboard cover" on the front edge of the keyboard into the slot under...
... keys along the front edge of the keyboard to damage the LCD panel. 19 Reattach the keyboard cover by following the instructions in Step 3. www.gateway.com 17 Insert the tabs on page 29. 20 Turn the notebook over so the bottom is facing up, then replace the keyboard screws removed... in Step 8. 21 Replace the memory bay cover and wireless network bay cover. 22 Replace the keyboard screw removed in "Replacing the keyboard cover" on the front edge of the keyboard into the slot under...
8511725 - Gateway Service Guide
Page 42
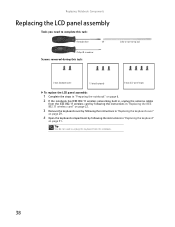
... during this task: Flat-blade driver - Tip You do not need to unplug the keyboard from the IEEE 802.11 wireless card by following the instructions in "Replacing the IEEE 802.11 wireless card" on page 22. 3 Remove the keyboard cover by following the instructions in "Replacing the keyboard cover" on page... (LCD panel hinges) To replace the LCD panel assembly: 1 Complete the steps in "Preparing the notebook" on page 6. 2 If the notebook has IEEE 802.11 wireless networking built in, unplug the antenna cables from the notebook. 38
... during this task: Flat-blade driver - Tip You do not need to unplug the keyboard from the IEEE 802.11 wireless card by following the instructions in "Replacing the IEEE 802.11 wireless card" on page 22. 3 Remove the keyboard cover by following the instructions in "Replacing the keyboard cover" on page... (LCD panel hinges) To replace the LCD panel assembly: 1 Complete the steps in "Preparing the notebook" on page 6. 2 If the notebook has IEEE 802.11 wireless networking built in, unplug the antenna cables from the notebook. 38
8511725 - Gateway Service Guide
Page 45
www.gateway.com 11 Slide the antenna cables through the retaining clips, under the system board, then into the wireless card area. 12 Slide the LCD video cable under the retaining clips, then plug the LCD video connector into the notebook. 13 Close the keyboard compartment by following the instructions in "Replacing the keyboard" on page 31. 14 Replace the keyboard cover by following the instructions in "Replacing the keyboard cover" on page 29. 15 Plug the antenna cables into the IEEE 802.11 wireless card, then replace the wireless bay cover. 41
www.gateway.com 11 Slide the antenna cables through the retaining clips, under the system board, then into the wireless card area. 12 Slide the LCD video cable under the retaining clips, then plug the LCD video connector into the notebook. 13 Close the keyboard compartment by following the instructions in "Replacing the keyboard" on page 31. 14 Replace the keyboard cover by following the instructions in "Replacing the keyboard cover" on page 29. 15 Plug the antenna cables into the IEEE 802.11 wireless card, then replace the wireless bay cover. 41
8511725 - Gateway Service Guide
Page 46
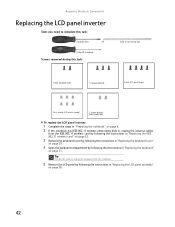
...only To replace the LCD panel inverter: 1 Complete the steps in "Preparing the notebook" on page 6. 2 If the notebook has IEEE 802.11 wireless networking built in, unplug the antenna cables from the notebook. 5 Remove the LCD panel by following the instructions in "Replacing the keyboard" on page ... Flat-blade driver - OR - Tip You do not need to unplug the keyboard from the IEEE 802.11 wireless card by following the instructions in "Replacing the IEEE 802.11 wireless card" on page 22. 3 Remove the keyboard cover by following the instructions in "Replacing the keyboard cover" on...
...only To replace the LCD panel inverter: 1 Complete the steps in "Preparing the notebook" on page 6. 2 If the notebook has IEEE 802.11 wireless networking built in, unplug the antenna cables from the notebook. 5 Remove the LCD panel by following the instructions in "Replacing the keyboard" on page ... Flat-blade driver - OR - Tip You do not need to unplug the keyboard from the IEEE 802.11 wireless card by following the instructions in "Replacing the IEEE 802.11 wireless card" on page 22. 3 Remove the keyboard cover by following the instructions in "Replacing the keyboard cover" on...

8511725 - Gateway Service Guide
Page 49
www.gateway.com 10 Unplug both cables from the front of the LCD panel assembly removed in Step 7. 16 Replace the four or six rubber inserts onto ... Close the keyboard compartment by following the instructions in "Replacing the keyboard" on page 29. 20 Plug the antenna cables into the IEEE 802.11 wireless card, then replace the wireless bay cover. 45
www.gateway.com 10 Unplug both cables from the front of the LCD panel assembly removed in Step 7. 16 Replace the four or six rubber inserts onto ... Close the keyboard compartment by following the instructions in "Replacing the keyboard" on page 29. 20 Plug the antenna cables into the IEEE 802.11 wireless card, then replace the wireless bay cover. 45

8511725 - Gateway Service Guide
Page 50
Tip You do not need to unplug the keyboard from the IEEE 802.11 wireless card by following the instructions in "Replacing the IEEE 802.11 wireless card" on page 22. 3 Remove the keyboard cover by following the instructions in "Replacing the keyboard cover" on page 29. 4 Open the ... chrome (LCD panel) To replace the LCD panel: 1 Complete the steps in "Preparing the notebook" on page 6. 2 If the notebook has IEEE 802.11 wireless networking built in, unplug the antenna cables from the notebook. 5 Remove the LCD panel by following the instructions in "Replacing the keyboard" on page 38...
Tip You do not need to unplug the keyboard from the IEEE 802.11 wireless card by following the instructions in "Replacing the IEEE 802.11 wireless card" on page 22. 3 Remove the keyboard cover by following the instructions in "Replacing the keyboard cover" on page 29. 4 Open the ... chrome (LCD panel) To replace the LCD panel: 1 Complete the steps in "Preparing the notebook" on page 6. 2 If the notebook has IEEE 802.11 wireless networking built in, unplug the antenna cables from the notebook. 5 Remove the LCD panel by following the instructions in "Replacing the keyboard" on page 38...

8511725 - Gateway Service Guide
Page 54
Replacing Notebook Components 12 Unplug both cables into the IEEE 802.11 wireless card, then replace the wireless bay cover. 50 Plug both cables from the LCD panel inverter on the old panel, then transfer the inverter to the new panel. You should ...
Replacing Notebook Components 12 Unplug both cables into the IEEE 802.11 wireless card, then replace the wireless bay cover. 50 Plug both cables from the LCD panel inverter on the old panel, then transfer the inverter to the new panel. You should ...
8511725 - Gateway Service Guide
Page 55
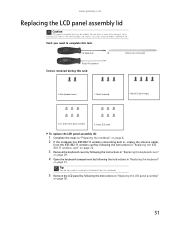
...) To replace the LCD panel assembly lid: 1 Complete the steps in "Preparing the notebook" on page 6. 2 If the notebook has IEEE 802.11 wireless networking built in, unplug the antenna cables from the notebook. 5 Remove the LCD panel by following the instructions in "Replacing the LCD panel assembly" on... page 38. 51 www.gateway.com Replacing the LCD panel assembly lid Caution LCD panel assembly lids vary by following the instructions in "Replacing the keyboard" on page 31.
...) To replace the LCD panel assembly lid: 1 Complete the steps in "Preparing the notebook" on page 6. 2 If the notebook has IEEE 802.11 wireless networking built in, unplug the antenna cables from the notebook. 5 Remove the LCD panel by following the instructions in "Replacing the LCD panel assembly" on... page 38. 51 www.gateway.com Replacing the LCD panel assembly lid Caution LCD panel assembly lids vary by following the instructions in "Replacing the keyboard" on page 31.

8511725 - Gateway Service Guide
Page 59
www.gateway.com 15 Press the front and back of the LCD panel together in several places until they click in "Replacing the keyboard cover" on page 29. 21 Plug the antenna cables into the IEEE 802.11 wireless card, then replace the wireless bay cover. 55 You should find no loose spots or...
www.gateway.com 15 Press the front and back of the LCD panel together in several places until they click in "Replacing the keyboard cover" on page 29. 21 Plug the antenna cables into the IEEE 802.11 wireless card, then replace the wireless bay cover. 55 You should find no loose spots or...
8511725 - Gateway Service Guide
Page 60
... the DVD drive" on page 11. 3 If the notebook has IEEE 802.11 wireless networking built in, unplug the antenna cables from the IEEE 802.11 wireless card by following the instructions in "Replacing the IEEE 802.11 wireless card" on page 22. 4 Remove the hard drive kit by following the instructions in...
... the DVD drive" on page 11. 3 If the notebook has IEEE 802.11 wireless networking built in, unplug the antenna cables from the IEEE 802.11 wireless card by following the instructions in "Replacing the IEEE 802.11 wireless card" on page 22. 4 Remove the hard drive kit by following the instructions in...
8511725 - Gateway Service Guide
Page 62
... drive by following the instructions in "Replacing the DVD drive" on page 11. 19 Plug the antenna cables into the IEEE 802.11 wireless card, then replace the wireless bay cover. 58 Replacing Notebook Components 10 Turn the notebook over so the top is facing up , then lift the palm rest assembly...
... drive by following the instructions in "Replacing the DVD drive" on page 11. 19 Plug the antenna cables into the IEEE 802.11 wireless card, then replace the wireless bay cover. 58 Replacing Notebook Components 10 Turn the notebook over so the top is facing up , then lift the palm rest assembly...
8511725 - Gateway Service Guide
Page 63
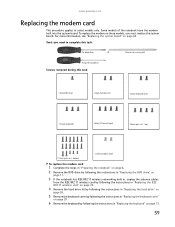
...removed during this task: Flat-blade driver - top) 17 black (palm rest - For more information, see "Replacing the system board" on page 31. 59 www.gateway.com Replacing the modem card This procedure applies to complete this task: 1 black (DVD drive) 2 black (hard drive kit) 2 black (keyboard cover) 1-3 ... drive" on page 11. 3 If the notebook has IEEE 802.11 wireless networking built in, unplug the antenna cables from the IEEE 802.11 wireless card by following the instructions in "Replacing the IEEE 802.11 wireless card" on page 22. 4 Remove the hard drive kit by following...
...removed during this task: Flat-blade driver - top) 17 black (palm rest - For more information, see "Replacing the system board" on page 31. 59 www.gateway.com Replacing the modem card This procedure applies to complete this task: 1 black (DVD drive) 2 black (hard drive kit) 2 black (keyboard cover) 1-3 ... drive" on page 11. 3 If the notebook has IEEE 802.11 wireless networking built in, unplug the antenna cables from the IEEE 802.11 wireless card by following the instructions in "Replacing the IEEE 802.11 wireless card" on page 22. 4 Remove the hard drive kit by following...
8511725 - Gateway Service Guide
Page 65
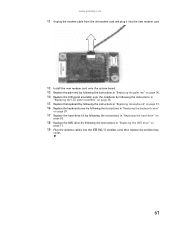
www.gateway.com 11 Unplug the modem cable from the old modem card and plug it into the new modem card. 12 Install the new modem card ... the DVD drive by following the instructions in "Replacing the DVD drive" on page 11. 19 Plug the antenna cables into the IEEE 802.11 wireless card, then replace the wireless bay cover. 61
www.gateway.com 11 Unplug the modem cable from the old modem card and plug it into the new modem card. 12 Install the new modem card ... the DVD drive by following the instructions in "Replacing the DVD drive" on page 11. 19 Plug the antenna cables into the IEEE 802.11 wireless card, then replace the wireless bay cover. 61


