8511725 - Gateway Service Guide
Page 9
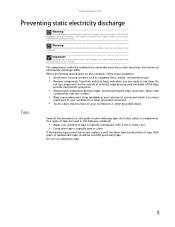
... at most electronics stores) and attach it with a red or brown tint. • Conductive tape is typically grey or silver. www.gateway.com Preventing static electricity discharge Warning To avoid exposure to static electricity, also known as carpeted floors, plastic, and packing foam. •...conductive tape is typically transparent, with the same type (conductivity) of tape are extremely sensitive to dangerous electrical voltages and moving parts, turn off the notebook, remove the battery, and unplug the power cord, modem cable, and network cable before opening the case. Avoid ...
... at most electronics stores) and attach it with a red or brown tint. • Conductive tape is typically grey or silver. www.gateway.com Preventing static electricity discharge Warning To avoid exposure to static electricity, also known as carpeted floors, plastic, and packing foam. •...conductive tape is typically transparent, with the same type (conductivity) of tape are extremely sensitive to dangerous electrical voltages and moving parts, turn off the notebook, remove the battery, and unplug the power cord, modem cable, and network cable before opening the case. Avoid ...

8511725 - Gateway Service Guide
Page 10
... notebook over so the bottom is facing up. 2 Slide the battery lock to dangerous electrical voltages and moving parts, turn off the notebook and unplug the power cord, modem cable, and network cable. 4 Remove the battery. Replacing Notebook Components Preparing the notebook Warning To ... for maintenance: 1 Make sure that the DVD drive does not contain a disc. 2 Disconnect all peripheral devices and remove any PC Cards and memory cards. 3 Turn off the notebook, remove the battery, and unplug the power cord, modem cable, and network cable before you restore power or reconnect the modem and...
... notebook over so the bottom is facing up. 2 Slide the battery lock to dangerous electrical voltages and moving parts, turn off the notebook and unplug the power cord, modem cable, and network cable. 4 Remove the battery. Replacing Notebook Components Preparing the notebook Warning To ... for maintenance: 1 Make sure that the DVD drive does not contain a disc. 2 Disconnect all peripheral devices and remove any PC Cards and memory cards. 3 Turn off the notebook, remove the battery, and unplug the power cord, modem cable, and network cable before you restore power or reconnect the modem and...
8511725 - Gateway Service Guide
Page 24
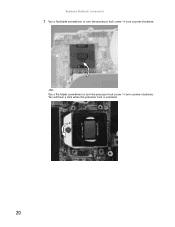
You will hear a click when the processor lock is unlocked. 20 Replacing Notebook Components 3 Use a flat-blade screwdriver to turn the processor lock screw ¼-turn counter-clockwise. -ORUse a flat-blade screwdriver to turn the processor lock screw ½-turn counter-clockwise.
You will hear a click when the processor lock is unlocked. 20 Replacing Notebook Components 3 Use a flat-blade screwdriver to turn the processor lock screw ¼-turn counter-clockwise. -ORUse a flat-blade screwdriver to turn the processor lock screw ½-turn counter-clockwise.
8511725 - Gateway Service Guide
Page 25
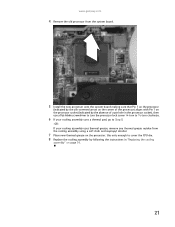
www.gateway.com 4 Remove the old processor from the system board. 5 Install the new processor onto the system board making sure that Pin 1 on the processor (indicated ... 1 on the processor socket (indicated by the absence of a pin hole in the processor socket), then use a flat-blade screwdriver to turn the processor lock screw ¼-turn to ½-turn clockwise. 6 If your cooling assembly uses thermal grease, remove any thermal grease residue from the cooling assembly using a soft cloth and isopropyl...
www.gateway.com 4 Remove the old processor from the system board. 5 Install the new processor onto the system board making sure that Pin 1 on the processor (indicated ... 1 on the processor socket (indicated by the absence of a pin hole in the processor socket), then use a flat-blade screwdriver to turn the processor lock screw ¼-turn to ½-turn clockwise. 6 If your cooling assembly uses thermal grease, remove any thermal grease residue from the cooling assembly using a soft cloth and isopropyl...
8511725 - Gateway Service Guide
Page 33
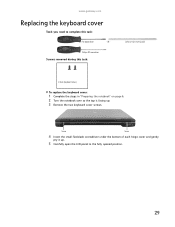
OR - Phillips #0 screwdriver Screws removed during this task: Flat-blade driver - Screw Screw 4 Insert the small flat-blade screwdriver under the bottom of each hinge cover and gently pry it up . 3 Remove the two keyboard cover screws. www.gateway.com Replacing the keyboard cover Tools you need to complete this task: Scribe or non-marring tool 2 black (keyboard cover) To replace the keyboard cover: 1 Complete the steps in "Preparing the notebook" on page 6. 2 Turn the notebook over so the top is facing up . 5 Carefully open the LCD panel to the fully opened position. 29
OR - Phillips #0 screwdriver Screws removed during this task: Flat-blade driver - Screw Screw 4 Insert the small flat-blade screwdriver under the bottom of each hinge cover and gently pry it up . 3 Remove the two keyboard cover screws. www.gateway.com Replacing the keyboard cover Tools you need to complete this task: Scribe or non-marring tool 2 black (keyboard cover) To replace the keyboard cover: 1 Complete the steps in "Preparing the notebook" on page 6. 2 Turn the notebook over so the top is facing up . 5 Carefully open the LCD panel to the fully opened position. 29
8511725 - Gateway Service Guide
Page 36
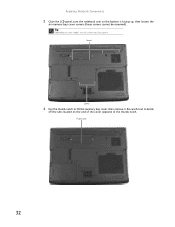
Screws Screws 6 Use the thumb notch to break off the tabs located on your model, not all screws may be removed). Tip Depending on the end of the cover opposite of the thumb notch. Replacing Notebook Components 5 Close the LCD panel, turn the notebook over so the bottom is facing up, then loosen the six memory bay cover screws (these screws cannot be captive. Thumb notch 32 Be careful not to lift the memory bay cover, then remove it.
Screws Screws 6 Use the thumb notch to break off the tabs located on your model, not all screws may be removed). Tip Depending on the end of the cover opposite of the thumb notch. Replacing Notebook Components 5 Close the LCD panel, turn the notebook over so the bottom is facing up, then loosen the six memory bay cover screws (these screws cannot be captive. Thumb notch 32 Be careful not to lift the memory bay cover, then remove it.
8511725 - Gateway Service Guide
Page 37
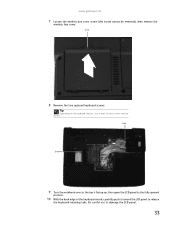
Be careful not to release the keyboard retaining tabs. Screw Screw 9 Turn the notebook over so the top is facing up, then open the LCD panel to the fully opened position. 10 With the back edge of these screws may be removed), then remove the wireless bay cover. Screw 8 Remove the two optional keyboard screws. www.gateway.com 7 Loosen the wireless bay cover screw (this screw cannot be absent. Tip Depending on the keyboard features, one or both of the keyboard raised, carefully push it toward the LCD panel to damage the LCD panel. 33
Be careful not to release the keyboard retaining tabs. Screw Screw 9 Turn the notebook over so the top is facing up, then open the LCD panel to the fully opened position. 10 With the back edge of these screws may be removed), then remove the wireless bay cover. Screw 8 Remove the two optional keyboard screws. www.gateway.com 7 Loosen the wireless bay cover screw (this screw cannot be absent. Tip Depending on the keyboard features, one or both of the keyboard raised, carefully push it toward the LCD panel to damage the LCD panel. 33
8511725 - Gateway Service Guide
Page 39
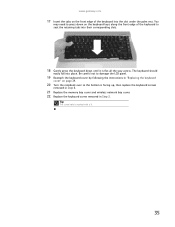
... keyboard cover by following the instructions in "Replacing the keyboard cover" on the keyboard keys along the front edge of the keyboard into place. www.gateway.com 17 Insert the tabs on the front edge of the keyboard to seat the retaining tabs into their corresponding slots. 18 Gently press the...
... keyboard cover by following the instructions in "Replacing the keyboard cover" on the keyboard keys along the front edge of the keyboard into place. www.gateway.com 17 Insert the tabs on the front edge of the keyboard to seat the retaining tabs into their corresponding slots. 18 Gently press the...
8511725 - Gateway Service Guide
Page 62
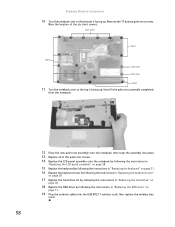
... page 11. 19 Plug the antenna cables into the IEEE 802.11 wireless card, then replace the wireless bay cover. 58 Replacing Notebook Components 10 Turn the notebook over so the top is facing up , then lift the palm rest assembly completely from the notebook. 12 Place the new palm rest.... 13 Replace all of the six short screws. Remove the 17 bottom palm rest screws. Short screws Screws Screws Short screw Short screw Screws 11 Turn the notebook over so the bottom is facing up .
... page 11. 19 Plug the antenna cables into the IEEE 802.11 wireless card, then replace the wireless bay cover. 58 Replacing Notebook Components 10 Turn the notebook over so the top is facing up , then lift the palm rest assembly completely from the notebook. 12 Place the new palm rest.... 13 Replace all of the six short screws. Remove the 17 bottom palm rest screws. Short screws Screws Screws Short screw Short screw Screws 11 Turn the notebook over so the bottom is facing up .
8511725 - Gateway Service Guide
Page 70
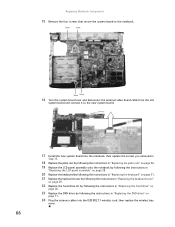
... 11. 24 Plug the antenna cables into the IEEE 802.11 wireless card, then replace the wireless bay cover. 66 Screw Screw Screw Screw 16 Turn the system board over and disconnect the external video board cable from the old system board and connect it to the notebook.
... 11. 24 Plug the antenna cables into the IEEE 802.11 wireless card, then replace the wireless bay cover. 66 Screw Screw Screw Screw 16 Turn the system board over and disconnect the external video board cable from the old system board and connect it to the notebook.
8512055 - Component Replacement Manual
Page 1
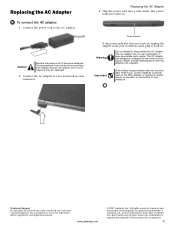
...same type and voltage rating as the original cord or your notebook may be of Gateway, Inc. Power indicator If the power indicator does not turn blue after three hours, contact Gateway Customer Care at the Web address or telephone number shown on the label on ... All other countries. Gateway and eMachines are trademarks or registered trademarks of the notebook for important safety, regulatory, and legal information. The replacement cord must be damaged. 2 Connect the AC adapter to your notebook, then plug it becomes damaged. The power indicator turns on , unplug the...
...same type and voltage rating as the original cord or your notebook may be of Gateway, Inc. Power indicator If the power indicator does not turn blue after three hours, contact Gateway Customer Care at the Web address or telephone number shown on the label on ... All other countries. Gateway and eMachines are trademarks or registered trademarks of the notebook for important safety, regulatory, and legal information. The replacement cord must be damaged. 2 Connect the AC adapter to your notebook, then plug it becomes damaged. The power indicator turns on , unplug the...
8512055 - Component Replacement Manual
Page 2
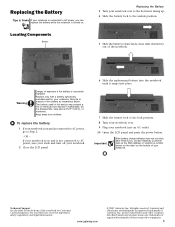
...176;F (100°C), or incinerate. To replace the battery: 1 If your notebook is on . www.gateway.com © 2007 Gateway, Inc. All other countries. Important If the battery charge indicator does not turn off your notebook. 2 Close the LCD panel. 6 Slide the replacement battery into the notebook until it ...registered trademarks of the notebook. OR If your notebook is on and is not connected to AC power, save your work and turn blue after three hours, contact Gateway Customer Care at the Web address or telephone number shown on the label on the bottom of their respective companies...
...176;F (100°C), or incinerate. To replace the battery: 1 If your notebook is on . www.gateway.com © 2007 Gateway, Inc. All other countries. Important If the battery charge indicator does not turn off your notebook. 2 Close the LCD panel. 6 Slide the replacement battery into the notebook until it ...registered trademarks of the notebook. OR If your notebook is on and is not connected to AC power, save your work and turn blue after three hours, contact Gateway Customer Care at the Web address or telephone number shown on the label on the bottom of their respective companies...
8512055 - Component Replacement Manual
Page 3
...place. Screw 8 Loosen the six memory bay cover screws (these guidelines: • Avoid static-causing surfaces such as electrostatic discharge (ESD). Gateway and eMachines are ready to use them. Preventing static electricity discharge The components inside of the bags provide electrostatic protection. • Always hold ...and unplug the AC adapter, modem cable, and network cable before replacing a component. Avoid touching the edge connectors. www.gateway.com © 2007 Gateway, Inc. Never slide components over any PC Cards. 6 Turn your notebook over so the bottom is empty...
...place. Screw 8 Loosen the six memory bay cover screws (these guidelines: • Avoid static-causing surfaces such as electrostatic discharge (ESD). Gateway and eMachines are ready to use them. Preventing static electricity discharge The components inside of the bags provide electrostatic protection. • Always hold ...and unplug the AC adapter, modem cable, and network cable before replacing a component. Avoid touching the edge connectors. www.gateway.com © 2007 Gateway, Inc. Never slide components over any PC Cards. 6 Turn your notebook over so the bottom is empty...
8512055 - Component Replacement Manual
Page 4
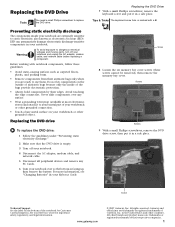
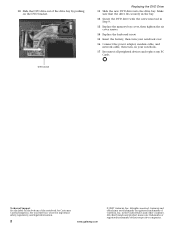
...cover, then tighten the six cover screws. 14 Replace the keyboard screw. 15 Insert the battery, then turn your notebook over. 16 Connect the power adapter, modem cable, and network cable, then turn on your Reference Guide for Customer Care Information. Make sure that the drive fits securely in the bay... the drive bay by pushing on the bottom of their respective companies. All rights reserved. Technical Support See the label on the DVD bracket. Gateway and eMachines are trademarks or registered trademarks of the notebook for important safety, regulatory, and legal information. 2 www...
...cover, then tighten the six cover screws. 14 Replace the keyboard screw. 15 Insert the battery, then turn your notebook over. 16 Connect the power adapter, modem cable, and network cable, then turn on your Reference Guide for Customer Care Information. Make sure that the drive fits securely in the bay... the drive bay by pushing on the bottom of their respective companies. All rights reserved. Technical Support See the label on the DVD bracket. Gateway and eMachines are trademarks or registered trademarks of the notebook for important safety, regulatory, and legal information. 2 www...
8512055 - Component Replacement Manual
Page 5
...Follow the guidelines under "Preventing static electricity discharge." 3 Turn off your Reference Guide for important safety, regulatory, and legal information. For more information, see "Preparing for Customer Care Information. Gateway and eMachines are extremely sensitive to use them. To ... replacing a component. Important If you cannot create a Drivers and Applications Recovery disc, Gateway may need a small Phillips screwdriver to dangerous electrical voltages and moving parts, turn off your notebook. 4 Disconnect the AC adapter, modem cable, and network cable. ...
...Follow the guidelines under "Preventing static electricity discharge." 3 Turn off your Reference Guide for important safety, regulatory, and legal information. For more information, see "Preparing for Customer Care Information. Gateway and eMachines are extremely sensitive to use them. To ... replacing a component. Important If you cannot create a Drivers and Applications Recovery disc, Gateway may need a small Phillips screwdriver to dangerous electrical voltages and moving parts, turn off your notebook. 4 Disconnect the AC adapter, modem cable, and network cable. ...

8512055 - Component Replacement Manual
Page 6
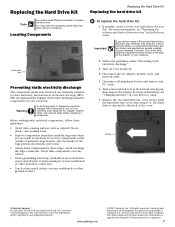
...drive to the hard drive cover. A list of the notebook for important safety, regulatory, and legal information. 2 www.gateway.com © 2007 Gateway, Inc. All rights reserved. in the United States and other brands and product names are trademarks or registered trademarks of their...network cable. 15 Turn on -screen instructions. 19 After Windows is completely re-installed, use the software and driver recovery discs you created to you from Gateway with the operating system, applications, and drivers installed, you see the Windows startup screen. Gateway and eMachines are ...
...drive to the hard drive cover. A list of the notebook for important safety, regulatory, and legal information. 2 www.gateway.com © 2007 Gateway, Inc. All rights reserved. in the United States and other brands and product names are trademarks or registered trademarks of their...network cable. 15 Turn on -screen instructions. 19 After Windows is completely re-installed, use the software and driver recovery discs you created to you from Gateway with the operating system, applications, and drivers installed, you see the Windows startup screen. Gateway and eMachines are ...
8512055 - Component Replacement Manual
Page 7
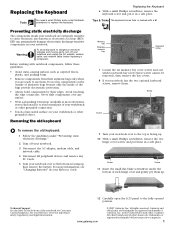
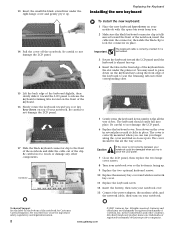
...Tools You need a small Phillips and a small flat-blade screwdriver to use them . Warning To avoid exposure to dangerous electrical voltages and moving parts, turn off your notebook. 3 Disconnect the AC adapter, modem cable, and network cable. 4 Disconnect all peripheral devices and remove any surface. • ... before replacing a component. Before working with a K. Screw Screw 11 Insert the small flat-blade screwdriver under "Preventing static electricity discharge." 2 Turn off your workbench or other countries. Gateway and eMachines are ready to replace the keyboard.
...Tools You need a small Phillips and a small flat-blade screwdriver to use them . Warning To avoid exposure to dangerous electrical voltages and moving parts, turn off your notebook. 3 Disconnect the AC adapter, modem cable, and network cable. 4 Disconnect all peripheral devices and remove any surface. • ... before replacing a component. Before working with a K. Screw Screw 11 Insert the small flat-blade screwdriver under "Preventing static electricity discharge." 2 Turn off your workbench or other countries. Gateway and eMachines are ready to replace the keyboard.
8512055 - Component Replacement Manual
Page 8
... slide the cable out of the notebook for important safety, regulatory, and legal information. 2 www.gateway.com © 2007 Gateway, Inc. Gateway and eMachines are trademarks or registered trademarks of Gateway, Inc. All other brands and product names are trademarks or registered trademarks of their corresponding slots. .... 10 Replace the memory bay cover and wireless network bay cover. 11 Replace the keyboard screw. 12 Insert the battery, then turn on the front of the keyboard. 16 Slowly rotate the keyboard toward the front of the notebook, insert the cable into their ...
... slide the cable out of the notebook for important safety, regulatory, and legal information. 2 www.gateway.com © 2007 Gateway, Inc. Gateway and eMachines are trademarks or registered trademarks of Gateway, Inc. All other brands and product names are trademarks or registered trademarks of their corresponding slots. .... 10 Replace the memory bay cover and wireless network bay cover. 11 Replace the keyboard screw. 12 Insert the battery, then turn on the front of the keyboard. 16 Slowly rotate the keyboard toward the front of the notebook, insert the cable into their ...
8512055 - Component Replacement Manual
Page 9
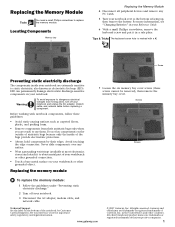
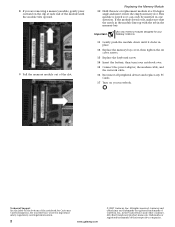
... cable, and network cable before replacing a component. ESD can permanently damage electrostatic discharge-sensitive components in a safe place. Gateway and eMachines are trademarks or registered trademarks of the bags provide electrostatic protection. • Always hold components by their respective ... or other countries. Screws Screws To replace the memory module: 1 Follow the guidelines under "Preventing static electricity discharge." 2 Turn off your notebook are ready to static electricity, also known as carpeted floors, plastic, and packing foam. • Remove ...
... cable, and network cable before replacing a component. ESD can permanently damage electrostatic discharge-sensitive components in a safe place. Gateway and eMachines are trademarks or registered trademarks of the bags provide electrostatic protection. • Always hold components by their respective ... or other countries. Screws Screws To replace the memory module: 1 Follow the guidelines under "Preventing static electricity discharge." 2 Turn off your notebook are ready to static electricity, also known as carpeted floors, plastic, and packing foam. • Remove ...
8512055 - Component Replacement Manual
Page 10
...tighten the six cover screws. 13 Replace the keyboard screw. 14 Insert the battery, then turn your Reference Guide for important safety, regulatory, and legal information. 2 www.gateway.com © 2007 Gateway, Inc. Replacing the Memory Module 10 Hold the new or replacement module at each end of..., the modem cable, and the network cable. 16 Reconnect all peripheral devices and replace any PC Cards. 17 Turn on the bottom of their respective companies. Gateway and eMachines are trademarks or registered trademarks of the notebook for your notebook. in the memory bay. All rights ...
...tighten the six cover screws. 13 Replace the keyboard screw. 14 Insert the battery, then turn your Reference Guide for important safety, regulatory, and legal information. 2 www.gateway.com © 2007 Gateway, Inc. Replacing the Memory Module 10 Hold the new or replacement module at each end of..., the modem cable, and the network cable. 16 Reconnect all peripheral devices and replace any PC Cards. 17 Turn on the bottom of their respective companies. Gateway and eMachines are trademarks or registered trademarks of the notebook for your notebook. in the memory bay. All rights ...


