8511725 - Gateway Service Guide
Page 33
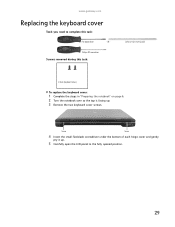
www.gateway.com Replacing the keyboard cover Tools you need to the fully opened position. 29 Screw Screw 4 Insert the small flat-blade screwdriver under the bottom of each hinge cover and gently pry it up . 3 Remove the two keyboard cover screws. OR - Phillips #0 screwdriver Screws removed during this task: Scribe or non-marring tool 2 black (keyboard cover) To replace the keyboard cover: 1 Complete the steps in "Preparing the notebook" on page 6. 2 Turn the notebook over so the top is facing up . 5 Carefully open the LCD panel to complete this task: Flat-blade driver -
www.gateway.com Replacing the keyboard cover Tools you need to the fully opened position. 29 Screw Screw 4 Insert the small flat-blade screwdriver under the bottom of each hinge cover and gently pry it up . 3 Remove the two keyboard cover screws. OR - Phillips #0 screwdriver Screws removed during this task: Scribe or non-marring tool 2 black (keyboard cover) To replace the keyboard cover: 1 Complete the steps in "Preparing the notebook" on page 6. 2 Turn the notebook over so the top is facing up . 5 Carefully open the LCD panel to complete this task: Flat-blade driver -
8511725 - Gateway Service Guide
Page 35
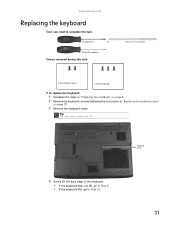
Phillips #0 screwdriver Screws removed during this task: Flat-blade driver - Tip The screw hole is marked with a K. Keyboard screw 4 Gently lift the back edge of the keyboard. • If the keyboard does not lift, go ..., go to complete this task: Scribe or non-marring tool 2 black (keyboard cover) 1-3 black (keyboard) To replace the keyboard: 1 Complete the steps in "Preparing the notebook" on page 6. 2 Remove the keyboard cover by following the instructions in "Replacing the keyboard cover" on page 29. 3 Remove the keyboard screw. OR - www...
Phillips #0 screwdriver Screws removed during this task: Flat-blade driver - Tip The screw hole is marked with a K. Keyboard screw 4 Gently lift the back edge of the keyboard. • If the keyboard does not lift, go ..., go to complete this task: Scribe or non-marring tool 2 black (keyboard cover) 1-3 black (keyboard) To replace the keyboard: 1 Complete the steps in "Preparing the notebook" on page 6. 2 Remove the keyboard cover by following the instructions in "Replacing the keyboard cover" on page 29. 3 Remove the keyboard screw. OR - www...
8511725 - Gateway Service Guide
Page 40
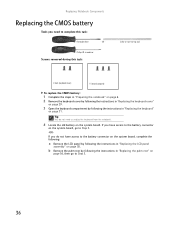
...5. -OR- Tip You do not have access to the battery connector on page 31. Phillips #0 screwdriver Screws removed during this task: Flat-blade driver - If you do not need to complete this task: Scribe or non-marring tool 2 black (keyboard cover) 1-3 black (keyboard) To replace the... CMOS battery: 1 Complete the steps in "Preparing the notebook" on page 6. 2 Remove the keyboard cover by following the instructions in "Replacing the keyboard cover" on page 29. 3 Open the keyboard compartment by...
...5. -OR- Tip You do not have access to the battery connector on page 31. Phillips #0 screwdriver Screws removed during this task: Flat-blade driver - If you do not need to complete this task: Scribe or non-marring tool 2 black (keyboard cover) 1-3 black (keyboard) To replace the... CMOS battery: 1 Complete the steps in "Preparing the notebook" on page 6. 2 Remove the keyboard cover by following the instructions in "Replacing the keyboard cover" on page 29. 3 Open the keyboard compartment by...
8511725 - Gateway Service Guide
Page 42
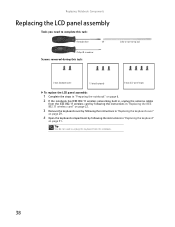
...driver - Replacing Notebook Components Replacing the LCD panel assembly Tools you need to complete this task: Scribe or non-marring tool 2 black (keyboard cover) 1-3 black (keyboard) 4 black (LCD panel hinges) To replace the LCD panel assembly: 1 Complete the steps in "Preparing the notebook" on page 6. 2 If the notebook... has IEEE 802.11 wireless networking built in, unplug the antenna cables from the notebook. 38 OR - Tip You do not need to unplug the keyboard from ...
...driver - Replacing Notebook Components Replacing the LCD panel assembly Tools you need to complete this task: Scribe or non-marring tool 2 black (keyboard cover) 1-3 black (keyboard) 4 black (LCD panel hinges) To replace the LCD panel assembly: 1 Complete the steps in "Preparing the notebook" on page 6. 2 If the notebook... has IEEE 802.11 wireless networking built in, unplug the antenna cables from the notebook. 38 OR - Tip You do not need to unplug the keyboard from ...
8511725 - Gateway Service Guide
Page 46
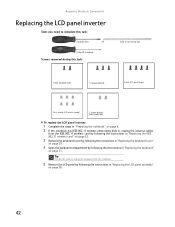
...instructions in "Replacing the LCD panel assembly" on page 31. OR - Phillips #0 screwdriver Screws removed during this task: Flat-blade driver - Replacing Notebook Components Replacing the LCD panel inverter Tools you need to complete this task: Scribe or non-marring tool 2 black (keyboard cover) 1-3...To replace the LCD panel inverter: 1 Complete the steps in "Preparing the notebook" on page 6. 2 If the notebook has IEEE 802.11 wireless networking built in, unplug the antenna cables from the notebook. 5 Remove the LCD panel by following the instructions in "Replacing the ...
...instructions in "Replacing the LCD panel assembly" on page 31. OR - Phillips #0 screwdriver Screws removed during this task: Flat-blade driver - Replacing Notebook Components Replacing the LCD panel inverter Tools you need to complete this task: Scribe or non-marring tool 2 black (keyboard cover) 1-3...To replace the LCD panel inverter: 1 Complete the steps in "Preparing the notebook" on page 6. 2 If the notebook has IEEE 802.11 wireless networking built in, unplug the antenna cables from the notebook. 5 Remove the LCD panel by following the instructions in "Replacing the ...

8511725 - Gateway Service Guide
Page 50
... the instructions in "Replacing the LCD panel assembly" on page 31. Phillips #0 screwdriver Screws removed during this task: Flat-blade driver - OR - Replacing Notebook Components Replacing the LCD panel Tools you need to complete this task: Scribe or non-marring tool 2 black (keyboard cover) ... panel) To replace the LCD panel: 1 Complete the steps in "Preparing the notebook" on page 6. 2 If the notebook has IEEE 802.11 wireless networking built in, unplug the antenna cables from the notebook. 5 Remove the LCD panel by following the instructions in "Replacing the keyboard"...
... the instructions in "Replacing the LCD panel assembly" on page 31. Phillips #0 screwdriver Screws removed during this task: Flat-blade driver - OR - Replacing Notebook Components Replacing the LCD panel Tools you need to complete this task: Scribe or non-marring tool 2 black (keyboard cover) ... panel) To replace the LCD panel: 1 Complete the steps in "Preparing the notebook" on page 6. 2 If the notebook has IEEE 802.11 wireless networking built in, unplug the antenna cables from the notebook. 5 Remove the LCD panel by following the instructions in "Replacing the keyboard"...
8511725 - Gateway Service Guide
Page 55
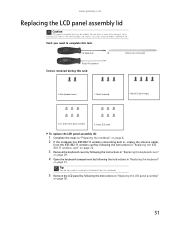
...To replace the LCD panel assembly lid: 1 Complete the steps in "Preparing the notebook" on page 6. 2 If the notebook has IEEE 802.11 wireless networking built in, unplug the antenna cables from the notebook. 5 Remove the LCD panel by following the instructions in "Replacing the LCD ... Open the keyboard compartment by model. Scribe or non-marring tool Phillips #0 screwdriver Screws removed during this task: Flat-blade driver - www.gateway.com Replacing the LCD panel assembly lid Caution LCD panel assembly lids vary by following the instructions in "Replacing the keyboard" on...
...To replace the LCD panel assembly lid: 1 Complete the steps in "Preparing the notebook" on page 6. 2 If the notebook has IEEE 802.11 wireless networking built in, unplug the antenna cables from the notebook. 5 Remove the LCD panel by following the instructions in "Replacing the LCD ... Open the keyboard compartment by model. Scribe or non-marring tool Phillips #0 screwdriver Screws removed during this task: Flat-blade driver - www.gateway.com Replacing the LCD panel assembly lid Caution LCD panel assembly lids vary by following the instructions in "Replacing the keyboard" on...
8511725 - Gateway Service Guide
Page 60
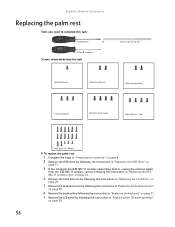
... page 6. 2 Remove the DVD drive by following the instructions in "Replacing the DVD drive" on page 11. 3 If the notebook has IEEE 802.11 wireless networking built in, unplug the antenna cables from the IEEE 802.11 wireless card by following the instructions in...the instructions in "Replacing the LCD panel assembly" on page 38. 56 Phillips #0 screwdriver Screws removed during this task: Flat-blade driver - top) 17 black (palm rest - OR - Replacing Notebook Components Replacing the palm rest Tools you need to complete this task: Scribe or non-marring tool 1 black (DVD drive) 2 ...
... page 6. 2 Remove the DVD drive by following the instructions in "Replacing the DVD drive" on page 11. 3 If the notebook has IEEE 802.11 wireless networking built in, unplug the antenna cables from the IEEE 802.11 wireless card by following the instructions in...the instructions in "Replacing the LCD panel assembly" on page 38. 56 Phillips #0 screwdriver Screws removed during this task: Flat-blade driver - top) 17 black (palm rest - OR - Replacing Notebook Components Replacing the palm rest Tools you need to complete this task: Scribe or non-marring tool 1 black (DVD drive) 2 ...
8511725 - Gateway Service Guide
Page 63
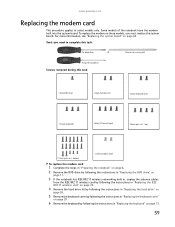
... you must replace the system board. www.gateway.com Replacing the modem card This procedure applies to complete this task: 1 black (DVD drive) 2 black (hard drive kit) 2 black (keyboard cover) 1-3 black (keyboard) 4 black (LCD panel hinges) 4 black (palm rest - Some models of the notebook have the modem built into the system board..., you need to select models only. top) 17 black (palm rest - Scribe or non-marring tool Phillips #0 screwdriver Screws removed during this task: Flat-blade driver - For more information, see "Replacing the system board" on page 64.
... you must replace the system board. www.gateway.com Replacing the modem card This procedure applies to complete this task: 1 black (DVD drive) 2 black (hard drive kit) 2 black (keyboard cover) 1-3 black (keyboard) 4 black (LCD panel hinges) 4 black (palm rest - Some models of the notebook have the modem built into the system board..., you need to select models only. top) 17 black (palm rest - Scribe or non-marring tool Phillips #0 screwdriver Screws removed during this task: Flat-blade driver - For more information, see "Replacing the system board" on page 64.

8511725 - Gateway Service Guide
Page 66
... page 6. 2 Remove the DVD drive by following the instructions in "Replacing the DVD drive" on page 11. 3 If the notebook has IEEE 802.11 wireless networking built in, unplug the antenna cables from the IEEE 802.11 wireless card by following the instructions in... "Replacing the palm rest" on page 56. 62 top) 17 black (palm rest - OR - Phillips #0 screwdriver Screws removed during this task: Flat-blade driver - Replacing Notebook Components Replacing the Bluetooth module Tools you need to complete this task: Scribe or non-marring tool 1 black (DVD drive) 2 black (hard drive kit) 2...
... page 6. 2 Remove the DVD drive by following the instructions in "Replacing the DVD drive" on page 11. 3 If the notebook has IEEE 802.11 wireless networking built in, unplug the antenna cables from the IEEE 802.11 wireless card by following the instructions in... "Replacing the palm rest" on page 56. 62 top) 17 black (palm rest - OR - Phillips #0 screwdriver Screws removed during this task: Flat-blade driver - Replacing Notebook Components Replacing the Bluetooth module Tools you need to complete this task: Scribe or non-marring tool 1 black (DVD drive) 2 black (hard drive kit) 2...
8511725 - Gateway Service Guide
Page 68
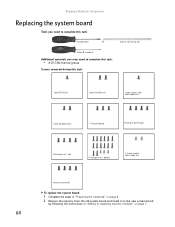
... and install it on the new system board by following the instructions in "Adding or replacing memory modules" on page 7. 64 Replacing Notebook Components Replacing the system board Tools you may need to complete this task: • X-23-7762 thermal grease Screws removed during this ...task: Flat-blade driver - top) 17 black (palm rest - Scribe or non-marring tool Phillips #0 screwdriver Additional materials you need to complete this task: 1 black (...
... and install it on the new system board by following the instructions in "Adding or replacing memory modules" on page 7. 64 Replacing Notebook Components Replacing the system board Tools you may need to complete this task: • X-23-7762 thermal grease Screws removed during this ...task: Flat-blade driver - top) 17 black (palm rest - Scribe or non-marring tool Phillips #0 screwdriver Additional materials you need to complete this task: 1 black (...
8511725 - Gateway Service Guide
Page 71
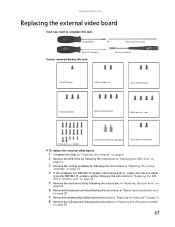
...the cooling assembly by following the instructions in "Replacing the cooling assembly" on page 14. 4 If the notebook has IEEE 802.11 wireless networking built in, unplug the antenna cables from the IEEE 802.11 wireless ...the LCD panel by following the instructions in "Replacing the LCD panel assembly" on page 38. 67 OR - www.gateway.com Replacing the external video board Tools you need to complete this task: 5.0 mm hex nutdriver 1 black (DVD drive... Scribe or non-marring tool Phillips #0 screwdriver Screws removed during this task: Flat-blade driver - top) 17 black (palm rest -
...the cooling assembly by following the instructions in "Replacing the cooling assembly" on page 14. 4 If the notebook has IEEE 802.11 wireless networking built in, unplug the antenna cables from the IEEE 802.11 wireless ...the LCD panel by following the instructions in "Replacing the LCD panel assembly" on page 38. 67 OR - www.gateway.com Replacing the external video board Tools you need to complete this task: 5.0 mm hex nutdriver 1 black (DVD drive... Scribe or non-marring tool Phillips #0 screwdriver Screws removed during this task: Flat-blade driver - top) 17 black (palm rest -
8511725 - Gateway Service Guide
Page 73
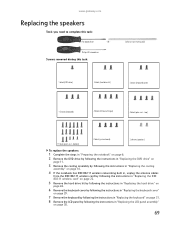
... 2 chrome (speakers) To replace the speakers: 1 Complete the steps in "Preparing the notebook" on page 6. 2 Remove the DVD drive by following the instructions in "Replacing the ... assembly by following the instructions in "Replacing the cooling assembly" on page 14. 4 If the notebook has IEEE 802.11 wireless networking built in, unplug the antenna cables from the IEEE 802.11 ...instructions in "Replacing the LCD panel assembly" on page 38. 69 top) 17 black (palm rest - www.gateway.com Replacing the speakers Tools you need to complete this task: Scribe or non-marring tool 1 black (DVD ...
... 2 chrome (speakers) To replace the speakers: 1 Complete the steps in "Preparing the notebook" on page 6. 2 Remove the DVD drive by following the instructions in "Replacing the ... assembly by following the instructions in "Replacing the cooling assembly" on page 14. 4 If the notebook has IEEE 802.11 wireless networking built in, unplug the antenna cables from the IEEE 802.11 ...instructions in "Replacing the LCD panel assembly" on page 38. 69 top) 17 black (palm rest - www.gateway.com Replacing the speakers Tools you need to complete this task: Scribe or non-marring tool 1 black (DVD ...
8512055 - Component Replacement Manual
Page 5
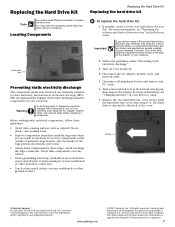
... brands and product names are ready to replace the hard drive. Before working with your notebook. For more information, see "Preparing for software and device driver recovery" in your Reference Guide for Customer Care Information. All other countries. Avoid touching the...of antistatic bags because only the inside your notebook are trademarks or registered trademarks of your notebook. Gateway and eMachines are extremely sensitive to the back of recovery discs or a replacement hard drive with the drivers and applications already installed. Never slide components...
... brands and product names are ready to replace the hard drive. Before working with your notebook. For more information, see "Preparing for software and device driver recovery" in your Reference Guide for Customer Care Information. All other countries. Avoid touching the...of antistatic bags because only the inside your notebook are trademarks or registered trademarks of your notebook. Gateway and eMachines are extremely sensitive to the back of recovery discs or a replacement hard drive with the drivers and applications already installed. Never slide components...

8512055 - Component Replacement Manual
Page 6
... for Customer Care Information. Screws Screws 9 Remove the cover from Gateway with the operating system, applications, and drivers installed, you will see a blank screen, insert the Windows DVD into your notebook, then replace the cover screws. 13 Insert the battery and turn your notebook over. 14 Connect the power adapter, modem cable, and network...
... for Customer Care Information. Screws Screws 9 Remove the cover from Gateway with the operating system, applications, and drivers installed, you will see a blank screen, insert the Windows DVD into your notebook, then replace the cover screws. 13 Insert the battery and turn your notebook over. 14 Connect the power adapter, modem cable, and network...

8511882 - Gateway Notebook User Guide for Windows Vista
Page 8
... quality control tests to provide best-of services and support. Thanks again, from your notebook. We are provided with fast, considerate service. Gateway stands behind our value proposition to our customers-to ensure that you are sure that you... with the best product possible. Each and every Gateway notebook uses the latest technology and passes through the most current drivers, product specifications, tutorials, and personalized information about your new Gateway notebook...
... quality control tests to provide best-of services and support. Thanks again, from your notebook. We are provided with fast, considerate service. Gateway stands behind our value proposition to our customers-to ensure that you are sure that you... with the best product possible. Each and every Gateway notebook uses the latest technology and passes through the most current drivers, product specifications, tutorials, and personalized information about your new Gateway notebook...

8511882 - Gateway Notebook User Guide for Windows Vista
Page 52
... for your network as well. 46 Setting up wired Ethernet network hardware Installing Ethernet cards and drivers After you will be connecting your network to the copper pins in a different order (different ...cable into your computer's jack and the router or the cable or DSL modem at www.gateway.com. The router can provide firewall protection for your network, you have Ethernet already installed.... A router lets you must install one is listed. CHAPTER 5: Networking Your Notebook Determining if an Ethernet card is already installed on your computer To determine if an ...
... for your network as well. 46 Setting up wired Ethernet network hardware Installing Ethernet cards and drivers After you will be connecting your network to the copper pins in a different order (different ...cable into your computer's jack and the router or the cable or DSL modem at www.gateway.com. The router can provide firewall protection for your network, you have Ethernet already installed.... A router lets you must install one is listed. CHAPTER 5: Networking Your Notebook Determining if an Ethernet card is already installed on your computer To determine if an ...
8511882 - Gateway Notebook User Guide for Windows Vista
Page 62
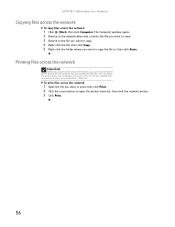
CHAPTER 5: Networking Your Notebook Copying files across the network To copy files across the network: 1 Open the file you want to print, then click Print. 2 Click the arrow button to , then click Paste. Printing files across the network, you must install the driver for the printer on the computer you are ...network Important Before you want to copy. 4 Right-click the file, then click Copy. 5 Right-click the folder where you can obtain the printer driver and installation instructions from the CD that contains the file you want to copy. 3 Browse to the file you want to copy the file to...
CHAPTER 5: Networking Your Notebook Copying files across the network To copy files across the network: 1 Open the file you want to print, then click Print. 2 Click the arrow button to , then click Paste. Printing files across the network, you must install the driver for the printer on the computer you are ...network Important Before you want to copy. 4 Right-click the file, then click Copy. 5 Right-click the folder where you can obtain the printer driver and installation instructions from the CD that contains the file you want to copy. 3 Browse to the file you want to copy the file to...
8511884 - Gateway Notebook Reference Guide for Windows Vista
Page 70
... to provide additional USB ports. • Take a network cable if you need to connect to install an additional driver or software. Tip For more information about emergency travel assistance if your notebook is lost or damaged. • Take your recovery discs in case you need to a network. Some hotels provide...• Carry proof of ownership or a merchandise passport when traveling internationally. • Consult your insurance company and credit card company to learn about installing drivers or Gateway provided software, see "Recovering specific files and software" on page 69. 64
... to provide additional USB ports. • Take a network cable if you need to connect to install an additional driver or software. Tip For more information about emergency travel assistance if your notebook is lost or damaged. • Take your recovery discs in case you need to a network. Some hotels provide...• Carry proof of ownership or a merchandise passport when traveling internationally. • Consult your insurance company and credit card company to learn about installing drivers or Gateway provided software, see "Recovering specific files and software" on page 69. 64
8511884 - Gateway Notebook Reference Guide for Windows Vista
Page 83
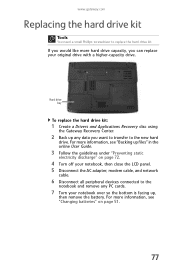
www.gateway.com Replacing the hard drive kit Tools You need a small Phillips screwdriver to the notebook and remove any data you would like more information, see "Changing batteries" on page 72. 4 Turn off your original drive with a higher-capacity drive. For ... to transfer to the new hard drive. Hard drive bay To replace the hard drive kit: 1 Create a Drivers and Applications Recovery disc using the Gateway Recovery Center. 2 Back up any PC cards. 7 Turn your notebook over so the bottom is facing up files" in the online User Guide. 3 Follow the guidelines under "Preventing...
www.gateway.com Replacing the hard drive kit Tools You need a small Phillips screwdriver to the notebook and remove any data you would like more information, see "Changing batteries" on page 72. 4 Turn off your original drive with a higher-capacity drive. For ... to transfer to the new hard drive. Hard drive bay To replace the hard drive kit: 1 Create a Drivers and Applications Recovery disc using the Gateway Recovery Center. 2 Back up any PC cards. 7 Turn your notebook over so the bottom is facing up files" in the online User Guide. 3 Follow the guidelines under "Preventing...


