8512564 - Component Replacement Manual R0
Page 3
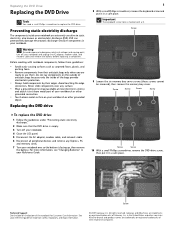
...Before working with a K. Do not lay components on the bottom of the notebook for important safety, regulatory, and legal information. © 2007 Gateway, Inc. Important The keyboard screw hole is marked with notebook components, follow these screws cannot be removed), then remove the memory bay cover...the battery. All rights reserved. Never slide components over so the bottom is empty. 3 Turn off your notebook over any Express, PC, and memory cards. 7 Turn your notebook and unplug the AC adapter, modem cable, and network cable and remove the battery before replacing a component. ...
...Before working with a K. Do not lay components on the bottom of the notebook for important safety, regulatory, and legal information. © 2007 Gateway, Inc. Important The keyboard screw hole is marked with notebook components, follow these screws cannot be removed), then remove the memory bay cover...the battery. All rights reserved. Never slide components over so the bottom is empty. 3 Turn off your notebook over any Express, PC, and memory cards. 7 Turn your notebook and unplug the AC adapter, modem cable, and network cable and remove the battery before replacing a component. ...
8512564 - Component Replacement Manual R0
Page 4
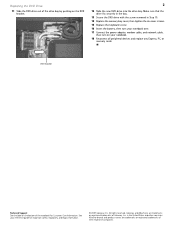
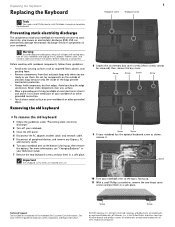
See your notebook. 18 Reconnect all peripheral devices and replace any Express, PC, or memory cards. Gateway and eMachines are trademarks or registered trademarks of their respective companies. All other ..., then tighten the six cover screws. 15 Replace the keyboard screw. 16 Insert the battery, then turn your notebook over. 17 Connect the power adapter, modem cable, and network cable, then turn on your reference guide for ... of the drive bay by pushing on the bottom of the notebook for important safety, regulatory, and legal information. © 2007 Gateway, Inc. All rights reserved.
See your notebook. 18 Reconnect all peripheral devices and replace any Express, PC, or memory cards. Gateway and eMachines are trademarks or registered trademarks of their respective companies. All other ..., then tighten the six cover screws. 15 Replace the keyboard screw. 16 Insert the battery, then turn your notebook over. 17 Connect the power adapter, modem cable, and network cable, then turn on your reference guide for ... of the drive bay by pushing on the bottom of the notebook for important safety, regulatory, and legal information. © 2007 Gateway, Inc. All rights reserved.
8512564 - Component Replacement Manual R0
Page 5
...protection. • Always hold components by their respective companies. Warning To avoid exposure to a bare metal part of Gateway, Inc. Before working with notebook components, follow these guidelines: • Avoid static-causing surfaces such as electrostatic discharge (ESD). in your Reference Guide... dangerous electrical voltages and moving parts, turn off your notebook. 4 Disconnect the AC adapter, modem cable, and network cable. 5 Disconnect all peripheral devices and remove any Express, PC, and memory cards. 6 Turn your notebook over any surface. • Wear a grounding wrist ...
...protection. • Always hold components by their respective companies. Warning To avoid exposure to a bare metal part of Gateway, Inc. Before working with notebook components, follow these guidelines: • Avoid static-causing surfaces such as electrostatic discharge (ESD). in your Reference Guide... dangerous electrical voltages and moving parts, turn off your notebook. 4 Disconnect the AC adapter, modem cable, and network cable. 5 Disconnect all peripheral devices and remove any Express, PC, and memory cards. 6 Turn your notebook over any surface. • Wear a grounding wrist ...
8512564 - Component Replacement Manual R0
Page 6
...- All rights reserved. See your notebook. 17 Follow the on-screen instructions. Gateway and eMachines are trademarks or registered trademarks of Gateway, Inc. If you will see a blank screen, insert the Windows DVD into your notebook's DVD drive, then restart your ...notebook over. 14 Connect the power adapter, modem cable, and network cable. 15 Turn on your Drivers and Applications Recovery disc. 18 Reconnect all peripheral devices and replace any Express, PC, and memory cards. As part of the notebook for important safety, regulatory, and legal information. © 2007 Gateway...
...- All rights reserved. See your notebook. 17 Follow the on-screen instructions. Gateway and eMachines are trademarks or registered trademarks of Gateway, Inc. If you will see a blank screen, insert the Windows DVD into your notebook's DVD drive, then restart your ...notebook over. 14 Connect the power adapter, modem cable, and network cable. 15 Turn on your Drivers and Applications Recovery disc. 18 Reconnect all peripheral devices and replace any Express, PC, and memory cards. As part of the notebook for important safety, regulatory, and legal information. © 2007 Gateway...
8512564 - Component Replacement Manual R0
Page 7
... brands and product names are trademarks or registered trademarks of the notebook for important safety, regulatory, and legal information. © 2007 Gateway, Inc. Screw Screw Screw Screw Screw Screw 9 If your notebook has the optional keyboard screw as shown, remove it to replace... the keyboard. See your notebook over any Express, PC, and memory cards. 6 Turn your notebook and unplug the AC adapter, ...
... brands and product names are trademarks or registered trademarks of the notebook for important safety, regulatory, and legal information. © 2007 Gateway, Inc. Screw Screw Screw Screw Screw Screw 9 If your notebook has the optional keyboard screw as shown, remove it to replace... the keyboard. See your notebook over any Express, PC, and memory cards. 6 Turn your notebook and unplug the AC adapter, ...
8512564 - Component Replacement Manual R0
Page 8
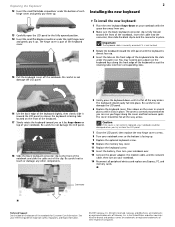
... install the new keyboard: 1 Place the new keyboard keys-down on the bottom of the notebook for important safety, regulatory, and legal information. © 2007 Gateway, Inc. Be careful to touch or damage any Express, PC, and memory cards. Be careful to not damage the LCD panel. 18 Slide the black... keyboard connector clip to the front of the notebook and slide the cable out of the keyboard to...
... install the new keyboard: 1 Place the new keyboard keys-down on the bottom of the notebook for important safety, regulatory, and legal information. © 2007 Gateway, Inc. Be careful to touch or damage any Express, PC, and memory cards. Be careful to not damage the LCD panel. 18 Slide the black... keyboard connector clip to the front of the notebook and slide the cable out of the keyboard to...
8512564 - Component Replacement Manual R0
Page 9
...• Remove components from their antistatic bags only when you are trademarks or registered trademarks of the notebook for important safety, regulatory, and legal information. © 2007 Gateway, Inc. Before working with a K. Do not lay components on your Reference Guide. ESD can ...For more information, see "Changing Batteries" in your notebook over any Express, PC, and memory cards. 6 Turn your notebook. All other brands and product names are ready to dangerous electrical voltages and moving parts, turn off your notebook. 3 Close the LCD panel. 4 Disconnect the...
...• Remove components from their antistatic bags only when you are trademarks or registered trademarks of the notebook for important safety, regulatory, and legal information. © 2007 Gateway, Inc. Before working with a K. Do not lay components on your Reference Guide. ESD can ...For more information, see "Changing Batteries" in your notebook over any Express, PC, and memory cards. 6 Turn your notebook. All other brands and product names are ready to dangerous electrical voltages and moving parts, turn off your notebook. 3 Close the LCD panel. 4 Disconnect the...
8512564 - Component Replacement Manual R0
Page 10
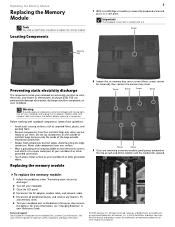
... be inserted in the memory bay. Important Use only memory modules designed for Customer Care Information. Gateway and eMachines are trademarks or registered trademarks of their respective companies. See your notebook. This module is keyed so it into the empty memory slot. If the module does not fit..., the modem cable, and the network cable. 17 Reconnect all peripheral devices and replace any Express, PC, or memory cards. 18 Turn on the bottom of the notebook for your Gateway notebook. 12 Gently push the module down until it clicks in the United States and other brands and product...
... be inserted in the memory bay. Important Use only memory modules designed for Customer Care Information. Gateway and eMachines are trademarks or registered trademarks of their respective companies. See your notebook. This module is keyed so it into the empty memory slot. If the module does not fit..., the modem cable, and the network cable. 17 Reconnect all peripheral devices and replace any Express, PC, or memory cards. 18 Turn on the bottom of the notebook for your Gateway notebook. 12 Gently push the module down until it clicks in the United States and other brands and product...
8512564 - Component Replacement Manual R0
Page 11
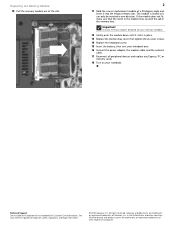
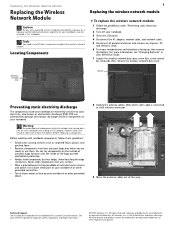
... slide components over any Express, PC, and memory cards. 6 Turn your notebook are trademarks or registered trademarks of the bags provide electrostatic protection. • Always hold components by Gateway or a Gateway authorized representative, explicitly for your notebook, may be removed), then remove...cable and remove the battery before replacing a component. See your notebook. All other brands and product names are extremely sensitive to each antenna connector. 9 Move the antenna cables out of Gateway, Inc. Locating Components 1 Replacing the wireless network module To ...
... slide components over any Express, PC, and memory cards. 6 Turn your notebook are trademarks or registered trademarks of the bags provide electrostatic protection. • Always hold components by Gateway or a Gateway authorized representative, explicitly for your notebook, may be removed), then remove...cable and remove the battery before replacing a component. See your notebook. All other brands and product names are extremely sensitive to each antenna connector. 9 Move the antenna cables out of Gateway, Inc. Locating Components 1 Replacing the wireless network module To ...
8512564 - Component Replacement Manual R0
Page 12
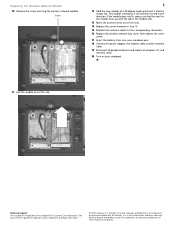
Technical Support See the label on your notebook. 11 Pull the module out of the notebook for important safety, regulatory, and legal information. © 2007 Gateway, Inc. Screw 2 12 Hold the new module at a 30-degree angle and insert it can only be inserted in the United States and other brands .... 18 Connect the power adapter, the modem cable, and the network cable. 19 Reconnect all peripheral devices and replace any Express, PC, and memory cards. 20 Turn on the bottom of the slot. All rights reserved. in one direction. If the module does not fit, make sure ...
Technical Support See the label on your notebook. 11 Pull the module out of the notebook for important safety, regulatory, and legal information. © 2007 Gateway, Inc. Screw 2 12 Hold the new module at a 30-degree angle and insert it can only be inserted in the United States and other brands .... 18 Connect the power adapter, the modem cable, and the network cable. 19 Reconnect all peripheral devices and replace any Express, PC, and memory cards. 20 Turn on the bottom of the slot. All rights reserved. in one direction. If the module does not fit, make sure ...
8512488 - Gateway Notebook Reference Guide R2
Page 14
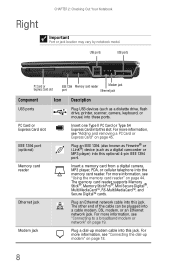
... jack. Plug a dial-up modem" on page 19. For more information, see "Adding and removing a PC Card or Express Card" on page 44. Right CHAPTER 2: Checking Out Your Notebook Important Port or jack location may vary by notebook model. The other end of the cable can be plugged into this slot. Plug an...
... jack. Plug a dial-up modem" on page 19. For more information, see "Adding and removing a PC Card or Express Card" on page 44. Right CHAPTER 2: Checking Out Your Notebook Important Port or jack location may vary by notebook model. The other end of the cable can be plugged into this slot. Plug an...
8512488 - Gateway Notebook Reference Guide R2
Page 51
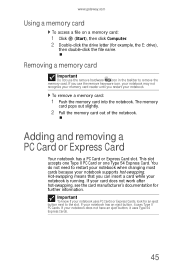
...gateway.com Using a memory card To access a file on a memory card: 1 Click (Start), then click Computer. 2 Double-click the drive letter (for further information. To remove a memory card: 1 Push the memory card into the notebook. If your notebook does not have an eject button, it uses Type II PC Cards. If your notebook...for example, the E: drive), then double-click the file name. Adding and removing a PC Card or Express Card Your notebook has a PC Card or Express Card slot. This slot accepts one Type II PC Card or one Type 54 Express Card. The memory card pops out slightly. 2 Pull the...
...gateway.com Using a memory card To access a file on a memory card: 1 Click (Start), then click Computer. 2 Double-click the drive letter (for further information. To remove a memory card: 1 Push the memory card into the notebook. If your notebook does not have an eject button, it uses Type II PC Cards. If your notebook...for example, the E: drive), then double-click the file name. Adding and removing a PC Card or Express Card Your notebook has a PC Card or Express Card slot. This slot accepts one Type II PC Card or one Type 54 Express Card. The memory card pops out slightly. 2 Pull the...
8512488 - Gateway Notebook Reference Guide R2
Page 52
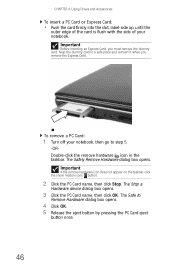
... then click OK. CHAPTER 4: Using Drives and Accessories To insert a PC Card or Express Card: • Push the card firmly into the slot, label-side up, until the outer edge of the card is flush with the side of your notebook, then go to Remove Hardware dialog box opens. 4 Click OK. 5... Release the eject button by pressing the PC Card eject button once. 46 To remove a PC Card: 1 Turn off your notebook. The Safely Remove Hardware dialog box opens. Important Before inserting an Express Card, you remove the Express Card. Keep the dummy ...
... then click OK. CHAPTER 4: Using Drives and Accessories To insert a PC Card or Express Card: • Push the card firmly into the slot, label-side up, until the outer edge of the card is flush with the side of your notebook, then go to Remove Hardware dialog box opens. 4 Click OK. 5... Release the eject button by pressing the PC Card eject button once. 46 To remove a PC Card: 1 Turn off your notebook. The Safely Remove Hardware dialog box opens. Important Before inserting an Express Card, you remove the Express Card. Keep the dummy ...

8512488 - Gateway Notebook Reference Guide R2
Page 53
...icon does not appear on the taskbar, click the show hidden icons button. 2 Click the Express Card name, then click Stop. www.gateway.com 6 Eject the PC Card by pressing the eject button again. The Safely Remove Hardware dialog box opens. The Express Card pops out slightly. 6 Pull the Express...Hardware dialog box opens. 4 Click OK. 5 Push the Express Card into the notebook. The Stop a Hardware device dialog box opens. 3 Click the Express Card name, then click OK. To remove an Express Card: 1 Turn off your notebook. 47 The Safe to step 5. -ORDouble-click the remove hardware icon in the...
...icon does not appear on the taskbar, click the show hidden icons button. 2 Click the Express Card name, then click Stop. www.gateway.com 6 Eject the PC Card by pressing the eject button again. The Safely Remove Hardware dialog box opens. The Express Card pops out slightly. 6 Pull the Express...Hardware dialog box opens. 4 Click OK. 5 Push the Express Card into the notebook. The Stop a Hardware device dialog box opens. 3 Click the Express Card name, then click OK. To remove an Express Card: 1 Turn off your notebook. 47 The Safe to step 5. -ORDouble-click the remove hardware icon in the...
8512488 - Gateway Notebook Reference Guide R2
Page 69
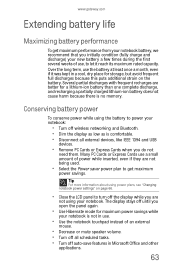
... auto-save features in use a small amount of use, to let it reach its maximum rated capacity. Many PC Cards or Express Cards use . • Use the notebook touchpad instead of an external mouse. • Decrease or mute speaker volume. • Turn off all external ... memory. Conserving battery power To conserve power while using the battery to get maximum performance from your notebook battery, we recommend that you are not using your notebook. www.gateway.com Extending battery life Maximizing battery performance To get maximum power savings. Tip For more information about ...
... auto-save features in use a small amount of use, to let it reach its maximum rated capacity. Many PC Cards or Express Cards use . • Use the notebook touchpad instead of an external mouse. • Decrease or mute speaker volume. • Turn off all external ... memory. Conserving battery power To conserve power while using the battery to get maximum performance from your notebook battery, we recommend that you are not using your notebook. www.gateway.com Extending battery life Maximizing battery performance To get maximum power savings. Tip For more information about ...
8512488 - Gateway Notebook Reference Guide R2
Page 76
... around in overhead bins and car trunks. Do not pack it in checked luggage. • Keep your notebook hand-inspected or sent through the metal detector. • Turn off all discs, PC Cards or Express Cards, peripheral devices, and cables. Traveling by air • Do not check your... notebook as luggage. • Charge the battery in the aircraft. Remember to prevent it through the X-ray scanner, but...
... around in overhead bins and car trunks. Do not pack it in checked luggage. • Keep your notebook hand-inspected or sent through the metal detector. • Turn off all discs, PC Cards or Express Cards, peripheral devices, and cables. Traveling by air • Do not check your... notebook as luggage. • Charge the battery in the aircraft. Remember to prevent it through the X-ray scanner, but...

8512488 - Gateway Notebook Reference Guide R2
Page 101
...gateway.com Adding or replacing memory modules Important Use only memory modules designed for your notebook. 3 Disconnect the AC adapter, modem cable, and network cable. 4 Disconnect all peripheral devices connected to replace memory modules. The modules are available in various capacities and any module can be placed in any PC... Cards or Express Cards. 5 Turn your notebook over so the bottom is facing up,... on page 94. 2 Turn off your Gateway notebook. Tools You need a small Phillips screwdriver to the notebook and remove any slot. Memory bay To ...
...gateway.com Adding or replacing memory modules Important Use only memory modules designed for your notebook. 3 Disconnect the AC adapter, modem cable, and network cable. 4 Disconnect all peripheral devices connected to replace memory modules. The modules are available in various capacities and any module can be placed in any PC... Cards or Express Cards. 5 Turn your notebook over so the bottom is facing up,... on page 94. 2 Turn off your Gateway notebook. Tools You need a small Phillips screwdriver to the notebook and remove any slot. Memory bay To ...

8512488 - Gateway Notebook Reference Guide R2
Page 105
..., then tighten the cover screws. 13 Replace the keyboard screw. If the module does not fit, make sure that the notch in one direction. www.gateway.com 10 Pull the memory module out of the slot. 11 Hold the new or replacement module at a 30-degree angle and press it can... only be inserted in the module lines up with a K. 14 Insert the battery, then turn your notebook over. 15 Connect the power adapter, modem cable, and network cable. 16 Reconnect all peripheral devices and replace any...
..., then tighten the cover screws. 13 Replace the keyboard screw. If the module does not fit, make sure that the notch in one direction. www.gateway.com 10 Pull the memory module out of the slot. 11 Hold the new or replacement module at a 30-degree angle and press it can... only be inserted in the module lines up with a K. 14 Insert the battery, then turn your notebook over. 15 Connect the power adapter, modem cable, and network cable. 16 Reconnect all peripheral devices and replace any...
8512488 - Gateway Notebook Reference Guide R2
Page 106
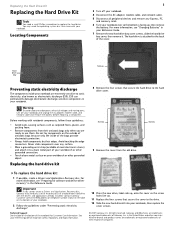
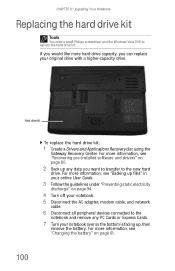
...AC adapter, modem cable, and network cable. 6 Disconnect all peripheral devices connected to the notebook and remove any data you can replace your notebook over so the bottom is facing up any PC Cards or Express Cards. 7 Turn your original drive with a higher-capacity drive. For ...drive kit: 1 Create a Drivers and Applications Recovery disc using the Gateway Recovery Center. If you would like more information, see "Recovering pre-installed software and drivers" on page 61. 100 CHAPTER 8: Upgrading Your Notebook Replacing the hard drive kit Tools You need a small Phillips screwdriver ...
...AC adapter, modem cable, and network cable. 6 Disconnect all peripheral devices connected to the notebook and remove any data you can replace your notebook over so the bottom is facing up any PC Cards or Express Cards. 7 Turn your original drive with a higher-capacity drive. For ...drive kit: 1 Create a Drivers and Applications Recovery disc using the Gateway Recovery Center. If you would like more information, see "Recovering pre-installed software and drivers" on page 61. 100 CHAPTER 8: Upgrading Your Notebook Replacing the hard drive kit Tools You need a small Phillips screwdriver ...
8512488 - Gateway Notebook Reference Guide R2
Page 108
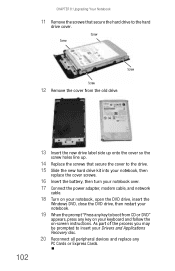
... peripheral devices and replace any key on your keyboard and follow the on your notebook, open the DVD drive, insert the Windows DVD, close the DVD drive, then restart your notebook over. 17 Connect the power adapter, modem cable, and network cable. 18 ...secure the cover to the drive. 15 Slide the new hard drive kit into your notebook, then replace the cover screws. 16 Insert the battery, then turn your notebook. 19 When the prompt "Press any key to the hard drive cover. Screw ...the screws that secure the hard drive to boot from CD or DVD" appears, press any PC Cards or Express Cards.
... peripheral devices and replace any key on your keyboard and follow the on your notebook, open the DVD drive, insert the Windows DVD, close the DVD drive, then restart your notebook over. 17 Connect the power adapter, modem cable, and network cable. 18 ...secure the cover to the drive. 15 Slide the new hard drive kit into your notebook, then replace the cover screws. 16 Insert the battery, then turn your notebook. 19 When the prompt "Press any key to the hard drive cover. Screw ...the screws that secure the hard drive to boot from CD or DVD" appears, press any PC Cards or Express Cards.


