8512564 - Component Replacement Manual R0
Page 6
...the United States and other brands and product names are trademarks or registered trademarks of the process, you will see the Windows startup screen. Replacing the Hard Drive Kit 2 13 Insert the battery, then turn your notebook over. 14 Connect the power adapter, modem cable, ... 18. -OR- See your Drivers and Applications Recovery disc. 18 Reconnect all peripheral devices and replace any Express, PC, and memory cards. All other countries. As part of Gateway, Inc. Gateway and eMachines are trademarks or registered trademarks of the notebook for important safety, regulatory, and legal...
...the United States and other brands and product names are trademarks or registered trademarks of the process, you will see the Windows startup screen. Replacing the Hard Drive Kit 2 13 Insert the battery, then turn your notebook over. 14 Connect the power adapter, modem cable, ... 18. -OR- See your Drivers and Applications Recovery disc. 18 Reconnect all peripheral devices and replace any Express, PC, and memory cards. All other countries. As part of Gateway, Inc. Gateway and eMachines are trademarks or registered trademarks of the notebook for important safety, regulatory, and legal...
8512488 - Gateway Notebook Reference Guide R2
Page 5
www.gateway.com Conserving battery power 63 Using alternate power sources 64 Changing power modes 64 Changing notebook... . . 75 Caring for your notebook 76 Cleaning your notebook 76 Cleaning the exterior 77 Cleaning the keyboard 77 Cleaning the notebook screen 77 Maintaining the battery 78 Storing batteries 78 Cleaning CDs or DVDs 79 Recovering your system 79 Recovering pre-installed software and drivers 80...the Windows DVD 90 Chapter 8: Upgrading Your Notebook 93 Preventing static electricity discharge 94 Adding or replacing memory modules 95 Replacing the hard drive kit 100 iii
www.gateway.com Conserving battery power 63 Using alternate power sources 64 Changing power modes 64 Changing notebook... . . 75 Caring for your notebook 76 Cleaning your notebook 76 Cleaning the exterior 77 Cleaning the keyboard 77 Cleaning the notebook screen 77 Maintaining the battery 78 Storing batteries 78 Cleaning CDs or DVDs 79 Recovering your system 79 Recovering pre-installed software and drivers 80...the Windows DVD 90 Chapter 8: Upgrading Your Notebook 93 Preventing static electricity discharge 94 Adding or replacing memory modules 95 Replacing the hard drive kit 100 iii
8512488 - Gateway Notebook Reference Guide R2
Page 83
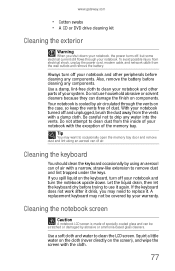
... wall outlets and remove the battery. Also, remove the battery before cleaning any water into the vents. Do not use it . A replacement keyboard may need to clean your notebook and other peripherals before trying to occasionally open the memory bay door and remove dust and lint using...keyboard You should clean the keyboard occasionally by air circulated through your notebook and other parts of air. Do not attempt to clean the LCD screen. www.gateway.com • Cotton swabs • A CD or DVD drive cleaning kit Cleaning the exterior Warning When you shut down . Your notebook...
... wall outlets and remove the battery. Also, remove the battery before cleaning any water into the vents. Do not use it . A replacement keyboard may need to clean your notebook and other peripherals before trying to occasionally open the memory bay door and remove dust and lint using...keyboard You should clean the keyboard occasionally by air circulated through your notebook and other parts of air. Do not attempt to clean the LCD screen. www.gateway.com • Cotton swabs • A CD or DVD drive cleaning kit Cleaning the exterior Warning When you shut down . Your notebook...
8512488 - Gateway Notebook Reference Guide R2
Page 108
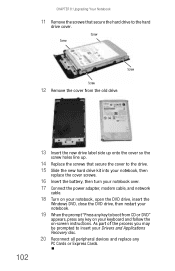
... you may be prompted to insert your keyboard and follow the on-screen instructions. CHAPTER 8: Upgrading Your Notebook 11 Remove the screws that secure the cover to the drive. 15 Slide the new hard drive kit into your notebook, then replace the cover screws. 16 Insert the battery, then turn your notebook... 12 Remove the cover from CD or DVD" appears, press any key on your Drivers and Applications Recovery disc. 20 Reconnect all peripheral devices and replace any key to boot from the old drive. 102 13 Insert the new drive label side up onto the cover so the screw holes line...
... you may be prompted to insert your keyboard and follow the on-screen instructions. CHAPTER 8: Upgrading Your Notebook 11 Remove the screws that secure the cover to the drive. 15 Slide the new hard drive kit into your notebook, then replace the cover screws. 16 Insert the battery, then turn your notebook... 12 Remove the cover from CD or DVD" appears, press any key on your Drivers and Applications Recovery disc. 20 Reconnect all peripheral devices and replace any key to boot from the old drive. 102 13 Insert the new drive label side up onto the cover so the screw holes line...
8512488 - Gateway Notebook Reference Guide R2
Page 113
www.gateway.com The text on the display...brightness, see "Identifying drive types" on page 35. • Change the display settings. Gateway's inspection standards keep these pixels are always dark or too bright • This condition is...sources of pixels affected. Press FN + F4 several times to identify whether a repair or replacement is not in place. • Make sure that the disc label is facing up, then...TFT technology used in your online User Guide. • Move your display, contact Gateway Customer Care to toggle through the LCD panel, an external monitor or projector, or ...
www.gateway.com The text on the display...brightness, see "Identifying drive types" on page 35. • Change the display settings. Gateway's inspection standards keep these pixels are always dark or too bright • This condition is...sources of pixels affected. Press FN + F4 several times to identify whether a repair or replacement is not in place. • Make sure that the disc label is facing up, then...TFT technology used in your online User Guide. • Move your display, contact Gateway Customer Care to toggle through the LCD panel, an external monitor or projector, or ...
8512488 - Gateway Notebook Reference Guide R2
Page 119
.... VGA only transmits video. Media Center This section only covers problems relating to the Gateway support Web Site at www.gateway.com. Your notebook has two video outputs: • VGA-If your TV or ...mode is the best choice. • Type of connection used , quality of video cables, display device screen resolution, size of TV, age of the TV, or the type of TV (interlaced or progressive scan...box, then press ENTER. Type the phrase Media Center in the keyboard, turn it upside down to replace it . You should use the built-in speakers, a set of connection used -You can affect the...
.... VGA only transmits video. Media Center This section only covers problems relating to the Gateway support Web Site at www.gateway.com. Your notebook has two video outputs: • VGA-If your TV or ...mode is the best choice. • Type of connection used , quality of video cables, display device screen resolution, size of TV, age of the TV, or the type of TV (interlaced or progressive scan...box, then press ENTER. Type the phrase Media Center in the keyboard, turn it upside down to replace it . You should use the built-in speakers, a set of connection used -You can affect the...
8512488 - Gateway Notebook Reference Guide R2
Page 122
...Not enough memory" error message • Close all programs, then restart your notebook. For more information about installing memory, see "Adding or replacing memory modules" on page 8. The Control Panel window opens. 2 Click System and Maintenance. 3 Click Administrative Tools. 4 Double-click Memory Diagnostics... Tool, then follow the on a home DVD player. DVDs recorded with the Media Center can be played on -screen instructions. CHAPTER 9: Troubleshooting You want to know whether you can play recorded videos on your network jack, see "Right" on page ...
...Not enough memory" error message • Close all programs, then restart your notebook. For more information about installing memory, see "Adding or replacing memory modules" on page 8. The Control Panel window opens. 2 Click System and Maintenance. 3 Click Administrative Tools. 4 Double-click Memory Diagnostics... Tool, then follow the on a home DVD player. DVDs recorded with the Media Center can be played on -screen instructions. CHAPTER 9: Troubleshooting You want to know whether you can play recorded videos on your network jack, see "Right" on page ...
8512488 - Gateway Notebook Reference Guide R2
Page 153
...USB port 8 programs closing unresponsive 22 opening 30 recovery discs 81, 84 re-installing 80 projector adding 50 color quality 52 port 9 screen resolution 52 troubleshooting 128 using 26, 53 Properties button 33 R radio approval authorities 71 radio frequency wireless connections 71 RAM See memory ...re-installing defaults 89 drivers 80 programs 79, 80 software 79, 80 Windows 79, 80 with Gateway Recovery Center 83 with Windows DVD 90 with Windows System Restore 86 replacing See installing resetting notebook 22 restarting notebook 22 restoring defaults 89 drivers 80 programs 80 software 80...
...USB port 8 programs closing unresponsive 22 opening 30 recovery discs 81, 84 re-installing 80 projector adding 50 color quality 52 port 9 screen resolution 52 troubleshooting 128 using 26, 53 Properties button 33 R radio approval authorities 71 radio frequency wireless connections 71 RAM See memory ...re-installing defaults 89 drivers 80 programs 79, 80 software 79, 80 Windows 79, 80 with Gateway Recovery Center 83 with Windows DVD 90 with Windows System Restore 86 replacing See installing resetting notebook 22 restarting notebook 22 restoring defaults 89 drivers 80 programs 80 software 80...


