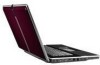
MUWA200008 - Gateway Notebook Reference Guide with eRecovery (English)
Page 3
... About This Reference 1 About this guide 2 Accessing your online User Guide 2 Gateway contact information 2 Contacting Gateway Customer Care 2 Gateway model and serial number 3 Microsoft Certificate of Authenticity 3 For more information 3 Chapter 2: Checking Out Your Notebook . . . 5 Front 6 Left 7 Right 9 Back 10 Bottom 11 Keyboard... 16 Reducing eye strain 16 Setting up your computer desk and chair . . . . . 17 Sitting at your notebook 17 Avoiding discomfort and injury from repetitive strain 18 Connecting the AC adapter 18 Protecting from power source problems 20 Connecting ...
MUWA200008 - Gateway Notebook Reference Guide with eRecovery (English)
Page 5
www.gateway.com Using alternate power sources 67 Changing power modes 68 Changing notebook power settings 69 Changing the power plan 69 Changing advanced settings 71 Chapter 6: Traveling with Your Notebook . 73 Packing your notebook 74 Traveling by air 74 Dial-up modem 74 Radio frequency ... 75 Security 76 Power 77 Additional tips 78 Chapter 7: Maintaining Your Notebook . . . 79 Caring for your notebook 80 Cleaning your notebook 80 Cleaning the exterior 81 Cleaning the keyboard 81 Cleaning the notebook screen 82 Maintaining the battery 82 Storing batteries 83 Cleaning CDs or ...
MUWA200008 - Gateway Notebook Reference Guide with eRecovery (English)
Page 8
... has been included on the following topics: • Help and technical support • Using and customizing Windows and other notebook information, see your online User Guide. Your User Guide is an in-depth, easy-to-read manual that are specific to...includes information on your online User Guide: • Click (Start), All Programs, then click Gateway Documentation. Gateway contact information Contacting Gateway Customer Care Your Setup Guide contains information about contacting Gateway Customer Care. 2 For all other software • Using the Internet • Protecting your ...
MUWA200008 - Gateway Notebook Reference Guide with eRecovery (English)
Page 9
...features ordered, and location. The Support page also has links to additional Gateway documentation and detailed specifications. 3 For more information For more information about your notebook, visit Gateway's Support page at www.gateway.com or the Web address shown on your operating system. Microsoft Certificate ... informational purposes only. The Microsoft Certificate of Authenticity label found on the bottom of your notebook contains information that identifies your notebook model and its features. www.gateway.com Gateway model and serial number A label on the bottom of your...
MUWA200008 - Gateway Notebook Reference Guide with eRecovery (English)
Page 12
... Headphone 1 with SPDIF support • Headphone 2 Microphone jack Plug a microphone into this jack. The built-in . 6 Notebook is off when speakers or headphones are not plugged in speakers are turned off . Headphone jack Plug amplified speakers or headphones into...battery charge is malfunctioning. Battery is very low. Battery is charging. • LED blinking red - CHAPTER 2: Checking Out Your Notebook Front Power indicator Battery charge indicator Headphone jack 1 Headphone jack 2 Microphone jack Speaker Component Icon Description Power indicator • LED on...
MUWA200008 - Gateway Notebook Reference Guide with eRecovery (English)
Page 14
For more information, see "Connecting the optional dial-up modem cable into this port. Secure your notebook to an object by connecting a Kensington cable lock to this connector. 8 Plug the AC adapter cable into this slot. CHAPTER 2: Checking Out Your Notebook Component Modem jack (optional) Kensington™ lock slot Monitor port Power connector Icon Description Plug a dial-up modem" on page 55. For more information, see "Viewing the display on a projector, monitor, or television" on page 21. Plug an analog VGA monitor or projector into this optional jack.
MUWA200008 - Gateway Notebook Reference Guide with eRecovery (English)
Page 15
Right www.gateway.com Component DVD drive USB port DVD drive Icon Description USB ports Insert CDs or DVDs into this drive. To determine the type of drive in your notebook, examine the drive tray's plastic cover and compare the logo to those listed in "Identifying drive types" on page 48. Plug a USB device (such as a diskette drive, flash drive, printer, scanner, camera, keyboard, or mouse) into this port. 9 For more information, see "Using the DVD drive" on page 48.
MUWA200008 - Gateway Notebook Reference Guide with eRecovery (English)
Page 16
... into these slots are blocked, your notebook so air vents are blocked, the notebook may overheat resulting in unexpected shutdown or permanent damage to harm your lap. Caution: Provide adequate space around your notebook may become hot enough to the notebook. If these slots. Warning: Do ...not work with the notebook resting on a bed, sofa, rug, or other similar surface. 10 If the air...
MUWA200008 - Gateway Notebook Reference Guide with eRecovery (English)
Page 17
Battery lock Slide to release the battery. For more information, see "Changing batteries" on page 63. For more information, see "Changing batteries" on page 63. Hard drive bay The hard drive is not plugged into AC power. Bottom www.gateway.com Battery Battery latch Battery lock Ventilation slots and cooling fan Hard drive bay Memory bay Component Icon Description Battery Provides power when the notebook is located in this bay. 11 Battery latch Slide to unlock the battery.
MUWA200008 - Gateway Notebook Reference Guide with eRecovery (English)
Page 18
...other similar surface. Caution: Do not block or insert objects into these slots are blocked, the notebook may overheat resulting in this bay. Do not use the notebook on your notebook so air vents are located in unexpected shutdown or permanent damage to harm your skin. Keyboard area ... touch controls (optional) Status indicators Keyboard Microphones Multimedia panel (optional) Status indicators 12 Touchpad CHAPTER 2: Checking Out Your Notebook Component Icon Memory bay Ventilation fan Description Memory modules are not obstructed. Helps cool internal components.
MUWA200008 - Gateway Notebook Reference Guide with eRecovery (English)
Page 20
For more information, see who they are communicating with when making VoIP calls. CHAPTER 2: Checking Out Your Notebook LCD panel Webcam (optional) Ambient Light Sensor (optional) Component Icon Description Webcam (optional) Use to save power. Important The Ambient Light Sensor feature can be ... process. 14 Ambient Light Sensor (optional) Detects the amount of lights available & adjusts display brightness accordingly to let others see "Using the webcam" on your notebook. 2 As soon as your notebook starts and you see a startup screen, press F2.
MUWA200008 - Gateway Notebook Reference Guide with eRecovery (English)
Page 21
CHAPTER3 Setting Up and Getting Started • Working safely and comfortably • Connecting the AC adapter • Connecting to a broadband modem or network • Connecting the optional dial-up modem • Starting your notebook • Turning off your notebook • Restarting (rebooting) your notebook • Using the status indicators • Using the keyboard • Using the EZ Pad touchpad • Using the optional multimedia panel • Using the webcam • Adjusting the brightness • Adjusting the volume 15
MUWA200008 - Gateway Notebook Reference Guide with eRecovery (English)
Page 22
... indoor lighting should not reflect on the sides clear. CHAPTER 3: Setting Up and Getting Started Working safely and comfortably Before using your notebook, follow these general guidelines for setting up a safe and comfortable work area. Soft surfaces can avoid glare on your screen and light...directly into your eyes. Instead, use a laptop desk to protect your legs. • Do not use your notebook on a rigid, hard surface, and make sure that you can block your notebook's ventilation openings, leading to overheating, permanent damage to your lap, a blanket, carpet, or a sofa. Reduce...
MUWA200008 - Gateway Notebook Reference Guide with eRecovery (English)
Page 23
... hips, and elbows form right angles when you work. • Take breaks to stand and stretch your legs. • Avoid twisting your wrists. www.gateway.com • Avoid focusing your eyes on your screen for your computer desk. • Adjust the height of your computer desk and chair When you.... This position lets your shoulders relax while you use a pillow or cushion to focus on the back of your head vertical while looking at your notebook • Avoid bending, arching, or angling your torso or neck. 17 Setting up your computer desk and chair, make sure that is comfortable, ...
MUWA200008 - Gateway Notebook Reference Guide with eRecovery (English)
Page 24
... to you expect. The AC adapter has dangerous voltages that can run your notebook using an AC adapter or your notebook's battery. CHAPTER 3: Setting Up and Getting Started Avoiding discomfort and injury from Gateway. Allow three hours for the battery to break up the work day, and... schedule a variety of tasks. Contact Gateway about returning defective AC adapters. For information on ...
MUWA200008 - Gateway Notebook Reference Guide with eRecovery (English)
Page 25
... indicator does not turn on, complete the following steps until it turns on: • Unplug the adapter from your notebook's power connector. 3 Plug the power cord into a different wall outlet. 19 www.gateway.com To connect the AC adapter: 1 Connect the power cord to the AC adapter. 2 Connect the AC adapter ...to your notebook, then plug it back in. • Press FN+F1 to toggle the status lights on and off. • ...
MUWA200008 - Gateway Notebook Reference Guide with eRecovery (English)
Page 26
... problems During a power surge, the voltage level of electricity coming into your notebook. For more information, see "Gateway contact information" on the Customer Care label. Protecting from reaching your notebook can increase to a broadband modem or network Your notebook has a network jack that has a modem jack. Connecting to levels far ... to a cable or DSL modem or to AC power until the battery charge indicator turns blue. If you finish using your notebook for the first time, turn blue after three hours, contact Gateway Customer Care at the location shown on page 2.
MUWA200008 - Gateway Notebook Reference Guide with eRecovery (English)
Page 27
...To reduce the risk of fire, use to connect to a standard telephone line. Connecting the optional dial-up modem Your notebook may have a built-in 56K modem that the plug locks into the jack. 2 Insert the other end of the ...network cable into the network jack on your dialup modem connection. 21 www.gateway.com To connect to a cable or DSL modem or to a wired Ethernet network: 1 Insert one end of the network cable into a...26 AWG or larger (for example, No. 24 AWG) UL-listed or CSA-certified telecommunication line cord for your notebook.
MUWA200008 - Gateway Notebook Reference Guide with eRecovery (English)
Page 28
CHAPTER 3: Setting Up and Getting Started To connect the optional modem: 1 Insert one end of the modem cable into the modem jack on your notebook. 2 Insert the other end of the modem cable into a telephone wall jack. Important The modem will not work with digital or PBX telephone lines. 22
MUWA200008 - Gateway Notebook Reference Guide with eRecovery (English)
Page 29
... hot enough to create your first user account. 23 To start your skin. Do not use the notebook on your lap. www.gateway.com Starting your notebook Warning Do not work with the notebook resting on a bed, sofa, rug, or other similar surface. Tip For more information about changing ...the power button mode, see "Changing advanced settings" on page 71. 3 If you are starting your notebook for the first ...