User Guide
Page 3
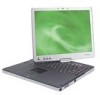
... Out Your Gateway M275 1 Front 2 Left Side 3 Right Side 5 Back 6 Bottom 7 Keyboard area 8 Identifying your model 10 Gateway model number 10 Gateway serial number 11 Internal wireless label 11 Microsoft Certificate of Authenticity 11 Finding your specifications 12 Accessories 13 2 Getting Started 15 Safety instructions 16 General tips 16 Using the battery 17 Using the...
... Out Your Gateway M275 1 Front 2 Left Side 3 Right Side 5 Back 6 Bottom 7 Keyboard area 8 Identifying your model 10 Gateway model number 10 Gateway serial number 11 Internal wireless label 11 Microsoft Certificate of Authenticity 11 Finding your specifications 12 Accessories 13 2 Getting Started 15 Safety instructions 16 General tips 16 Using the battery 17 Using the...
User Guide
Page 6
...another 153 8 Managing Power 155 Monitoring the battery charge 156 Recharging the battery 157 Recalibrating the battery 158 Changing batteries 159 Replacing the battery 160 Extending battery life 162 Conserving battery power 162 Using alternate power sources 163 ...Changing power modes 163 Changing power settings 165 Changing the power scheme 166 Changing alarm options 167 Changing advanced settings 168 Turning on the Power on Lid Lift feature 169 Activating and using Hibernate mode 170 9 Traveling With Your Gateway M275...
...another 153 8 Managing Power 155 Monitoring the battery charge 156 Recharging the battery 157 Recalibrating the battery 158 Changing batteries 159 Replacing the battery 160 Extending battery life 162 Conserving battery power 162 Using alternate power sources 163 ...Changing power modes 163 Changing power settings 165 Changing the power scheme 166 Changing alarm options 167 Changing advanced settings 168 Turning on the Power on Lid Lift feature 169 Activating and using Hibernate mode 170 9 Traveling With Your Gateway M275...
User Guide
Page 9
...or replacing memory in the memory bay 256 Replacing memory under the keyboard 259 Replacing the hard drive kit 267 16 Using the Gateway M275 Port Replicator 271 Front 272 Left side 273 Back 274 Connecting to the port replicator 276 Attaching to the port replicator 276 Disconnecting...277 Securing your port replicator 278 17 Troubleshooting 279 Safety guidelines 280 First steps 281 Software support tools 281 Troubleshooting 282 Audio 282 Battery 282 Device installation 282 Diskette drive (external 283 Display 284 DVD or DVD/CD-RW drives 285 File management 287 Hard drive 288...
...or replacing memory in the memory bay 256 Replacing memory under the keyboard 259 Replacing the hard drive kit 267 16 Using the Gateway M275 Port Replicator 271 Front 272 Left side 273 Back 274 Connecting to the port replicator 276 Attaching to the port replicator 276 Disconnecting...277 Securing your port replicator 278 17 Troubleshooting 279 Safety guidelines 280 First steps 281 Software support tools 281 Troubleshooting 282 Audio 282 Battery 282 Device installation 282 Diskette drive (external 283 Display 284 DVD or DVD/CD-RW drives 285 File management 287 Hard drive 288...

User Guide
Page 26
... not on page 173. 16 www.gateway.com For more information, see "Traveling With Your Gateway M275" on the cable itself. As you disconnect a cable, pull on its power source, and remove the battery. If you have a charged battery available in overhead storage compartments where it ...operation is not impaired but never put your convertible tablet PC through a metal detector. For more information, see "Traveling With Your Gateway M275" on page 173. ■ When traveling, do not check your convertible tablet PC. Chapter 2: Getting Started Safety instructions Certain precautions...
... not on page 173. 16 www.gateway.com For more information, see "Traveling With Your Gateway M275" on the cable itself. As you disconnect a cable, pull on its power source, and remove the battery. If you have a charged battery available in overhead storage compartments where it ...operation is not impaired but never put your convertible tablet PC through a metal detector. For more information, see "Traveling With Your Gateway M275" on page 173. ■ When traveling, do not check your convertible tablet PC. Chapter 2: Getting Started Safety instructions Certain precautions...
User Guide
Page 169
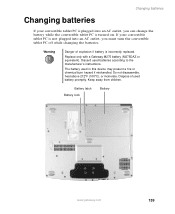
... is turned on. Replace only with a Gateway M275 battery (M275DAZ or equivalent). Battery latch Battery lock Battery www.gateway.com 159 Discard used in this device may present a fire or chemical burn hazard if mishandled. The battery used batteries according to the manufacturer's instructions. Dispose of explosion if battery is incorrectly replaced. Changing batteries Changing batteries If your convertible tablet PC is...
... is turned on. Replace only with a Gateway M275 battery (M275DAZ or equivalent). Battery latch Battery lock Battery www.gateway.com 159 Discard used in this device may present a fire or chemical burn hazard if mishandled. The battery used batteries according to the manufacturer's instructions. Dispose of explosion if battery is incorrectly replaced. Changing batteries Changing batteries If your convertible tablet PC is...
User Guide
Page 184
... securely into the Gateway carrying case, and keep it separate from sliding around in case Security asks you will need while traveling, and do not forget to pack at least one convertible tablet PC pen. ■ Protect the pen by charging the battery in overhead bins ...and car trunks. Secure it to start your convertible tablet PC. ■ Have your convertible tablet PC hand-inspected or sent through the X-ray scanner, but never carry it in your convertible tablet PC ■ Remove all peripheral devices and cables. Chapter 9: Traveling With Your Gateway M275...
... securely into the Gateway carrying case, and keep it separate from sliding around in case Security asks you will need while traveling, and do not forget to pack at least one convertible tablet PC pen. ■ Protect the pen by charging the battery in overhead bins ...and car trunks. Secure it to start your convertible tablet PC. ■ Have your convertible tablet PC hand-inspected or sent through the X-ray scanner, but never carry it in your convertible tablet PC ■ Remove all peripheral devices and cables. Chapter 9: Traveling With Your Gateway M275...

User Guide
Page 232
... the hard drive could be lost or corrupted. ■ Avoid subjecting your convertible tablet PC to extreme temperature changes. Chapter 13: Maintaining Your Gateway M275 Caring for your convertible tablet PC To extend the life of your convertible tablet PC: ■ Be careful not to bump or drop your ...general rule, your convertible tablet PC is not covered by your convertible tablet PC's pen on top of time, unplug AC power and remove the battery after discharging it . Display screen ■ Use only your warranty. The case and LCD panel can become brittle and easy to either extreme is...
... the hard drive could be lost or corrupted. ■ Avoid subjecting your convertible tablet PC to extreme temperature changes. Chapter 13: Maintaining Your Gateway M275 Caring for your convertible tablet PC To extend the life of your convertible tablet PC: ■ Be careful not to bump or drop your ...general rule, your convertible tablet PC is not covered by your convertible tablet PC's pen on top of time, unplug AC power and remove the battery after discharging it . Display screen ■ Use only your warranty. The case and LCD panel can become brittle and easy to either extreme is...
User Guide
Page 264
...most electronics stores) and attach it to static electricity, also known as electrostatic discharge (ESD). Chapter 15: Upgrading Your Gateway M275 Preventing static electricity discharge The components inside your convertible tablet PC and unplug the power cord and modem and network cables before... grounded object. ■ Unplug the power cord and the modem and network cables. ■ Remove the battery. For more information, see "Changing batteries" on your convertible tablet PC. Warning ESD can permanently damage electrostatic discharge-sensitive components in your workbench or ...
...most electronics stores) and attach it to static electricity, also known as electrostatic discharge (ESD). Chapter 15: Upgrading Your Gateway M275 Preventing static electricity discharge The components inside your convertible tablet PC and unplug the power cord and modem and network cables before... grounded object. ■ Unplug the power cord and the modem and network cables. ■ Remove the battery. For more information, see "Changing batteries" on your convertible tablet PC. Warning ESD can permanently damage electrostatic discharge-sensitive components in your workbench or ...
User Guide
Page 268
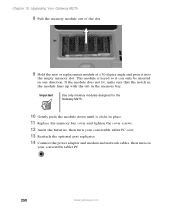
... keyed so it can only be inserted in the memory bay. Chapter 15: Upgrading Your Gateway M275 8 Pull the memory module out of the slot. 9 Hold the new or replacement module...it clicks in place. 11 Replace the memory bay cover and tighten the cover screws. 12 Insert the batteries, then turn your convertible tablet PC over. 13 Reattach the optional port replicator. 14 Connect the power adapter... and modem and network cables, then turn on your convertible tablet PC. 258 www.gateway.com If the module does not fit, make sure that the notch in the module lines up with...
... keyed so it can only be inserted in the memory bay. Chapter 15: Upgrading Your Gateway M275 8 Pull the memory module out of the slot. 9 Hold the new or replacement module...it clicks in place. 11 Replace the memory bay cover and tighten the cover screws. 12 Insert the batteries, then turn your convertible tablet PC over. 13 Reattach the optional port replicator. 14 Connect the power adapter... and modem and network cables, then turn on your convertible tablet PC. 258 www.gateway.com If the module does not fit, make sure that the notch in the module lines up with...

User Guide
Page 269
... up. 4 Remove the battery. For more information, see "Changing batteries" on page 254. 2 Turn off your convertible tablet PC, disconnect the AC adapter and modem and network cables. 3 Turn your memory. Adding or replacing memory Replacing memory under the keyboard Important Use only memory modules designed for the Gateway M275 for upgrading your convertible...
... up. 4 Remove the battery. For more information, see "Changing batteries" on page 254. 2 Turn off your convertible tablet PC, disconnect the AC adapter and modem and network cables. 3 Turn your memory. Adding or replacing memory Replacing memory under the keyboard Important Use only memory modules designed for the Gateway M275 for upgrading your convertible...
User Guide
Page 278
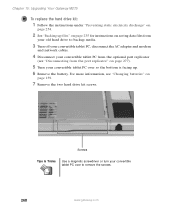
Chapter 15: Upgrading Your Gateway M275 To replace the hard drive kit: 1 Follow the instructions under "Preventing static electricity discharge" on page 254. 2 See "Backing up . 6 Remove the battery. Screws Tips & Tricks Use a magnetic screwdriver or turn your convertible tablet PC over so the bottom is facing up files" on page 235 ...convertible tablet PC, disconnect the AC adapter and modem and network cables. 4 Disconnect your convertible tablet PC from the optional port replicator (see "Changing batteries" on page 277). 5 Turn your old hard drive to remove the screws. 268 www...
Chapter 15: Upgrading Your Gateway M275 To replace the hard drive kit: 1 Follow the instructions under "Preventing static electricity discharge" on page 254. 2 See "Backing up . 6 Remove the battery. Screws Tips & Tricks Use a magnetic screwdriver or turn your convertible tablet PC over so the bottom is facing up files" on page 235 ...convertible tablet PC, disconnect the AC adapter and modem and network cables. 4 Disconnect your convertible tablet PC from the optional port replicator (see "Changing batteries" on page 277). 5 Turn your old hard drive to remove the screws. 268 www...
User Guide
Page 280
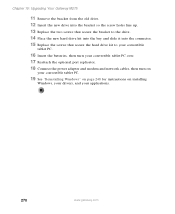
Chapter 15: Upgrading Your Gateway M275 11 Remove the bracket from the old drive. 12 Insert the new drive into the bracket so the screw holes line up. 13 Replace the ... bay and slide it into the connector. 15 Replace the screws that secure the hard drive kit to your convertible tablet PC. 16 Insert the batteries, then turn your convertible tablet PC over. 17 Reattach the optional port replicator. 18 Connect the power adapter and modem and network cables, then turn...
Chapter 15: Upgrading Your Gateway M275 11 Remove the bracket from the old drive. 12 Insert the new drive into the bracket so the screw holes line up. 13 Replace the ... bay and slide it into the connector. 15 Replace the screws that secure the hard drive kit to your convertible tablet PC. 16 Insert the batteries, then turn your convertible tablet PC over. 17 Reattach the optional port replicator. 18 Connect the power adapter and modem and network cables, then turn...
