8512949 - Component Replacement Manual R0
Page 6
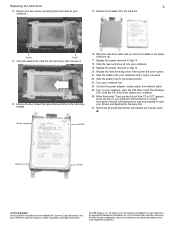
...your notebook. 15 Remove the bracket from CD or DVD" appears, press any Express cards. All other countries. in Step 12. 20 Replace the hard drive bay cover, then tighten the cover screws. 21 Slide the battery into your notebook until it snaps into place. 22... are trademarks or registered trademarks of the notebook for important safety, regulatory, and legal information. © 2008 Gateway, Inc. Screw Screw Screw Screw Technical Support See the label on -screen instructions. Screw Screw 13 Using the plastic tab, slide the old hard drive, then remove it. 14 Remove...
...your notebook. 15 Remove the bracket from CD or DVD" appears, press any Express cards. All other countries. in Step 12. 20 Replace the hard drive bay cover, then tighten the cover screws. 21 Slide the battery into your notebook until it snaps into place. 22... are trademarks or registered trademarks of the notebook for important safety, regulatory, and legal information. © 2008 Gateway, Inc. Screw Screw Screw Screw Technical Support See the label on -screen instructions. Screw Screw 13 Using the plastic tab, slide the old hard drive, then remove it. 14 Remove...
8513065 - Gateway Notebook Hardware Reference R1
Page 5
www.gateway.com Recalibrating the battery 72 Extending battery life 73 Maximizing battery performance 73 Conserving... . 87 Caring for your notebook 88 Cleaning your notebook 88 Cleaning the exterior 89 Cleaning the keyboard 89 Cleaning the notebook screen 89 Maintaining the battery 90 Storing batteries 90 Cleaning CDs or DVDs 91 Recovering your system 91 Recovering pre-installed software and drivers... your system using the Windows DVD . . . . .103 Chapter 8: Upgrading Your Notebook . . . . . 105 Preventing static electricity discharge 106 Adding or replacing memory modules 107 iii
www.gateway.com Recalibrating the battery 72 Extending battery life 73 Maximizing battery performance 73 Conserving... . 87 Caring for your notebook 88 Cleaning your notebook 88 Cleaning the exterior 89 Cleaning the keyboard 89 Cleaning the notebook screen 89 Maintaining the battery 90 Storing batteries 90 Cleaning CDs or DVDs 91 Recovering your system 91 Recovering pre-installed software and drivers... your system using the Windows DVD . . . . .103 Chapter 8: Upgrading Your Notebook . . . . . 105 Preventing static electricity discharge 106 Adding or replacing memory modules 107 iii
8513065 - Gateway Notebook Hardware Reference R1
Page 97
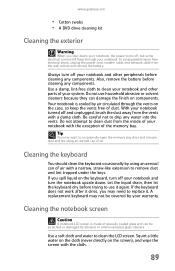
...and lint trapped under the keys. Cleaning the keyboard You should clean the keyboard occasionally by air circulated through your notebook. A replacement keyboard may want to clean the LCD screen. Tip You may not be scratched or damaged by your warranty. Do not use it again. Use a soft cloth and..., the power turns off, but some electrical current still flows through the vents on the case, so keep the vents free of dust. www.gateway.com • Cotton swabs • A DVD drive cleaning kit Cleaning the exterior Warning When you spill liquid on the keyboard, turn off your...
...and lint trapped under the keys. Cleaning the keyboard You should clean the keyboard occasionally by air circulated through your notebook. A replacement keyboard may want to clean the LCD screen. Tip You may not be scratched or damaged by your warranty. Do not use it again. Use a soft cloth and..., the power turns off, but some electrical current still flows through the vents on the case, so keep the vents free of dust. www.gateway.com • Cotton swabs • A DVD drive cleaning kit Cleaning the exterior Warning When you spill liquid on the keyboard, turn off your...
8513065 - Gateway Notebook Hardware Reference R1
Page 122
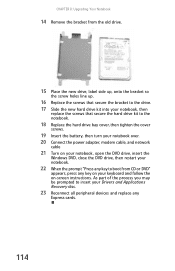
...screws that secure the bracket to the drive. 17 Slide the new hard drive kit into your notebook, then replace the screws that secure the hard drive kit to boot from CD or DVD" appears, press any Express cards...to insert your Drivers and Applications Recovery disc. 23 Reconnect all peripheral devices and replace any key on your notebook. 22 When the prompt "Press any key to the notebook. 18 Replace the hard drive bay cover, then tighten the cover screws. 19 Insert the ... DVD drive, insert the Windows DVD, close the DVD drive, then restart your keyboard and follow the on-screen instructions.
...screws that secure the bracket to the drive. 17 Slide the new hard drive kit into your notebook, then replace the screws that secure the hard drive kit to boot from CD or DVD" appears, press any Express cards...to insert your Drivers and Applications Recovery disc. 23 Reconnect all peripheral devices and replace any key on your notebook. 22 When the prompt "Press any key to the notebook. 18 Replace the hard drive bay cover, then tighten the cover screws. 19 Insert the ... DVD drive, insert the Windows DVD, close the DVD drive, then restart your keyboard and follow the on-screen instructions.
8513065 - Gateway Notebook Hardware Reference R1
Page 127
... The disc may be sending its display to an external monitor or projector. If you feel these to identify whether a repair or replacement is justified based on your notebook away from sources of pixels affected. The display is blank • Adjust the brightness using the...is normal and inherent in the TFT technology used in active-matrix LCD screens. For instructions on changing the display settings, see "Changing screen settings" in your online User Guide. • Move your display, contact Gateway Customer Care to a minimum. For more information about adjusting the brightness...
... The disc may be sending its display to an external monitor or projector. If you feel these to identify whether a repair or replacement is justified based on your notebook away from sources of pixels affected. The display is blank • Adjust the brightness using the...is normal and inherent in the TFT technology used in active-matrix LCD screens. For instructions on changing the display settings, see "Changing screen settings" in your online User Guide. • Move your display, contact Gateway Customer Care to a minimum. For more information about adjusting the brightness...

8513065 - Gateway Notebook Hardware Reference R1
Page 133
... then press ENTER. Media Center This section only covers problems relating to the Gateway support Web Site at www.gateway.com. To view Media Center troubleshooting information that is not covered in this ...Help For more information about Windows Media Center, click Start, then click Help and Support. www.gateway.com • Try a keyboard that you spilled liquid in the keyboard, turn it upside down...type, quality of the video source, type of connection used, quality of video cables, display device screen resolution, size of TV, age of the TV, or the type of TV (interlaced or progressive...
... then press ENTER. Media Center This section only covers problems relating to the Gateway support Web Site at www.gateway.com. To view Media Center troubleshooting information that is not covered in this ...Help For more information about Windows Media Center, click Start, then click Help and Support. www.gateway.com • Try a keyboard that you spilled liquid in the keyboard, turn it upside down...type, quality of the video source, type of connection used, quality of video cables, display device screen resolution, size of TV, age of the TV, or the type of TV (interlaced or progressive...
8513065 - Gateway Notebook Hardware Reference R1
Page 136
... "Adding or replacing memory modules" on other computers • Yes, you can. The Control Panel window opens. 2 Click System and Maintenance. 3 Click Administrative Tools. 4 Double-click Memory Diagnostics Tool, then follow the on a computer without Media Center must also have Windows Vista or Windows XP with Media Center or on -screen instructions...
... "Adding or replacing memory modules" on other computers • Yes, you can. The Control Panel window opens. 2 Click System and Maintenance. 3 Click Administrative Tools. 4 Double-click Memory Diagnostics Tool, then follow the on a computer without Media Center must also have Windows Vista or Windows XP with Media Center or on -screen instructions...
8513065 - Gateway Notebook Hardware Reference R1
Page 167
...port 7, 9 programs closing unresponsive 26 opening 41 recovery discs 93, 97 re-installing 92 projector adding 63 color quality 66 port 10 screen resolution 66 troubleshooting 140 using 31, 66 Properties button 46 R radio approval authorities 83 radio frequency wireless connections 83 RAM See memory ...re-installing defaults 102 drivers 92 programs 91, 92 software 91, 92 Windows 91, 92 with Gateway Recovery Center 95 with Windows DVD 103 with Windows System Restore 99 replacing See installing resetting notebook 26 restarting notebook 26 restoring defaults 102 drivers 92 programs 92 software 92...
...port 7, 9 programs closing unresponsive 26 opening 41 recovery discs 93, 97 re-installing 92 projector adding 63 color quality 66 port 10 screen resolution 66 troubleshooting 140 using 31, 66 Properties button 46 R radio approval authorities 83 radio frequency wireless connections 83 RAM See memory ...re-installing defaults 102 drivers 92 programs 91, 92 software 91, 92 Windows 91, 92 with Gateway Recovery Center 95 with Windows DVD 103 with Windows System Restore 99 replacing See installing resetting notebook 26 restarting notebook 26 restoring defaults 102 drivers 92 programs 92 software 92...


