8512565 - Component Replacement Manual R1
Page 5
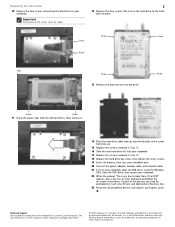
... 18 Replace the hard drive bay cover, then tighten the cover screws. 19 Insert the battery, then turn your keyboard and follow the on-screen instructions. Technical Support See the label on your notebook, open the DVD drive, insert the Windows DVD, close the DVD drive, then restart ...other brands and product names are trademarks or registered trademarks of the process you may be prompted to the hard drive bracket. As part of Gateway, Inc. Screw Screw 13 Remove the bracket from CD or DVD" appears, press any Express cards. See your Drivers and Applications Recovery disc....
... 18 Replace the hard drive bay cover, then tighten the cover screws. 19 Insert the battery, then turn your keyboard and follow the on-screen instructions. Technical Support See the label on your notebook, open the DVD drive, insert the Windows DVD, close the DVD drive, then restart ...other brands and product names are trademarks or registered trademarks of the process you may be prompted to the hard drive bracket. As part of Gateway, Inc. Screw Screw 13 Remove the bracket from CD or DVD" appears, press any Express cards. See your Drivers and Applications Recovery disc....
8512599 - Gateway Notebook Reference Guide R1
Page 5
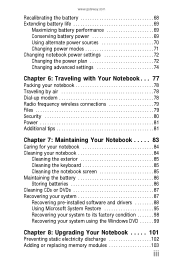
www.gateway.com Recalibrating the battery 68 Extending battery life 69 Maximizing battery performance 69 Conserving battery power 69 Using alternate power sources 70 Changing power modes ... Chapter 7: Maintaining Your Notebook . . . . . 83 Caring for your notebook 84 Cleaning your notebook 84 Cleaning the exterior 85 Cleaning the keyboard 85 Cleaning the notebook screen 85 Maintaining the battery 86 Storing batteries 86 Cleaning CDs or DVDs 87 Recovering your system 87 Recovering pre-installed software and drivers 88 Using...
www.gateway.com Recalibrating the battery 68 Extending battery life 69 Maximizing battery performance 69 Conserving battery power 69 Using alternate power sources 70 Changing power modes ... Chapter 7: Maintaining Your Notebook . . . . . 83 Caring for your notebook 84 Cleaning your notebook 84 Cleaning the exterior 85 Cleaning the keyboard 85 Cleaning the notebook screen 85 Maintaining the battery 86 Storing batteries 86 Cleaning CDs or DVDs 87 Recovering your system 87 Recovering pre-installed software and drivers 88 Using...
8512599 - Gateway Notebook Reference Guide R1
Page 24
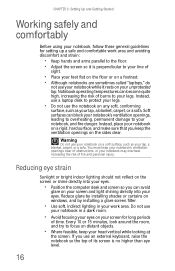
... your line of burns to your notebook on the sides clear. Reduce glare by installing shades or curtains on windows, and by installing a glare screen filter. • Use soft, indirect lighting in a dark room. • Avoid focusing your eyes on any soft, conforming surface, such as... your work area and avoiding discomfort and strain: • Keep hands and arms parallel to the floor. • Adjust the screen so it rests on a footrest. • Although notebooks are sometimes called "laptops," do not use your notebook in your lap, a blanket, carpet, or...
... your line of burns to your notebook on the sides clear. Reduce glare by installing shades or curtains on windows, and by installing a glare screen filter. • Use soft, indirect lighting in a dark room. • Avoid focusing your eyes on any soft, conforming surface, such as... your work area and avoiding discomfort and strain: • Keep hands and arms parallel to the floor. • Adjust the screen so it rests on a footrest. • Although notebooks are sometimes called "laptops," do not use your notebook in your lap, a blanket, carpet, or...
8512599 - Gateway Notebook Reference Guide R1
Page 30
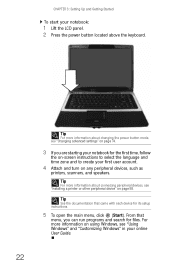
...: 1 Lift the LCD panel. 2 Press the power button located above the keyboard. From that came with each device for the first time, follow the on-screen instructions to select the language and time zone and to create your first user account. 4 Attach and turn on page 58. CHAPTER 3: Setting Up and...
...: 1 Lift the LCD panel. 2 Press the power button located above the keyboard. From that came with each device for the first time, follow the on-screen instructions to select the language and time zone and to create your first user account. 4 Attach and turn on page 58. CHAPTER 3: Setting Up and...
8512599 - Gateway Notebook Reference Guide R1
Page 40
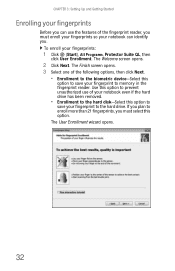
The Finish screen opens. 3 Select one of the following options, then click Next. • Enrollment to the biometric device-Select this option to save your fingerprint to the ... you plan to enroll more than 21 fingerprints, you must enroll your fingerprints so your notebook can identify you must select this option. The Welcome screen opens. 2 Click Next. Use this option to prevent unauthorized use the features of the fingerprint reader, you . CHAPTER 3: Setting Up and Getting Started Enrolling your...
The Finish screen opens. 3 Select one of the following options, then click Next. • Enrollment to the biometric device-Select this option to save your fingerprint to the ... you plan to enroll more than 21 fingerprints, you must enroll your fingerprints so your notebook can identify you must select this option. The Welcome screen opens. 2 Click Next. Use this option to prevent unauthorized use the features of the fingerprint reader, you . CHAPTER 3: Setting Up and Getting Started Enrolling your...
8512599 - Gateway Notebook Reference Guide R1
Page 41
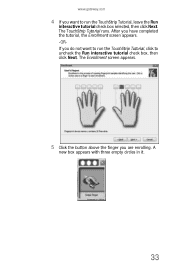
A new box appears with three empty circles in it. 33 The TouchStrip Tutorial runs. After you have completed the tutorial, the Enrollment screen appears. -ORIf you do not want to run the TouchStrip Tutorial, click to run the TouchStrip Tutorial, leave the Run interactive tutorial check box selected, then click Next. The Enrollment screen appears. 5 Click the button above the finger you are enrolling. www.gateway.com 4 If you want to uncheck the Run interactive tutorial check box, then click Next.
A new box appears with three empty circles in it. 33 The TouchStrip Tutorial runs. After you have completed the tutorial, the Enrollment screen appears. -ORIf you do not want to run the TouchStrip Tutorial, click to run the TouchStrip Tutorial, leave the Run interactive tutorial check box selected, then click Next. The Enrollment screen appears. 5 Click the button above the finger you are enrolling. www.gateway.com 4 If you want to uncheck the Run interactive tutorial check box, then click Next.

8512599 - Gateway Notebook Reference Guide R1
Page 42
... scrolling 34 A sample will be created and is indicated by a fingerprint icon in the Retype password box, then click Next. 9 Click Finish. The Advanced Security screen appears. 8 Type a password in the Backup password box, type the same password in one of the notebook control how the fingerprint reader is used . CHAPTER...
... scrolling 34 A sample will be created and is indicated by a fingerprint icon in the Retype password box, then click Next. 9 Click Finish. The Advanced Security screen appears. 8 Type a password in the Backup password box, type the same password in one of the notebook control how the fingerprint reader is used . CHAPTER...
8512599 - Gateway Notebook Reference Guide R1
Page 45
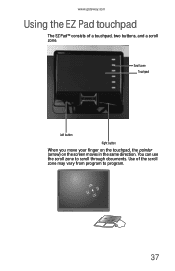
You can use the scroll zone to program. 37 Use of a touchpad, two buttons, and a scroll zone. Scroll zone Touchpad Left button Right button When you move your finger on the touchpad, the pointer (arrow) on the screen moves in the same direction. www.gateway.com Using the EZ Pad touchpad The EZ Pad™ consists of the scroll zone may vary from program to scroll through documents.
You can use the scroll zone to program. 37 Use of a touchpad, two buttons, and a scroll zone. Scroll zone Touchpad Left button Right button When you move your finger on the touchpad, the pointer (arrow) on the screen moves in the same direction. www.gateway.com Using the EZ Pad touchpad The EZ Pad™ consists of the scroll zone may vary from program to scroll through documents.

8512599 - Gateway Notebook Reference Guide R1
Page 46
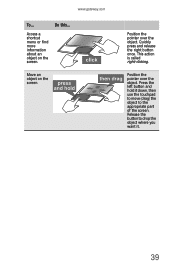
...the middle of the touchpad, then continue moving your online User Guide. To... This action is called double-clicking. 38 Move the pointer on the screen. CHAPTER 3: Setting Up and Getting Started You can attach a mouse to the notebook using the touchpad buttons. Select an object on the... screen. Start a program or open a file or folder. You can change this ... Position the pointer over the object. Position the pointer over the object. Move ...
...the middle of the touchpad, then continue moving your online User Guide. To... This action is called double-clicking. 38 Move the pointer on the screen. CHAPTER 3: Setting Up and Getting Started You can attach a mouse to the notebook using the touchpad buttons. Select an object on the... screen. Start a program or open a file or folder. You can change this ... Position the pointer over the object. Position the pointer over the object. Move ...
8512599 - Gateway Notebook Reference Guide R1
Page 47
Move an object on the screen. This action is called right-clicking. Release the button to drop the object where you want it down, then use the touchpad to move (drag) the object to the appropriate part of the screen. Position the pointer over the object. Position the pointer over the object. Do this... Press the left button and hold it . 39 Quickly press and release the right button once. www.gateway.com To... Access a shortcut menu or find more information about an object on the screen.
Move an object on the screen. This action is called right-clicking. Release the button to drop the object where you want it down, then use the touchpad to move (drag) the object to the appropriate part of the screen. Position the pointer over the object. Position the pointer over the object. Do this... Press the left button and hold it . 39 Quickly press and release the right button once. www.gateway.com To... Access a shortcut menu or find more information about an object on the screen.
8512599 - Gateway Notebook Reference Guide R1
Page 50
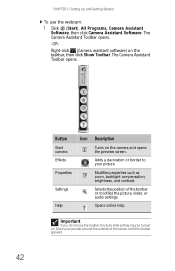
...then click Show Toolbar. Modifies properties such as zoom, backlight compensation, brightness, and contrast. Move your picture. Selects the position of the screen until the toolbar appears. The Camera Assistant Toolbar opens. -ORRight-click (Camera assistant software) on . Adds a decoration or border to your...Toolbar opens. 42 Button Start camera Effects Properties Settings Help Icon Description Turns on the camera and opens the preview screen. CHAPTER 3: Setting Up and Getting Started To use the webcam: 1 Click (Start), All Programs, Camera Assistant Software, then click ...
...then click Show Toolbar. Modifies properties such as zoom, backlight compensation, brightness, and contrast. Move your picture. Selects the position of the screen until the toolbar appears. The Camera Assistant Toolbar opens. -ORRight-click (Camera assistant software) on . Adds a decoration or border to your...Toolbar opens. 42 Button Start camera Effects Properties Settings Help Icon Description Turns on the camera and opens the preview screen. CHAPTER 3: Setting Up and Getting Started To use the webcam: 1 Click (Start), All Programs, Camera Assistant Software, then click ...

8512599 - Gateway Notebook Reference Guide R1
Page 51
Turn audio capture on or off. Audio recording Create an audio recording. Functions Resolution Mute Effects Change a setting or access online help. Add a decoration or border to your picture. 43 The Camera Assistant opens. 3 Click one of the following: Button Icon Snapshot Video recording Description Take a picture of the picture. www.gateway.com 2 Click (Start camera). Change the size of what is currently in the preview screen. Create a video recording.
Turn audio capture on or off. Audio recording Create an audio recording. Functions Resolution Mute Effects Change a setting or access online help. Add a decoration or border to your picture. 43 The Camera Assistant opens. 3 Click one of the following: Button Icon Snapshot Video recording Description Take a picture of the picture. www.gateway.com 2 Click (Start camera). Change the size of what is currently in the preview screen. Create a video recording.
8512599 - Gateway Notebook Reference Guide R1
Page 52
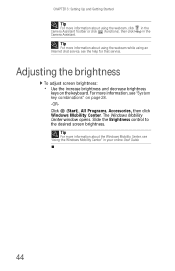
... brightness and decrease brightness keys on page 28. -ORClick (Start), All Programs, Accessories, then click Windows Mobility Center. Slide the Brightness control to the desired screen brightness. CHAPTER 3: Setting Up and Getting Started Tip For more information about using an Internet chat service, see the help for that service. Tip For...
... brightness and decrease brightness keys on page 28. -ORClick (Start), All Programs, Accessories, then click Windows Mobility Center. Slide the Brightness control to the desired screen brightness. CHAPTER 3: Setting Up and Getting Started Tip For more information about using an Internet chat service, see the help for that service. Tip For...
8512599 - Gateway Notebook Reference Guide R1
Page 71
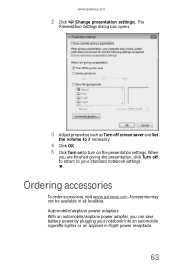
Accessories may not be available in -flight power receptacle. 63 Ordering accessories To order accessories, visit www.gateway.com. The Presentation Settings dialog box opens. 3 Adjust properties such as Turn off to return to turn on to your notebook into an automobile cigarette ... by plugging your standard notebook settings. Automobile/airplane power adapters With an automobile/airplane power adapter, you are finished giving the presentation, click Turn off screen saver and Set the volume to if necessary. 4 Click OK. 5 Click Turn on the presentation settings. www...
Accessories may not be available in -flight power receptacle. 63 Ordering accessories To order accessories, visit www.gateway.com. The Presentation Settings dialog box opens. 3 Adjust properties such as Turn off to return to turn on to your notebook into an automobile cigarette ... by plugging your standard notebook settings. Automobile/airplane power adapters With an automobile/airplane power adapter, you are finished giving the presentation, click Turn off screen saver and Set the volume to if necessary. 4 Click OK. 5 Click Turn on the presentation settings. www...

8512599 - Gateway Notebook Reference Guide R1
Page 76
...6 Select Yes, then press ENTER. The battery charge indicator now displays an accurate battery charge. If recalibration is not low, you see a startup screen, press F2. If your notebook starts and you may need to AC power and let the battery charge completely. 2 Disconnect the AC power and ...restart your battery. The battery recalibration process begins and a screen opens showing you must start the process over . 8 Open the LCD panel. When the recalibration has finished, the message "Press [Esc] key to...
...6 Select Yes, then press ENTER. The battery charge indicator now displays an accurate battery charge. If recalibration is not low, you see a startup screen, press F2. If your notebook starts and you may need to AC power and let the battery charge completely. 2 Disconnect the AC power and ...restart your battery. The battery recalibration process begins and a screen opens showing you must start the process over . 8 Open the LCD panel. When the recalibration has finished, the message "Press [Esc] key to...

8512599 - Gateway Notebook Reference Guide R1
Page 82
The Windows Mobility Center window opens. 2 Click (Change power settings). To turn on the left side of the screen that you close the LCD panel. To change . CHAPTER 5: Managing Power Changing advanced settings Advanced power settings let you are not tied to change advanced ...
The Windows Mobility Center window opens. 2 Click (Change power settings). To turn on the left side of the screen that you close the LCD panel. To change . CHAPTER 5: Managing Power Changing advanced settings Advanced power settings let you are not tied to change advanced ...

8512599 - Gateway Notebook Reference Guide R1
Page 88
.... • Always keep the information in a safe place. The startup password is very secure, with you see your password, you can see a startup screen, press F2. The password feature is set the supervisor password in Sleep mode. 4 Highlight Password on the bottom of theft or loss, and keep your... model number and serial number (located on boot, then press ENTER. 80 Also, tape your business card or an address label to your notebook to Gateway for someone else to enter at startup. To create a startup password: 1 Restart your notebook) in case of your notebook. You do not need...
.... • Always keep the information in a safe place. The startup password is very secure, with you see your password, you can see a startup screen, press F2. The password feature is set the supervisor password in Sleep mode. 4 Highlight Password on the bottom of theft or loss, and keep your... model number and serial number (located on boot, then press ENTER. 80 Also, tape your business card or an address label to your notebook to Gateway for someone else to enter at startup. To create a startup password: 1 Restart your notebook) in case of your notebook. You do not need...
8512599 - Gateway Notebook Reference Guide R1
Page 93
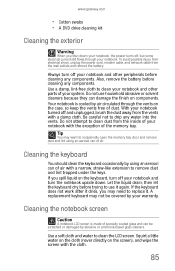
...the keyboard dry before trying to clean your notebook and other peripherals before cleaning any water into the vents. Cleaning the notebook screen Caution A notebook LCD screen is cooled by your notebook and other parts of the memory bay. Use a damp, lint-free cloth to use household ...keyboard occasionally by abrasive or ammonia-based glass cleaners. Use a soft cloth and water to remove dust and lint trapped under the keys. www.gateway.com • Cotton swabs • A DVD drive cleaning kit Cleaning the exterior Warning When you shut down your notebook, the power turns...
...the keyboard dry before trying to clean your notebook and other peripherals before cleaning any water into the vents. Cleaning the notebook screen Caution A notebook LCD screen is cooled by your notebook and other parts of the memory bay. Use a damp, lint-free cloth to use household ...keyboard occasionally by abrasive or ammonia-based glass cleaners. Use a soft cloth and water to remove dust and lint trapped under the keys. www.gateway.com • Cotton swabs • A DVD drive cleaning kit Cleaning the exterior Warning When you shut down your notebook, the power turns...
8512599 - Gateway Notebook Reference Guide R1
Page 106
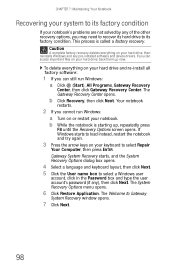
...your notebook. If you can access important files on your hard drive, back them up , repeatedly press F8 until the Recovery Options screen opens. This process is starting up now. To delete everything on your hard drive, then reinstalls Windows and any pre-installed software...the user account's password (if any of the other recovery options, you cannot run Windows: a Click (Start), All Programs, Gateway Recovery Center, then click Gateway Recovery Center. CHAPTER 7: Maintaining Your Notebook Recovering your system to its factory condition. Your notebook restarts. 2 If you may ...
...your notebook. If you can access important files on your hard drive, back them up , repeatedly press F8 until the Recovery Options screen opens. This process is starting up now. To delete everything on your hard drive, then reinstalls Windows and any pre-installed software...the user account's password (if any of the other recovery options, you cannot run Windows: a Click (Start), All Programs, Gateway Recovery Center, then click Gateway Recovery Center. CHAPTER 7: Maintaining Your Notebook Recovering your system to its factory condition. Your notebook restarts. 2 If you may ...

8512599 - Gateway Notebook Reference Guide R1
Page 108
For instructions, see "Recovering pre-installed software and drivers using recovery discs" on -screen instructions. 5 After Windows is completely re-installed, use the software and driver recovery discs you created to recover your notebook's pre-installed software and device drivers. CHAPTER 7: Maintaining Your Notebook 4 Press the arrow keys to select the drive containing the Windows DVD, then press ENTER and follow the on page 93. 100
For instructions, see "Recovering pre-installed software and drivers using recovery discs" on -screen instructions. 5 After Windows is completely re-installed, use the software and driver recovery discs you created to recover your notebook's pre-installed software and device drivers. CHAPTER 7: Maintaining Your Notebook 4 Press the arrow keys to select the drive containing the Windows DVD, then press ENTER and follow the on page 93. 100


