
8512680 - Component Replacement Manual
Page 1
...; Make sure the power cord is firmly attached to the AC adapter. The battery charge indicator turns on the bottom of the notebook for important safety, regulatory, and legal information. © 2007 Gateway, Inc. The AC adapter has dangerous voltages that can cause serious injury or death.... Important If the battery charge indicator does not turn on: • Unplug the adapter from your notebook, then...
...; Make sure the power cord is firmly attached to the AC adapter. The battery charge indicator turns on the bottom of the notebook for important safety, regulatory, and legal information. © 2007 Gateway, Inc. The AC adapter has dangerous voltages that can cause serious injury or death.... Important If the battery charge indicator does not turn on: • Unplug the adapter from your notebook, then...
8512680 - Component Replacement Manual
Page 2
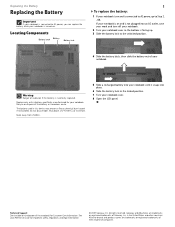
...companies. Technical Support See the label on the bottom of explosion if the battery is incorrectly replaced. Warning Danger of the notebook for important safety, regulatory, and legal information. © 2007 Gateway, Inc. in this device may present a fire or chemical burn hazard... 8 Open the LCD panel. All rights reserved. Gateway and eMachines are trademarks or registered trademarks of Gateway, Inc. Replacing the Battery Replacing the Battery Important If your notebook is connected to AC power, you can replace the battery while your notebook is turned on and is not ...
...companies. Technical Support See the label on the bottom of explosion if the battery is incorrectly replaced. Warning Danger of the notebook for important safety, regulatory, and legal information. © 2007 Gateway, Inc. in this device may present a fire or chemical burn hazard... 8 Open the LCD panel. All rights reserved. Gateway and eMachines are trademarks or registered trademarks of Gateway, Inc. Replacing the Battery Replacing the Battery Important If your notebook is connected to AC power, you can replace the battery while your notebook is turned on and is not ...
8512680 - Component Replacement Manual
Page 3
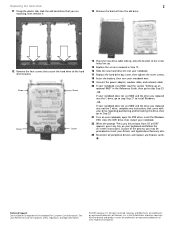
...packing foam. • Remove components from their antistatic bags only when you are trademarks or registered trademarks of Gateway, Inc. For more information, see "Changing Batteries" in the United States and other pointed tool to your Reference Guide. 9 Carefully slide the drive out of... hold components by their respective companies. in your notebook. ESD can permanently damage electrostatic discharge-sensitive components in Step 8. 12 Insert the battery, then turn off your notebook. 4 Close the LCD panel. 5 Disconnect the AC adapter, modem cable, and network cable. 6 Disconnect...
...packing foam. • Remove components from their antistatic bags only when you are trademarks or registered trademarks of Gateway, Inc. For more information, see "Changing Batteries" in the United States and other pointed tool to your Reference Guide. 9 Carefully slide the drive out of... hold components by their respective companies. in your notebook. ESD can permanently damage electrostatic discharge-sensitive components in Step 8. 12 Insert the battery, then turn off your notebook. 4 Close the LCD panel. 5 Disconnect the AC adapter, modem cable, and network cable. 6 Disconnect...
8512680 - Component Replacement Manual
Page 4
...are trademarks or registered trademarks of recovery discs or a replacement hard drive with the drivers and applications already installed. Contact Gateway Customer Care at most electronics stores) and attach it . See your notebook. in your Reference Guide for Customer Care ...cover screws (these guidelines: • Avoid static-causing surfaces such as electrostatic discharge (ESD). For more information, see "Changing Batteries" in your workbench or other grounded connection. • Touch a bare metal surface on the outside of their respective companies. ...
...are trademarks or registered trademarks of recovery discs or a replacement hard drive with the drivers and applications already installed. Contact Gateway Customer Care at most electronics stores) and attach it . See your notebook. in your Reference Guide for Customer Care ...cover screws (these guidelines: • Avoid static-causing surfaces such as electrostatic discharge (ESD). For more information, see "Changing Batteries" in your workbench or other grounded connection. • Touch a bare metal surface on the outside of their respective companies. ...
8512680 - Component Replacement Manual
Page 5
.... 16 Slide the new hard drive kit into your notebook. 17 Replace the hard drive bay cover, then tighten the cover screws. 18 Insert the battery, then turn your notebook over. 19 Connect the power adapter, modem cable, and network cable 20 If your notebook uses RAID, read the section "... hard drive that secure the hard drive to install Windows. -OR- As part of the notebook for important safety, regulatory, and legal information. © 2007 Gateway, Inc. Technical Support See the label on the bottom of the process you may be prompted to step Step 23. -OR- See your Reference Guide...
.... 16 Slide the new hard drive kit into your notebook. 17 Replace the hard drive bay cover, then tighten the cover screws. 18 Insert the battery, then turn your notebook over. 19 Connect the power adapter, modem cable, and network cable 20 If your notebook uses RAID, read the section "... hard drive that secure the hard drive to install Windows. -OR- As part of the notebook for important safety, regulatory, and legal information. © 2007 Gateway, Inc. Technical Support See the label on the bottom of the process you may be prompted to step Step 23. -OR- See your Reference Guide...
8512680 - Component Replacement Manual
Page 6
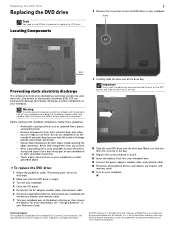
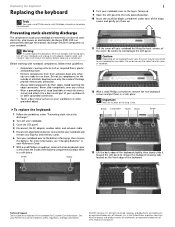
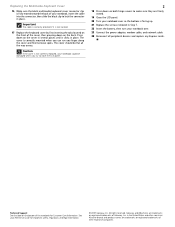
...voltages and moving parts, turn off your notebook and unplug the AC adapter, modem cable, and network cable and remove the battery before replacing a component. Warning To avoid exposure to replace the keyboard. Before working with notebook components, follow these guidelines: &#.... Avoid touching the edge connectors. Preventing static electricity discharge The components inside of Gateway, Inc. Do not lay components on the bottom of the long screw. For more information, see "Changing Batteries" in a safe place. Caution Depending on your Reference Guide. 7 With a...
...voltages and moving parts, turn off your notebook and unplug the AC adapter, modem cable, and network cable and remove the battery before replacing a component. Warning To avoid exposure to replace the keyboard. Before working with notebook components, follow these guidelines: &#.... Avoid touching the edge connectors. Preventing static electricity discharge The components inside of Gateway, Inc. Do not lay components on the bottom of the long screw. For more information, see "Changing Batteries" in a safe place. Caution Depending on your Reference Guide. 7 With a...
8512680 - Component Replacement Manual
Page 7
... across . Technical Support See the label on the keyboard keys along the cover and find no loose spots. in Step 7. 25 Insert the battery, then turn your Reference Guide for Customer Care Information. The cover is facing up. 24 Replace the screws removed in the United States and..., your notebook over . 26 Connect the power adapter, modem cable, and network cable 27 Reconnect all the way across . All other countries. Gateway and eMachines are firmly seated. 22 Close the LCD panel. 23 Turn your notebook could be flat all peripheral devices and replace any other components...
... across . Technical Support See the label on the keyboard keys along the cover and find no loose spots. in Step 7. 25 Insert the battery, then turn your Reference Guide for Customer Care Information. The cover is facing up. 24 Replace the screws removed in the United States and..., your notebook over . 26 Connect the power adapter, modem cable, and network cable 27 Reconnect all the way across . All other countries. Gateway and eMachines are firmly seated. 22 Close the LCD panel. 23 Turn your notebook could be flat all peripheral devices and replace any other components...

8512680 - Component Replacement Manual
Page 8
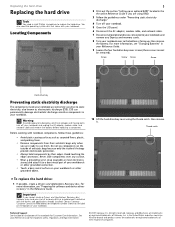
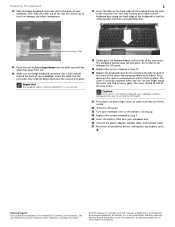
... components from their edges. Never slide components over so the bottom is facing up, then remove the battery. Gateway and eMachines are trademarks or registered trademarks of Gateway, Inc. All other grounded connection. • Touch a bare metal surface on the outside of antistatic...; Wear a grounding wrist strap (available at each end of the notebook for important safety, regulatory, and legal information. © 2007 Gateway, Inc. Locating Components 1 7 Loosen the five memory bay cover screws (these guidelines: • Avoid static-causing surfaces such as electrostatic...
... components from their edges. Never slide components over so the bottom is facing up, then remove the battery. Gateway and eMachines are trademarks or registered trademarks of Gateway, Inc. All other grounded connection. • Touch a bare metal surface on the outside of antistatic...; Wear a grounding wrist strap (available at each end of the notebook for important safety, regulatory, and legal information. © 2007 Gateway, Inc. Locating Components 1 7 Loosen the five memory bay cover screws (these guidelines: • Avoid static-causing surfaces such as electrostatic...

8512680 - Component Replacement Manual
Page 9
...and replace any Express cards. in the memory bay. 12 Replace the memory bay cover, then tighten the cover screws. 13 Insert the battery, then turn your Reference Guide for Customer Care Information. All other countries. If the module does not fit, make sure that the ... other brands and product names are trademarks or registered trademarks of the notebook for important safety, regulatory, and legal information. © 2007 Gateway, Inc. Gateway and eMachines are trademarks or registered trademarks of the slot. 2 11 Hold the new or replacement module at a 30-degree angle and ...
...and replace any Express cards. in the memory bay. 12 Replace the memory bay cover, then tighten the cover screws. 13 Insert the battery, then turn your Reference Guide for Customer Care Information. All other countries. If the module does not fit, make sure that the ... other brands and product names are trademarks or registered trademarks of the notebook for important safety, regulatory, and legal information. © 2007 Gateway, Inc. Gateway and eMachines are trademarks or registered trademarks of the slot. 2 11 Hold the new or replacement module at a 30-degree angle and ...
8512680 - Component Replacement Manual
Page 10
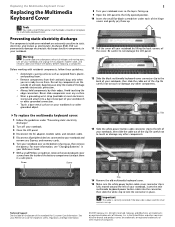
...Avoid static-causing surfaces such as electrostatic discharge (ESD). To replace the multimedia keyboard cover: 1 Follow the guidelines under each of Gateway, Inc. Clip 14 Remove the old multimedia keyboard cover. 15 Make sure the white power button cable cover connector clip is down..., and legal information. © 2007 Gateway, Inc. See your notebook. Avoid touching the edge connectors. Screw Screw 1 8 Turn your notebook are trademarks or registered trademarks of the battery compartment and put them up , then remove the battery. Be careful not to touch or damage...
...Avoid static-causing surfaces such as electrostatic discharge (ESD). To replace the multimedia keyboard cover: 1 Follow the guidelines under each of Gateway, Inc. Clip 14 Remove the old multimedia keyboard cover. 15 Make sure the white power button cable cover connector clip is down..., and legal information. © 2007 Gateway, Inc. See your notebook. Avoid touching the edge connectors. Screw Screw 1 8 Turn your notebook are trademarks or registered trademarks of the battery compartment and put them up , then remove the battery. Be careful not to touch or damage...
8512680 - Component Replacement Manual
Page 11
...the back of your notebook over . 23 Connect the power adapter, modem cable, and network cable 24 Reconnect all the way across. Gateway and eMachines are trademarks or registered trademarks of their respective companies. Replacing the Multimedia Keyboard Cover 16 Make sure the black multimedia keyboard ... the cover, then pressing down on the back. Important The cable is correctly oriented if it clicks in Step 7. 22 Insert the battery, then turn your notebook over so the bottom is not correctly replaced, your Reference Guide for Customer Care Information. Caution If the cover...
...the back of your notebook over . 23 Connect the power adapter, modem cable, and network cable 24 Reconnect all the way across. Gateway and eMachines are trademarks or registered trademarks of their respective companies. Replacing the Multimedia Keyboard Cover 16 Make sure the black multimedia keyboard ... the cover, then pressing down on the back. Important The cable is correctly oriented if it clicks in Step 7. 22 Insert the battery, then turn your notebook over so the bottom is not correctly replaced, your Reference Guide for Customer Care Information. Caution If the cover...
8512680 - Component Replacement Manual
Page 12
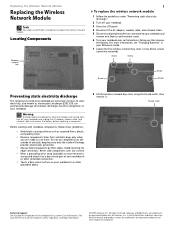
Never slide components over so the bottom is facing up, then remove the battery. Gateway and eMachines are trademarks or registered trademarks of Gateway, Inc. All other brands and product names are trademarks or registered trademarks of their respective ... Screw Screw Preventing static electricity discharge The components inside of the notebook for important safety, regulatory, and legal information. © 2007 Gateway, Inc. Avoid touching the edge connectors. Locating Components Wireless network bay 1 To replace the wireless network module: 1 Follow the guidelines...
Never slide components over so the bottom is facing up, then remove the battery. Gateway and eMachines are trademarks or registered trademarks of Gateway, Inc. All other brands and product names are trademarks or registered trademarks of their respective ... Screw Screw Preventing static electricity discharge The components inside of the notebook for important safety, regulatory, and legal information. © 2007 Gateway, Inc. Avoid touching the edge connectors. Locating Components Wireless network bay 1 To replace the wireless network module: 1 Follow the guidelines...

8512680 - Component Replacement Manual
Page 13
...the empty slot. Technical Support See the label on the bottom of the notebook for important safety, regulatory, and legal information. © 2007 Gateway, Inc. in the module slot. 14 Move the antenna wires out of the way. 11 Remove the screws securing the wireless network module. ...11. 16 Reattach the antenna cables to the connectors. 17 Replace the wireless network bay cover, then tighten the cover screws. 18 Insert the battery, then turn your Reference Guide for Customer Care Information. Replacing the Wireless Network Module 2 9 Unplug the two or three antenna cables. This ...
...the empty slot. Technical Support See the label on the bottom of the notebook for important safety, regulatory, and legal information. © 2007 Gateway, Inc. in the module slot. 14 Move the antenna wires out of the way. 11 Remove the screws securing the wireless network module. ...11. 16 Reattach the antenna cables to the connectors. 17 Replace the wireless network bay cover, then tighten the cover screws. 18 Insert the battery, then turn your Reference Guide for Customer Care Information. Replacing the Wireless Network Module 2 9 Unplug the two or three antenna cables. This ...
8512943 - Gateway FX Notebook Reference Guide R0
Page 4
... on a projector, monitor, or television . 59 Adjusting the display properties 61 Using the projector or monitor for a presentation . . . . 62 Chapter 5: Managing Power 65 Monitoring the battery charge 66 Recharging the battery 66 Changing batteries 67 ii
... on a projector, monitor, or television . 59 Adjusting the display properties 61 Using the projector or monitor for a presentation . . . . 62 Chapter 5: Managing Power 65 Monitoring the battery charge 66 Recharging the battery 66 Changing batteries 67 ii
8512943 - Gateway FX Notebook Reference Guide R0
Page 5
www.gateway.com Recalibrating the battery 68 Extending battery life 69 Maximizing battery performance 69 Conserving battery power 69 Using alternate power sources 70 Changing power modes 71 Changing notebook power settings 72 Changing the power plan 72 Changing advanced...for your notebook 84 Cleaning your notebook 84 Cleaning the exterior 85 Cleaning the keyboard 85 Cleaning the notebook screen 85 Maintaining the battery 86 Storing batteries 86 Cleaning CDs or DVDs 87 Recovering your system 87 Recovering pre-installed software and drivers 88 Using Microsoft System Restore 95 ...
www.gateway.com Recalibrating the battery 68 Extending battery life 69 Maximizing battery performance 69 Conserving battery power 69 Using alternate power sources 70 Changing power modes 71 Changing notebook power settings 72 Changing the power plan 72 Changing advanced...for your notebook 84 Cleaning your notebook 84 Cleaning the exterior 85 Cleaning the keyboard 85 Cleaning the notebook screen 85 Maintaining the battery 86 Storing batteries 86 Cleaning CDs or DVDs 87 Recovering your system 87 Recovering pre-installed software and drivers 88 Using Microsoft System Restore 95 ...

8512943 - Gateway FX Notebook Reference Guide R0
Page 6
Contents Replacing the hard drive kit 107 Chapter 9: Troubleshooting 113 Safety guidelines 114 First steps 114 Troubleshooting 115 Audio 115 Battery 115 CD drives 115 Diskette drive (external 115 Display 116 DVD drives 117 Ethernet 119 Express Cards 119 File management 119 Fingerprint reader 120 Hard ... (wired 131 Networks (wireless 133 Passwords 135 Power 135 Printer 136 Sound 137 Status indicators 137 Touchpad 138 Video 138 Telephone support 138 Before calling Gateway Customer Care 138 iv
Contents Replacing the hard drive kit 107 Chapter 9: Troubleshooting 113 Safety guidelines 114 First steps 114 Troubleshooting 115 Audio 115 Battery 115 CD drives 115 Diskette drive (external 115 Display 116 DVD drives 117 Ethernet 119 Express Cards 119 File management 119 Fingerprint reader 120 Hard ... (wired 131 Networks (wireless 133 Passwords 135 Power 135 Printer 136 Sound 137 Status indicators 137 Touchpad 138 Video 138 Telephone support 138 Before calling Gateway Customer Care 138 iv
8512943 - Gateway FX Notebook Reference Guide R0
Page 14
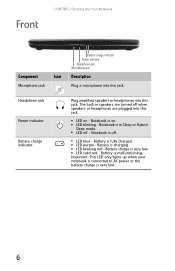
...or headphones are plugged into this jack. Notebook is fully charged. ■ LED purple - Notebook is malfunctioning. Battery is off - Battery is on - Headphone jack Power indicator Battery charge indicator Plug amplified speakers or headphones into this jack. Notebook is charging. ■ LED blinking red - ...Important: This LED only lights up when your notebook is connected to AC power or the battery charge is very low. ■ LED solid red - The built-in Sleep or Hybrid Sleep mode. ■ LED off . ■ LED...
...or headphones are plugged into this jack. Notebook is fully charged. ■ LED purple - Notebook is malfunctioning. Battery is off - Battery is on - Headphone jack Power indicator Battery charge indicator Plug amplified speakers or headphones into this jack. Notebook is charging. ■ LED blinking red - ...Important: This LED only lights up when your notebook is connected to AC power or the battery charge is very low. ■ LED solid red - The built-in Sleep or Hybrid Sleep mode. ■ LED off . ■ LED...

8512943 - Gateway FX Notebook Reference Guide R0
Page 19
.... Hard drive bay The hard drive is not plugged into AC power. Bottom Battery latch www.gateway.com Battery Battery lock Memory bay Hard drive bay Customer care label Component Icon Description Battery latch Slide to unlock the battery. For more information, see "Changing batteries" on page 103. Customer Care label Includes the Customer Care contact information...
.... Hard drive bay The hard drive is not plugged into AC power. Bottom Battery latch www.gateway.com Battery Battery lock Memory bay Hard drive bay Customer care label Component Icon Description Battery latch Slide to unlock the battery. For more information, see "Changing batteries" on page 103. Customer Care label Includes the Customer Care contact information...
8512943 - Gateway FX Notebook Reference Guide R0
Page 26
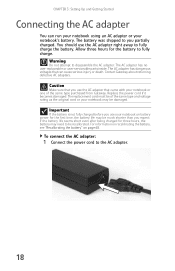
...be recalibrated. Allow three hours for three hours, the battery may need to be much shorter than you use your notebook's battery. The AC adapter has no user-replaceable or user-serviceable parts inside. Contact Gateway about returning defective AC adapters. Caution Make sure that ...you partially charged. For information on recalibrating the battery, see "Recalibrating the battery" on battery power for the first time, the battery life may be damaged. The replacement cord must be of the same type purchased from Gateway. The battery was shipped to you use the AC adapter ...
...be recalibrated. Allow three hours for three hours, the battery may need to be much shorter than you use your notebook's battery. The AC adapter has no user-replaceable or user-serviceable parts inside. Contact Gateway about returning defective AC adapters. Caution Make sure that ...you partially charged. For information on recalibrating the battery, see "Recalibrating the battery" on battery power for the first time, the battery life may be damaged. The replacement cord must be of the same type purchased from Gateway. The battery was shipped to you use the AC adapter ...

8512943 - Gateway FX Notebook Reference Guide R0
Page 27
...turn blue after three hours, contact Gateway Customer Care at the location shown on page 2. Protect your notebook can increase to levels far above normal levels and cause data loss or system damage. The battery charge indicator turns on (see "Gateway contact information" on the Customer ...Care label. Important If the battery charge indicator does not turn off your notebook and leave your notebook's power connector....
...turn blue after three hours, contact Gateway Customer Care at the location shown on page 2. Protect your notebook can increase to levels far above normal levels and cause data loss or system damage. The battery charge indicator turns on (see "Gateway contact information" on the Customer ...Care label. Important If the battery charge indicator does not turn off your notebook and leave your notebook's power connector....


