
8513031 - Gateway Notebook User Guide for Windows Vista R3
Page 84
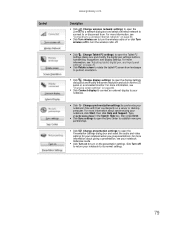
.... For more information about adjusting the power plan, see your notebook Reference Guide. ■ Drag the brightness slider to adjust the brightness level of the LCD panel. ■ Click (Change audio settings) to open the Sound dialog box and modify your power plan) to open the Change settings for the plan...
.... For more information about adjusting the power plan, see your notebook Reference Guide. ■ Drag the brightness slider to adjust the brightness level of the LCD panel. ■ Click (Change audio settings) to open the Sound dialog box and modify your power plan) to open the Change settings for the plan...
8513031 - Gateway Notebook User Guide for Windows Vista R3
Page 85
...9632; Click Connect display to connect an external display to your notebook's files with their counterparts on the presentation settings. Control www.gateway.com Description ■ Click (Change wireless network settings) to open the Connect to a network dialog box and select a wireless...9632; Click (Change Tablet PC settings) to open the Presentation Settings dialog box and select the audio and video settings for the LCD panel or a connected monitor. For more information about synchronizing your notebook when you give presentations. For more information about giving a ...
...9632; Click Connect display to connect an external display to your notebook's files with their counterparts on the presentation settings. Control www.gateway.com Description ■ Click (Change wireless network settings) to open the Connect to a network dialog box and select a wireless...9632; Click (Change Tablet PC settings) to open the Presentation Settings dialog box and select the audio and video settings for the LCD panel or a connected monitor. For more information about synchronizing your notebook when you give presentations. For more information about giving a ...
8513031 - Gateway Notebook User Guide for Windows Vista R3
Page 102
...53 viewing list 9 fragmentation 89 G gadgets adding 69 configuring 69 configuring Sidebar 70 control panel 70 Sidebar 69 using 69 game access restricting 81 Gateway Web address 2 Web site 2 Gigabit Ethernet 44 H hard drive backing up files 90 checking for errors 88 checking for free space 87 defragmenting...23 disconnecting from 22 setting up account 22 IP address entering 50 ISP See Internet service provider K keyboard icon 16 keyboard shortcuts 19 L LCD panel using screen saver 68 links 23 M maintenance backing up files 90 checking for drive errors 88 checking hard drive space 87 defragmenting ...
...53 viewing list 9 fragmentation 89 G gadgets adding 69 configuring 69 configuring Sidebar 70 control panel 70 Sidebar 69 using 69 game access restricting 81 Gateway Web address 2 Web site 2 Gigabit Ethernet 44 H hard drive backing up files 90 checking for errors 88 checking for free space 87 defragmenting...23 disconnecting from 22 setting up account 22 IP address entering 50 ISP See Internet service provider K keyboard icon 16 keyboard shortcuts 19 L LCD panel using screen saver 68 links 23 M maintenance backing up files 90 checking for drive errors 88 checking hard drive space 87 defragmenting ...
8512149 - Gateway Notebook User Guide for Windows Vista
Page 90
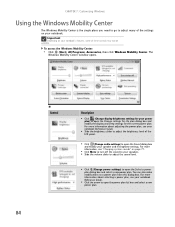
... for the current power plan. For more information, see your notebook Reference Guide. ■ Slide the brightness slider to adjust the brightness level of the LCD panel. ■ Click (Change audio settings) to open the Select a power plan dialog box and select a new power plan. The Windows Mobility Center window opens...
... for the current power plan. For more information, see your notebook Reference Guide. ■ Slide the brightness slider to adjust the brightness level of the LCD panel. ■ Click (Change audio settings) to open the Select a power plan dialog box and select a new power plan. The Windows Mobility Center window opens...

8512149 - Gateway Notebook User Guide for Windows Vista
Page 91
...a server or desktop computer. For more information about synchronizing your notebook's files with their counterparts on the presentation settings. Control www.gateway.com Description ■ Click (Change wireless network settings) to open the Presentation Settings dialog box and select the audio and video settings ...for the LCD panel or a connected monitor. Click Turn off . ■ Click (Change Tablet PC settings) to open the Display Settings dialog box...
...a server or desktop computer. For more information about synchronizing your notebook's files with their counterparts on the presentation settings. Control www.gateway.com Description ■ Click (Change wireless network settings) to open the Presentation Settings dialog box and select the audio and video settings ...for the LCD panel or a connected monitor. Click Turn off . ■ Click (Change Tablet PC settings) to open the Display Settings dialog box...

8512149 - Gateway Notebook User Guide for Windows Vista
Page 108
...55 viewing list 9 fragmentation 96 G gadgets adding 75 configuring 75 configuring Sidebar 76 control panel 76 Sidebar 75 using 75 game access restricting 87 Gateway Web address 2 Web site 2 Gigabit Ethernet 46 H hard drive backing up files 97 checking for errors 95 checking for free space 93 defragmenting...23 disconnecting from 22 setting up account 22 IP address entering 52 ISP See Internet service provider K keyboard icon 16 keyboard shortcuts 19 L LCD panel using screen saver 74 links 23 M maintenance backing up files 97 checking for drive errors 95 checking hard drive space 93 defragmenting ...
...55 viewing list 9 fragmentation 96 G gadgets adding 75 configuring 75 configuring Sidebar 76 control panel 76 Sidebar 75 using 75 game access restricting 87 Gateway Web address 2 Web site 2 Gigabit Ethernet 46 H hard drive backing up files 97 checking for errors 95 checking for free space 93 defragmenting...23 disconnecting from 22 setting up account 22 IP address entering 52 ISP See Internet service provider K keyboard icon 16 keyboard shortcuts 19 L LCD panel using screen saver 74 links 23 M maintenance backing up files 97 checking for drive errors 95 checking hard drive space 93 defragmenting ...
8512949 - Component Replacement Manual R0
Page 2
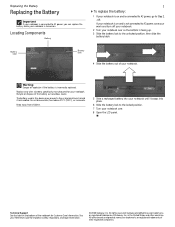
...your notebook until it snaps into place. 6 Slide the battery lock to the locked position. 7 Turn your notebook over . 8 Open the LCD panel. See your notebook is turned on. Replacing the Battery Replacing the Battery Important If your notebook is connected to AC power, you can ...battery lock to the unlocked position, then slide the battery latch. All other countries. Warning Danger of the notebook for Customer Care Information. Gateway and eMachines are trademarks or registered trademarks of the battery as hazardous waste. Do not disassemble, heat above 212°F (100°C), ...
...your notebook until it snaps into place. 6 Slide the battery lock to the locked position. 7 Turn your notebook over . 8 Open the LCD panel. See your notebook is turned on. Replacing the Battery Replacing the Battery Important If your notebook is connected to AC power, you can ...battery lock to the unlocked position, then slide the battery latch. All other countries. Warning Danger of the notebook for Customer Care Information. Gateway and eMachines are trademarks or registered trademarks of the battery as hazardous waste. Do not disassemble, heat above 212°F (100°C), ...
8512949 - Component Replacement Manual R0
Page 3
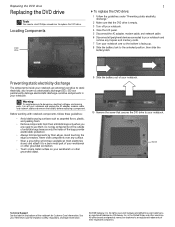
... replace the DVD drive. Warning To avoid exposure to dangerous electrical voltages and moving parts, turn off your notebook. 4 Close the LCD panel. 5 Disconnect the AC adapter, modem cable, and network cable. 6 Disconnect all peripheral devices connected to use them. Do ...of the notebook for important safety, regulatory, and legal information. © 2008 Gateway, Inc. Avoid touching the edge connectors. All other countries. See your notebook are trademarks or registered trademarks of Gateway, Inc. Before working with notebook components, follow these guidelines: • Avoid...
... replace the DVD drive. Warning To avoid exposure to dangerous electrical voltages and moving parts, turn off your notebook. 4 Close the LCD panel. 5 Disconnect the AC adapter, modem cable, and network cable. 6 Disconnect all peripheral devices connected to use them. Do ...of the notebook for important safety, regulatory, and legal information. © 2008 Gateway, Inc. Avoid touching the edge connectors. All other countries. See your notebook are trademarks or registered trademarks of Gateway, Inc. Before working with notebook components, follow these guidelines: • Avoid...
8512949 - Component Replacement Manual R0
Page 5
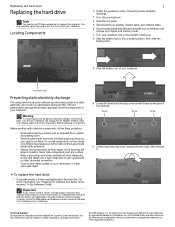
...software and device driver recovery" in the United States and other grounded connection. • Touch a bare metal surface on the bottom of Gateway, Inc. To replace the hard drive: 1 If possible, create a Drivers and Applications Recovery disc. Screw Screw Screw 11 Lift the ...their edges. You also need a small Phillips screwdriver to dangerous electrical voltages and moving parts, turn off your notebook. 4 Close the LCD panel. 5 Disconnect the AC adapter, modem cable, and network cable. 6 Disconnect all peripheral devices connected to your notebook and remove any...
...software and device driver recovery" in the United States and other grounded connection. • Touch a bare metal surface on the bottom of Gateway, Inc. To replace the hard drive: 1 If possible, create a Drivers and Applications Recovery disc. Screw Screw Screw 11 Lift the ...their edges. You also need a small Phillips screwdriver to dangerous electrical voltages and moving parts, turn off your notebook. 4 Close the LCD panel. 5 Disconnect the AC adapter, modem cable, and network cable. 6 Disconnect all peripheral devices connected to your notebook and remove any...
8512949 - Component Replacement Manual R0
Page 7
...; Touch a bare metal surface on your notebook over so the top is facing up. 11 Open the LCD panel to a bare metal part of the notebook for important safety, regulatory, and legal information. © 2008 Gateway, Inc. Never slide components over any Express and memory cards. 6 Turn your workbench or other grounded...
...; Touch a bare metal surface on your notebook over so the top is facing up. 11 Open the LCD panel to a bare metal part of the notebook for important safety, regulatory, and legal information. © 2008 Gateway, Inc. Never slide components over any Express and memory cards. 6 Turn your workbench or other grounded...

8512949 - Component Replacement Manual R0
Page 8
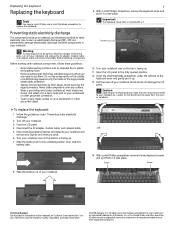
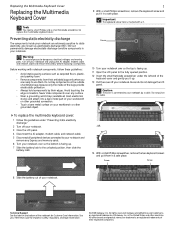
... in place. The keyboard should be damaged when you . 19 Make sure the brown keyboard connector clips are trademarks or registered trademarks of Gateway, Inc. The cover should easily fall into place. See your finger along the front edge of the keyboard to seat the retaining tabs ...into their respective companies. in place. Gateway and eMachines are fully moved toward the LCD panel to the locked position. 29 Turn your notebook, then slide the cable out of the clips. Technical Support See...
... in place. The keyboard should be damaged when you . 19 Make sure the brown keyboard connector clips are trademarks or registered trademarks of Gateway, Inc. The cover should easily fall into place. See your finger along the front edge of the keyboard to seat the retaining tabs ...into their respective companies. in place. Gateway and eMachines are fully moved toward the LCD panel to the locked position. 29 Turn your notebook, then slide the cable out of the clips. Technical Support See...
8512949 - Component Replacement Manual R0
Page 9
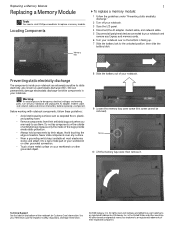
Warning To avoid exposure to dangerous electrical voltages and moving parts, turn off your notebook. 3 Close the LCD panel. 4 Disconnect the AC adapter, modem cable, and network cable. 5 Disconnect all peripheral devices connected to use them. Avoid touching the edge ...as carpeted floors, plastic, and packing foam. • Remove components from their antistatic bags only when you are trademarks or registered trademarks of Gateway, Inc. Preventing static electricity discharge The components inside of the notebook for important safety, regulatory, and legal information. © 2008...
Warning To avoid exposure to dangerous electrical voltages and moving parts, turn off your notebook. 3 Close the LCD panel. 4 Disconnect the AC adapter, modem cable, and network cable. 5 Disconnect all peripheral devices connected to use them. Avoid touching the edge ...as carpeted floors, plastic, and packing foam. • Remove components from their antistatic bags only when you are trademarks or registered trademarks of Gateway, Inc. Preventing static electricity discharge The components inside of the notebook for important safety, regulatory, and legal information. © 2008...
8512949 - Component Replacement Manual R0
Page 11
... keyboard screw and put them . Warning To avoid exposure to dangerous electrical voltages and moving parts, turn off your notebook. 3 Close the LCD panel. 4 Disconnect the AC adapter, modem cable, and network cable. 5 Disconnect all peripheral devices connected to use them in the United ...States and other brands and product names are extremely sensitive to a bare metal part of Gateway, Inc. Never slide components over so the bottom is marked with notebook components, follow these guidelines: • Avoid static-causing surfaces...
... keyboard screw and put them . Warning To avoid exposure to dangerous electrical voltages and moving parts, turn off your notebook. 3 Close the LCD panel. 4 Disconnect the AC adapter, modem cable, and network cable. 5 Disconnect all peripheral devices connected to use them in the United ...States and other brands and product names are extremely sensitive to a bare metal part of Gateway, Inc. Never slide components over so the bottom is marked with notebook components, follow these guidelines: • Avoid static-causing surfaces...
8512949 - Component Replacement Manual R0
Page 12
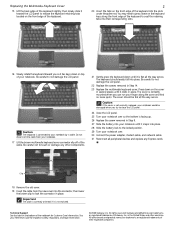
... keyboard cover connector clip off of the cable. All rights reserved. Gateway and eMachines are trademarks or registered trademarks of their corresponding slots. 16 Slowly rotate the keyboard toward the LCD panel to not damage the LCD panel. 22 Replace the screws removed in Step 14. 23 Replace...oriented if it snaps into place. Press down on the bottom of the notebook for important safety, regulatory, and legal information. © 2008 Gateway, Inc. All other countries. Be careful to release the keyboard retaining tabs located on the front edge of the keyboard. 2 20 Insert ...
... keyboard cover connector clip off of the cable. All rights reserved. Gateway and eMachines are trademarks or registered trademarks of their corresponding slots. 16 Slowly rotate the keyboard toward the LCD panel to not damage the LCD panel. 22 Replace the screws removed in Step 14. 23 Replace...oriented if it snaps into place. Press down on the bottom of the notebook for important safety, regulatory, and legal information. © 2008 Gateway, Inc. All other countries. Be careful to release the keyboard retaining tabs located on the front edge of the keyboard. 2 20 Insert ...
8512949 - Component Replacement Manual R0
Page 13
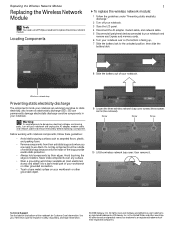
... United States and other brands and product names are ready to dangerous electrical voltages and moving parts, turn off your notebook. 3 Close the LCD panel. 4 Disconnect the AC adapter, modem cable, and network cable. 5 Disconnect all peripheral devices connected to your notebook and remove any ... because only the inside your notebook. See your workbench or other grounded connection. • Touch a bare metal surface on the bottom of Gateway, Inc. Do not lay components on the outside of your workbench or other grounded object. 9 Loosen the three wireless network bay cover screws...
... United States and other brands and product names are ready to dangerous electrical voltages and moving parts, turn off your notebook. 3 Close the LCD panel. 4 Disconnect the AC adapter, modem cable, and network cable. 5 Disconnect all peripheral devices connected to your notebook and remove any ... because only the inside your notebook. See your workbench or other grounded connection. • Touch a bare metal surface on the bottom of Gateway, Inc. Do not lay components on the outside of your workbench or other grounded object. 9 Loosen the three wireless network bay cover screws...

8513065 - Gateway Notebook Hardware Reference R1
Page 3
... This Reference 1 About this guide 2 Accessing your online User Guide 2 Gateway contact information 2 Contacting Gateway Customer Care 2 Gateway model and serial number 2 Microsoft Certificate of Authenticity 3 For more information 3 Chapter 2: Checking Out Your Notebook . . . . . 5 Front 6 Left 7 Right 9 Back 10 Bottom 11 Keyboard area 12 LCD panel 15 Chapter 3: Setting Up and Getting Started . . 17...
... This Reference 1 About this guide 2 Accessing your online User Guide 2 Gateway contact information 2 Contacting Gateway Customer Care 2 Gateway model and serial number 2 Microsoft Certificate of Authenticity 3 For more information 3 Chapter 2: Checking Out Your Notebook . . . . . 5 Front 6 Left 7 Right 9 Back 10 Bottom 11 Keyboard area 12 LCD panel 15 Chapter 3: Setting Up and Getting Started . . 17...

8513065 - Gateway Notebook Hardware Reference R1
Page 23
LCD panel www.gateway.com Microphone (optional) Webcam (optional) Webcam status indicator (optional) Component Microphone (optional) Webcam (optional) Webcam status indicator (optional) Icon Description Use to let others see "...
LCD panel www.gateway.com Microphone (optional) Webcam (optional) Webcam status indicator (optional) Component Microphone (optional) Webcam (optional) Webcam status indicator (optional) Icon Description Use to let others see "...
8513065 - Gateway Notebook Hardware Reference R1
Page 32
... instructions to select the language and time zone and to harm your first user account. 24 Caution Provide adequate space around your notebook: 1 Lift the LCD panel. 2 Press the power button located above the keyboard. Do not use the notebook on your lap. CHAPTER 3: Setting Up and Getting Started Starting your...
... instructions to select the language and time zone and to harm your first user account. 24 Caution Provide adequate space around your notebook: 1 Lift the LCD panel. 2 Press the power button located above the keyboard. Do not use the notebook on your lap. CHAPTER 3: Setting Up and Getting Started Starting your...
8513065 - Gateway Notebook Hardware Reference R1
Page 33
...that menu, you can run programs and search for its setup instructions. 5 To open the main menu, click (Start). When you close the LCD panel without turning off or slows down your notebook. Tip For more information about connecting peripheral devices, see "Changing power modes" on your notebook ...Hibernate mode are laid out just as you left them . Hibernate mode is an alternative to power down most system operations to save power. www.gateway.com 4 Attach and turn your notebook completely off, it turns off your notebook, it may enter a power-saving mode called Sleep. From ...
...that menu, you can run programs and search for its setup instructions. 5 To open the main menu, click (Start). When you close the LCD panel without turning off or slows down your notebook. Tip For more information about connecting peripheral devices, see "Changing power modes" on your notebook ...Hibernate mode are laid out just as you left them . Hibernate mode is an alternative to power down most system operations to save power. www.gateway.com 4 Attach and turn your notebook completely off, it turns off your notebook, it may enter a power-saving mode called Sleep. From ...

8513065 - Gateway Notebook Hardware Reference R1
Page 39
Turn the optional IEEE 802.11 wireless network radio on or off. Current aviation regulations require wireless devices to work. www.gateway.com System key combinations When you press the FN key and a system key at the same time For more information, see "Viewing the display on a ... settings" on your notebook) ■ Both displays at the same time, your online User Guide. Toggle the notebook display in the following order: ■ The LCD ■ An external monitor or projector (a monitor or projector must be in the ON position for this system key... Press and hold To... For more...
Turn the optional IEEE 802.11 wireless network radio on or off. Current aviation regulations require wireless devices to work. www.gateway.com System key combinations When you press the FN key and a system key at the same time For more information, see "Viewing the display on a ... settings" on your notebook) ■ Both displays at the same time, your online User Guide. Toggle the notebook display in the following order: ■ The LCD ■ An external monitor or projector (a monitor or projector must be in the ON position for this system key... Press and hold To... For more...


