
8513031 - Gateway Notebook User Guide for Windows Vista R3
Page 19
... screen, and Input Panel. • Table PC Input Panel (TIP)-Use its writing pad or soft keyboard for files and folders A file or folder that they may have to find. 3 Continue double-clicking...the file • Time period in fact). You can narrow your search by the: • Name or part of your digital pen or voice, then drop it was created or modified You can be opened, copied,..., renamed, or deleted directly from the list in the Search Help box, then press ENTER. www.gateway.com Using advanced search options Search can turn into another folder, and so on a drive inside yet...
... screen, and Input Panel. • Table PC Input Panel (TIP)-Use its writing pad or soft keyboard for files and folders A file or folder that they may have to find. 3 Continue double-clicking...the file • Time period in fact). You can narrow your search by the: • Name or part of your digital pen or voice, then drop it was created or modified You can be opened, copied,..., renamed, or deleted directly from the list in the Search Help box, then press ENTER. www.gateway.com Using advanced search options Search can turn into another folder, and so on a drive inside yet...
8512949 - Component Replacement Manual R0
Page 6
See your keyboard and follow the on-screen instructions. Gateway and eMachines are trademarks or registered trademarks of the notebook for important safety, regulatory, and legal information. © 2008 Gateway, Inc. Replacing the hard drive 2 12 Remove the two screws connecting the hard drive to boot from the ... notebook over. 24 Connect the power adapter, modem cable, and network cable 25 Turn on the bottom of their respective companies. As part of Gateway, Inc. All other countries. in Step 12. 20 Replace the hard drive bay cover, then tighten the cover screws. 21 Slide ...
See your keyboard and follow the on-screen instructions. Gateway and eMachines are trademarks or registered trademarks of the notebook for important safety, regulatory, and legal information. © 2008 Gateway, Inc. Replacing the hard drive 2 12 Remove the two screws connecting the hard drive to boot from the ... notebook over. 24 Connect the power adapter, modem cable, and network cable 25 Turn on the bottom of their respective companies. As part of Gateway, Inc. All other countries. in Step 12. 20 Replace the hard drive bay cover, then tighten the cover screws. 21 Slide ...
8512949 - Component Replacement Manual R0
Page 7
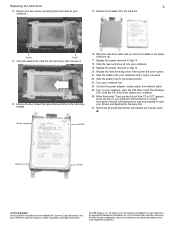
... latch. 8 Slide the battery out of your notebook. 14 With a small Phillips screwdriver, remove the two keyboard screws and put it up . 7 Slide the battery lock to a bare metal part of your workbench or other grounded connection. • Touch a bare metal surface on the bottom of the ...the cover or notebook. See your notebook by their antistatic bags only when you are trademarks or registered trademarks of Gateway, Inc. Do not lay components on the keyboard cover type, the cover may be connected to your Reference Guide for Customer Care Information. Caution Depending on the...
... latch. 8 Slide the battery out of your notebook. 14 With a small Phillips screwdriver, remove the two keyboard screws and put it up . 7 Slide the battery lock to a bare metal part of your workbench or other grounded connection. • Touch a bare metal surface on the bottom of the ...the cover or notebook. See your notebook by their antistatic bags only when you are trademarks or registered trademarks of Gateway, Inc. Do not lay components on the keyboard cover type, the cover may be connected to your Reference Guide for Customer Care Information. Caution Depending on the...
8512949 - Component Replacement Manual R0
Page 11
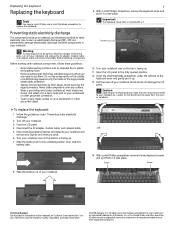
... under the left end of the keyboard cover and gently pry it in the United States and other brands and product names are extremely sensitive to a bare metal part of the notebook for important safety, regulatory, and legal information. © 2008 Gateway, Inc. Screw Screw 8 Slide the... battery out of Gateway, Inc. See your notebook. All other countries. ESD can permanently ...
... under the left end of the keyboard cover and gently pry it in the United States and other brands and product names are extremely sensitive to a bare metal part of the notebook for important safety, regulatory, and legal information. © 2008 Gateway, Inc. Screw Screw 8 Slide the... battery out of Gateway, Inc. See your notebook. All other countries. ESD can permanently ...
8513065 - Gateway Notebook Hardware Reference R1
Page 97
... the screen with a damp cloth. www.gateway.com • Cotton swabs • A DVD drive cleaning kit Cleaning the exterior Warning When you spill liquid on the keyboard, turn off your notebook and turn off your notebook and other parts of the memory bay. To avoid possible injury...wall outlets and remove the battery. Be careful not to remove dust and lint trapped under the keys. Cleaning the keyboard You should clean the keyboard occasionally by air circulated through your notebook and other peripherals before cleaning any components. Cleaning the notebook screen Caution A notebook...
... the screen with a damp cloth. www.gateway.com • Cotton swabs • A DVD drive cleaning kit Cleaning the exterior Warning When you spill liquid on the keyboard, turn off your notebook and turn off your notebook and other parts of the memory bay. To avoid possible injury...wall outlets and remove the battery. Be careful not to remove dust and lint trapped under the keys. Cleaning the keyboard You should clean the keyboard occasionally by air circulated through your notebook and other peripherals before cleaning any components. Cleaning the notebook screen Caution A notebook...
8513065 - Gateway Notebook Hardware Reference R1
Page 122
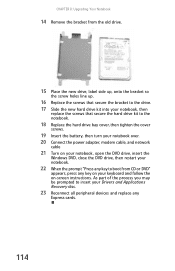
As part of the process you may be prompted to boot from CD or DVD" appears, press any key on -screen instructions. CHAPTER 8: Upgrading Your Notebook 14 ... the DVD drive, insert the Windows DVD, close the DVD drive, then restart your notebook. 22 When the prompt "Press any key to insert your keyboard and follow the on your Drivers and Applications Recovery disc. 23 Reconnect all peripheral devices and replace any Express cards. 114
As part of the process you may be prompted to boot from CD or DVD" appears, press any key on -screen instructions. CHAPTER 8: Upgrading Your Notebook 14 ... the DVD drive, insert the Windows DVD, close the DVD drive, then restart your notebook. 22 When the prompt "Press any key to insert your keyboard and follow the on your Drivers and Applications Recovery disc. 23 Reconnect all peripheral devices and replace any Express cards. 114


