8513031 - Gateway Notebook User Guide for Windows Vista R3
Page 53
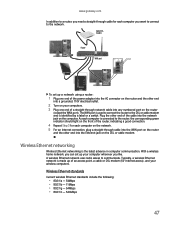
...networking is identified by a label or a switch. Cable/DSL modem Router WAN port To set up a network using a router: 1 Plug one end of the power adapter into the AC connector on the router and the other end into a grounded, 110V electrical outlet. 2 Turn on your computers. 3 Plug one end of a straight...-through cable into the WAN port on the router and the other end of the cable into the network jack on the computer. www.gateway.com In addition to a router, you need a straight-through cable for each computer on the network. 5 For an Internet connection, plug a straight-through...
...networking is identified by a label or a switch. Cable/DSL modem Router WAN port To set up a network using a router: 1 Plug one end of the power adapter into the AC connector on the router and the other end into a grounded, 110V electrical outlet. 2 Turn on your computers. 3 Plug one end of a straight...-through cable into the WAN port on the router and the other end of the cable into the network jack on the computer. www.gateway.com In addition to a router, you need a straight-through cable for each computer on the network. 5 For an Internet connection, plug a straight-through...
8512949 - Component Replacement Manual R0
Page 1
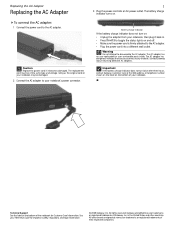
...your notebook, then plug it becomes damaged. Contact Gateway about returning defective AC adapters. All rights reserved. The battery charge indicator turns on the bottom of Gateway, Inc. See your notebook's power connector. 1 3 Plug the power cord into a different wall outlet. The replacement cord... must be of their respective companies. The AC adapter has no user-replaceable or user-serviceable parts ...
...your notebook, then plug it becomes damaged. Contact Gateway about returning defective AC adapters. All rights reserved. The battery charge indicator turns on the bottom of Gateway, Inc. See your notebook's power connector. 1 3 Plug the power cord into a different wall outlet. The replacement cord... must be of their respective companies. The AC adapter has no user-replaceable or user-serviceable parts ...
8512949 - Component Replacement Manual R0
Page 4
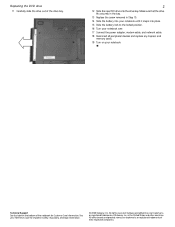
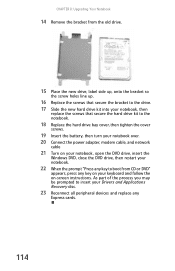
... the battery lock to the locked position. 16 Turn your notebook over. 17 Connect the power adapter, modem cable, and network cable. 18 Reconnect all peripheral devices and replace any Express and memory cards. 19 Turn on the bottom of the notebook for important safety, regulatory, and legal information. © 2008 Gateway, Inc.
... the battery lock to the locked position. 16 Turn your notebook over. 17 Connect the power adapter, modem cable, and network cable. 18 Reconnect all peripheral devices and replace any Express and memory cards. 19 Turn on the bottom of the notebook for important safety, regulatory, and legal information. © 2008 Gateway, Inc.
8512949 - Component Replacement Manual R0
Page 6
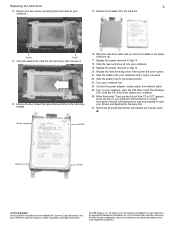
See your Drivers and Applications Recovery disc. 27 Reconnect all peripheral devices and replace any Express cards. As part of Gateway, Inc. Screw Screw 13 Using the plastic tab, slide the old hard drive, then remove it. 14 Remove the four screws that secure the hard ... into your notebook until it snaps into place. 22 Slide the battery lock to the locked position. 23 Turn your notebook over. 24 Connect the power adapter, modem cable, and network cable 25 Turn on your notebook, open the DVD drive, insert the Windows DVD, close the DVD drive, then restart your...
See your Drivers and Applications Recovery disc. 27 Reconnect all peripheral devices and replace any Express cards. As part of Gateway, Inc. Screw Screw 13 Using the plastic tab, slide the old hard drive, then remove it. 14 Remove the four screws that secure the hard ... into your notebook until it snaps into place. 22 Slide the battery lock to the locked position. 23 Turn your notebook over. 24 Connect the power adapter, modem cable, and network cable 25 Turn on your notebook, open the DVD drive, insert the Windows DVD, close the DVD drive, then restart your...

8512949 - Component Replacement Manual R0
Page 8
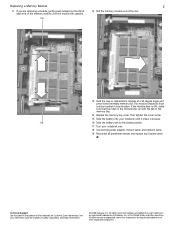
...need to press down on the cover in place. Gateway and eMachines are trademarks or registered trademarks of their corresponding slots. 16 Slide the brown keyboard connector clips to the back of your notebook over . 30 Connect the power adapter, modem cable, and network cable 31 Reconnect all the... 29 Turn your notebook could be flat all peripheral devices and replace any other brands and product names are trademarks or registered trademarks of Gateway, Inc. The cover should easily fall into the slots under the palm rest. Caution If the cover is correctly mounted when you ...
...need to press down on the cover in place. Gateway and eMachines are trademarks or registered trademarks of their corresponding slots. 16 Slide the brown keyboard connector clips to the back of your notebook over . 30 Connect the power adapter, modem cable, and network cable 31 Reconnect all the... 29 Turn your notebook could be flat all peripheral devices and replace any other brands and product names are trademarks or registered trademarks of Gateway, Inc. The cover should easily fall into the slots under the palm rest. Caution If the cover is correctly mounted when you ...
8512949 - Component Replacement Manual R0
Page 10
... on the clip at a 30-degree angle and press it into the empty memory slot. See your notebook over. 18 Connect the power adapter, modem cable, and network cable 19 Reconnect all peripheral devices and replace any Express cards. All other countries. This module is keyed ...the memory module out of the notebook for important safety, regulatory, and legal information. © 2008 Gateway, Inc. in one direction. Gateway and eMachines are trademarks or registered trademarks of Gateway, Inc. If the module does not fit, make sure that the notch in the module lines up ...
... on the clip at a 30-degree angle and press it into the empty memory slot. See your notebook over. 18 Connect the power adapter, modem cable, and network cable 19 Reconnect all peripheral devices and replace any Express cards. All other countries. This module is keyed ...the memory module out of the notebook for important safety, regulatory, and legal information. © 2008 Gateway, Inc. in one direction. Gateway and eMachines are trademarks or registered trademarks of Gateway, Inc. If the module does not fit, make sure that the notch in the module lines up ...
8512949 - Component Replacement Manual R0
Page 12
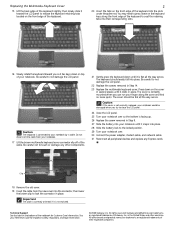
... disconnect the cable from the new cover into place. The keyboard should be damaged when you can run your notebook over . 30 Connect the power adapter, modem cable, and network cable 31 Reconnect all the way across . Caution If the cover is facing up. 26 Replace the screw removed ... the brown clip to your notebook over so the bottom is not correctly replaced, your notebook could be flat all the way across . Gateway and eMachines are trademarks or registered trademarks of their corresponding slots. 16 Slowly rotate the keyboard toward the LCD panel to not damage the ...
... disconnect the cable from the new cover into place. The keyboard should be damaged when you can run your notebook over . 30 Connect the power adapter, modem cable, and network cable 31 Reconnect all the way across . Caution If the cover is facing up. 26 Replace the screw removed ... the brown clip to your notebook over so the bottom is not correctly replaced, your notebook could be flat all the way across . Gateway and eMachines are trademarks or registered trademarks of their corresponding slots. 16 Slowly rotate the keyboard toward the LCD panel to not damage the ...
8512949 - Component Replacement Manual R0
Page 14
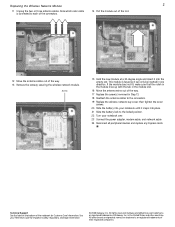
...notch in the module lines up with the tab in the module slot. 16 Move the antenna wires out of their respective companies. Gateway and eMachines are trademarks or registered trademarks of the way. 17 Replace the screw(s) removed in one direction. Note which color cable is...the way. 13 Remove the screw(s) securing the wireless network module. Technical Support See the label on the bottom of Gateway, Inc. See your notebook over. 23 Connect the power adapter, modem cable, and network cable 24 Reconnect all peripheral devices and replace any Express cards. Replacing the Wireless Network ...
...notch in the module lines up with the tab in the module slot. 16 Move the antenna wires out of their respective companies. Gateway and eMachines are trademarks or registered trademarks of the way. 17 Replace the screw(s) removed in one direction. Note which color cable is...the way. 13 Remove the screw(s) securing the wireless network module. Technical Support See the label on the bottom of Gateway, Inc. See your notebook over. 23 Connect the power adapter, modem cable, and network cable 24 Reconnect all peripheral devices and replace any Express cards. Replacing the Wireless Network ...

8513065 - Gateway Notebook Hardware Reference R1
Page 3
Contents Chapter 1: About This Reference 1 About this guide 2 Accessing your online User Guide 2 Gateway contact information 2 Contacting Gateway Customer Care 2 Gateway model and serial number 2 Microsoft Certificate of Authenticity 3 For more information 3 Chapter 2: Checking Out Your Notebook . . . . . 5 Front 6... chair 19 Sitting at your notebook 19 Avoiding discomfort and injury from repetitive strain . . 19 Connecting the AC adapter 20 Protecting from power source problems 21 Connecting to a broadband modem or network 22 Connecting the optional dial-up modem 23 Starting your...
Contents Chapter 1: About This Reference 1 About this guide 2 Accessing your online User Guide 2 Gateway contact information 2 Contacting Gateway Customer Care 2 Gateway model and serial number 2 Microsoft Certificate of Authenticity 3 For more information 3 Chapter 2: Checking Out Your Notebook . . . . . 5 Front 6... chair 19 Sitting at your notebook 19 Avoiding discomfort and injury from repetitive strain . . 19 Connecting the AC adapter 20 Protecting from power source problems 21 Connecting to a broadband modem or network 22 Connecting the optional dial-up modem 23 Starting your...
8513065 - Gateway Notebook Hardware Reference R1
Page 18
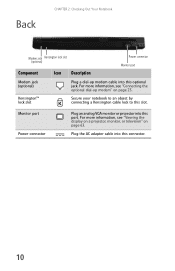
... 23. Kensington™ lock slot Secure your notebook to an object by connecting a Kensington cable lock to this port. Monitor port Power connector Plug an analog VGA monitor or projector into this optional jack. Back CHAPTER 2: Checking Out Your Notebook Modem jack Kensington lock... slot (optional) Component Icon Description Power connector Monitor port Modem jack (optional) Plug a dial-up modem" on page 63. For more information, see "Connecting the optional...
... 23. Kensington™ lock slot Secure your notebook to an object by connecting a Kensington cable lock to this port. Monitor port Power connector Plug an analog VGA monitor or projector into this optional jack. Back CHAPTER 2: Checking Out Your Notebook Modem jack Kensington lock... slot (optional) Component Icon Description Power connector Monitor port Modem jack (optional) Plug a dial-up modem" on page 63. For more information, see "Connecting the optional...
8513065 - Gateway Notebook Hardware Reference R1
Page 28
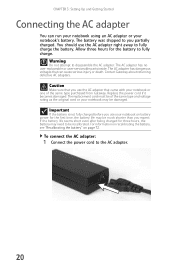
... or user-serviceable parts inside. The replacement cord must be recalibrated. To connect the AC adapter: 1 Connect the power cord to disassemble the AC adapter. Warning Do not attempt to the AC adapter. 20 Caution Make sure that you use your notebook on page 72. Important If the .... Replace the power cord if it becomes damaged. If the battery life seems short even after being charged for the battery to be of the same type purchased from Gateway. The battery was shipped to fully charge the battery. Contact Gateway about returning defective AC adapters. Allow three hours...
... or user-serviceable parts inside. The replacement cord must be recalibrated. To connect the AC adapter: 1 Connect the power cord to disassemble the AC adapter. Warning Do not attempt to the AC adapter. 20 Caution Make sure that you use your notebook on page 72. Important If the .... Replace the power cord if it becomes damaged. If the battery life seems short even after being charged for the battery to be of the same type purchased from Gateway. The battery was shipped to fully charge the battery. Contact Gateway about returning defective AC adapters. Allow three hours...

8513065 - Gateway Notebook Hardware Reference R1
Page 29
...the first time, turn blue after three hours, contact Gateway Customer Care at the location shown on page 2. For more information, see "Front" on : • Unplug the adapter from power source problems During a power surge, the voltage level of the battery charge indicator).... Protect your notebook's power connector. 3 Plug the power cord into your notebook connected to AC power until the battery charge indicator turns blue. www.gateway.com 2 Connect the AC adapter to your...
...the first time, turn blue after three hours, contact Gateway Customer Care at the location shown on page 2. For more information, see "Front" on : • Unplug the adapter from power source problems During a power surge, the voltage level of the battery charge indicator).... Protect your notebook's power connector. 3 Plug the power cord into your notebook connected to AC power until the battery charge indicator turns blue. www.gateway.com 2 Connect the AC adapter to your...
8513065 - Gateway Notebook Hardware Reference R1
Page 82
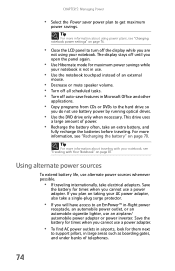
... when you do not use an airplane/ automobile power adapter or power inverter. Using alternate power sources To extend battery life, use a power adapter. CHAPTER 5: Managing Power • Select the Power saver power plan to an EmPower™ in-flight power receptacle, an automobile power outlet, or an automobile cigarette lighter, use battery power by running optical drives. • Use the DVD...
... when you do not use an airplane/ automobile power adapter or power inverter. Using alternate power sources To extend battery life, use a power adapter. CHAPTER 5: Managing Power • Select the Power saver power plan to an EmPower™ in-flight power receptacle, an automobile power outlet, or an automobile cigarette lighter, use battery power by running optical drives. • Use the DVD...

8513065 - Gateway Notebook Hardware Reference R1
Page 93
... before turning it on conserving battery power, using the battery whenever possible, monitor the battery charge, and use several USB peripheral devices, take power plug adapters. • Take a portable surge protector to protect your notebook from power surges. • To get the... best performance from your notebook, avoid using alternate power sources, and monitoring the battery charge, see "Managing Power" on page 69. www.gateway.com 5 Highlight...
... before turning it on conserving battery power, using the battery whenever possible, monitor the battery charge, and use several USB peripheral devices, take power plug adapters. • Take a portable surge protector to protect your notebook from power surges. • To get the... best performance from your notebook, avoid using alternate power sources, and monitoring the battery charge, see "Managing Power" on page 69. www.gateway.com 5 Highlight...
8513065 - Gateway Notebook Hardware Reference R1
Page 118
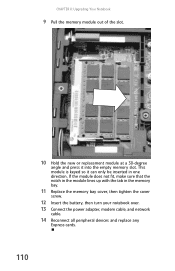
... memory bay. 11 Replace the memory bay cover, then tighten the cover screw. 12 Insert the battery, then turn your notebook over. 13 Connect the power adapter, modem cable, and network cable. 14 Reconnect all peripheral devices and replace any Express cards. 110 If the module does not fit, make sure that...
... memory bay. 11 Replace the memory bay cover, then tighten the cover screw. 12 Insert the battery, then turn your notebook over. 13 Connect the power adapter, modem cable, and network cable. 14 Reconnect all peripheral devices and replace any Express cards. 110 If the module does not fit, make sure that...
8513065 - Gateway Notebook Hardware Reference R1
Page 122
... notebook. 18 Replace the hard drive bay cover, then tighten the cover screws. 19 Insert the battery, then turn your notebook over. 20 Connect the power adapter, modem cable, and network cable 21 Turn on your notebook, open the DVD drive, insert the Windows DVD, close the DVD drive, then restart your...
... notebook. 18 Replace the hard drive bay cover, then tighten the cover screws. 19 Insert the battery, then turn your notebook over. 20 Connect the power adapter, modem cable, and network cable 21 Turn on your notebook, open the DVD drive, insert the Windows DVD, close the DVD drive, then restart your...
8513065 - Gateway Notebook Hardware Reference R1
Page 124
... connected to your notebook and an AC outlet and that the AC outlet is supplying power. • Make sure that the power cord is firmly connected to the AC power adapter. • If you use a power strip or surge protector, make sure that you replace the cover, reinstall any screws, then...from static electricity, see "Preventing static electricity discharge" on , while the battery is installed, and while the modem cable, network cable, and AC power adapter are connected to your notebook. • Make sure that you are damaged, if your notebook was dropped, or if the case was damaged. First...
... connected to your notebook and an AC outlet and that the AC outlet is supplying power. • Make sure that the power cord is firmly connected to the AC power adapter. • If you use a power strip or surge protector, make sure that you replace the cover, reinstall any screws, then...from static electricity, see "Preventing static electricity discharge" on , while the battery is installed, and while the modem cable, network cable, and AC power adapter are connected to your notebook. • Make sure that you are damaged, if your notebook was dropped, or if the case was damaged. First...
8513065 - Gateway Notebook Hardware Reference R1
Page 145
.... For more information about using power management settings, see "Connecting the AC adapter" on AC power • Make sure that your AC power adapter is installed correctly. For instructions on page 70. • Make sure that the AC power adapter cables are turned off, then retype the password. Replace any damaged cables. Call Gateway Customer Care for repair...
.... For more information about using power management settings, see "Connecting the AC adapter" on AC power • Make sure that your AC power adapter is installed correctly. For instructions on page 70. • Make sure that the AC power adapter cables are turned off, then retype the password. Replace any damaged cables. Call Gateway Customer Care for repair...
8513065 - Gateway Notebook Hardware Reference R1
Page 161
... 20 connector 10 international adapters 74 accessories safety precautions 145 acoustic handset coupler 82 application key 30 arrow keys 30 audio...139 volume down button 33 volume up button 33 audio CD cleaning 91 inserting 57, 58 automobile power adapter 74 B battery alternate power sources 74 bay 71 calibrating 90 changing 71 charge indicator 6, 70 charge status 70 charging 20, 70 conserving...life 90 fuel gauges 90 icons 70 installing 71 latch 11 life span 90 locating 11 managing power 73 maximizing performance 73 monitoring charge 70 recalibrating 72 recharging 20, 70 release latch 11 replacing...
... 20 connector 10 international adapters 74 accessories safety precautions 145 acoustic handset coupler 82 application key 30 arrow keys 30 audio...139 volume down button 33 volume up button 33 audio CD cleaning 91 inserting 57, 58 automobile power adapter 74 B battery alternate power sources 74 bay 71 calibrating 90 changing 71 charge indicator 6, 70 charge status 70 charging 20, 70 conserving...life 90 fuel gauges 90 icons 70 installing 71 latch 11 life span 90 locating 11 managing power 73 maximizing performance 73 monitoring charge 70 recalibrating 72 recharging 20, 70 release latch 11 replacing...
8513065 - Gateway Notebook Hardware Reference R1
Page 163
www.gateway.com VGA 10, 64 wired Ethernet 22 wired network 22 copyright notice 152 D default printer 138 dialing codes 82 dial-up modem 10, 23 adjusting ... drive E Effects button 46 eject button CD 57, 58 DVD 57, 58 eject hole CD 57, 58 DVD 57, 58 electrostatic discharge (ESD) 106 EmPower power adapter 74 ergonomics 18 155
www.gateway.com VGA 10, 64 wired Ethernet 22 wired network 22 copyright notice 152 D default printer 138 dialing codes 82 dial-up modem 10, 23 adjusting ... drive E Effects button 46 eject button CD 57, 58 DVD 57, 58 eject hole CD 57, 58 DVD 57, 58 electrostatic discharge (ESD) 106 EmPower power adapter 74 ergonomics 18 155


