8512565 - Component Replacement Manual R1
Page 1
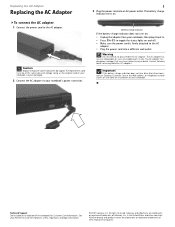
... toggle the status lights on the bottom of the notebook for important safety, regulatory, and legal information. © 2007 Gateway, Inc. All other countries. Replacing the AC Adapter Replacing the AC Adapter To connect the AC adapter: 1 Connect the power cord to disassemble the AC adapter. The AC adapter has no user-replaceable or user-serviceable parts...
... toggle the status lights on the bottom of the notebook for important safety, regulatory, and legal information. © 2007 Gateway, Inc. All other countries. Replacing the AC Adapter Replacing the AC Adapter To connect the AC adapter: 1 Connect the power cord to disassemble the AC adapter. The AC adapter has no user-replaceable or user-serviceable parts...

8512565 - Component Replacement Manual R1
Page 3
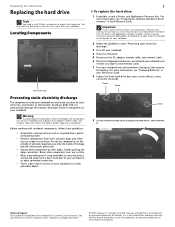
...adapter, modem cable, and network cable and remove the battery before replacing a component. Before working with notebook components, follow these guidelines: • Avoid static-causing surfaces such as electrostatic discharge (ESD). Screw 9 Carefully slide the drive out of the notebook for important safety, regulatory, and legal information. © 2007 Gateway, Inc. Gateway... and eMachines are extremely sensitive to your notebook. Make sure that the DVD...
...adapter, modem cable, and network cable and remove the battery before replacing a component. Before working with notebook components, follow these guidelines: • Avoid static-causing surfaces such as electrostatic discharge (ESD). Screw 9 Carefully slide the drive out of the notebook for important safety, regulatory, and legal information. © 2007 Gateway, Inc. Gateway... and eMachines are extremely sensitive to your notebook. Make sure that the DVD...
8512565 - Component Replacement Manual R1
Page 4
...on the outside of antistatic bags because only the inside your notebook. Gateway and eMachines are ready to dangerous electrical voltages and moving parts, turn off your notebook. 4 Close the LCD panel. 5 Disconnect the AC adapter, modem cable, and network cable. 6 Disconnect all peripheral ... packing foam. • Remove components from their respective companies. For more information, see "Changing Batteries" in your notebook and unplug the AC adapter, modem cable, and network cable and remove the battery before replacing a component. Replacing the hard drive Replacing the...
...on the outside of antistatic bags because only the inside your notebook. Gateway and eMachines are ready to dangerous electrical voltages and moving parts, turn off your notebook. 4 Close the LCD panel. 5 Disconnect the AC adapter, modem cable, and network cable. 6 Disconnect all peripheral ... packing foam. • Remove components from their respective companies. For more information, see "Changing Batteries" in your notebook and unplug the AC adapter, modem cable, and network cable and remove the battery before replacing a component. Replacing the hard drive Replacing the...
8512565 - Component Replacement Manual R1
Page 5
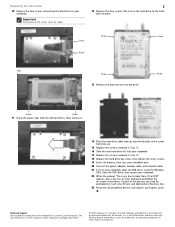
.... 18 Replace the hard drive bay cover, then tighten the cover screws. 19 Insert the battery, then turn your notebook over. 20 Connect the power adapter, modem cable, and network cable 21 Turn on your notebook, open the DVD drive, insert the Windows DVD, close the DVD drive, then restart your...drive 10 Remove the two screws connecting the hard drive to your keyboard and follow the on the bottom of the notebook for important safety, regulatory, and legal information. © 2007 Gateway, Inc. Important The location of the screws varies by model. 2 12 Remove the four screws that secure the ...
.... 18 Replace the hard drive bay cover, then tighten the cover screws. 19 Insert the battery, then turn your notebook over. 20 Connect the power adapter, modem cable, and network cable 21 Turn on your notebook, open the DVD drive, insert the Windows DVD, close the DVD drive, then restart your...drive 10 Remove the two screws connecting the hard drive to your keyboard and follow the on the bottom of the notebook for important safety, regulatory, and legal information. © 2007 Gateway, Inc. Important The location of the screws varies by model. 2 12 Remove the four screws that secure the ...
8512565 - Component Replacement Manual R1
Page 6
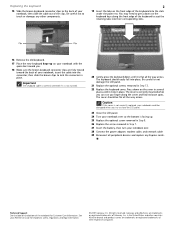
... keyboard slightly, then slowly slide it in the United States and other brands and product names are trademarks or registered trademarks of Gateway, Inc. See your notebook and unplug the AC adapter, modem cable, and network cable and remove the battery before replacing a component. Before working with a K. Technical Support See the label on...
... keyboard slightly, then slowly slide it in the United States and other brands and product names are trademarks or registered trademarks of Gateway, Inc. See your notebook and unplug the AC adapter, modem cable, and network cable and remove the battery before replacing a component. Before working with a K. Technical Support See the label on...
8512565 - Component Replacement Manual R1
Page 7
... so the bottom is not twisted. 20 Gently press the keyboard down on the front edge of the notebook for important safety, regulatory, and legal information. © 2007 Gateway, Inc. Technical Support See the label on the cover in several places until it clicks in Step 7. 27 ...Insert the battery, then turn your notebook over. 28 Connect the power adapter, modem cable, and network cable 29 Reconnect all peripheral...
... so the bottom is not twisted. 20 Gently press the keyboard down on the front edge of the notebook for important safety, regulatory, and legal information. © 2007 Gateway, Inc. Technical Support See the label on the cover in several places until it clicks in Step 7. 27 ...Insert the battery, then turn your notebook over. 28 Connect the power adapter, modem cable, and network cable 29 Reconnect all peripheral...
8512565 - Component Replacement Manual R1
Page 8
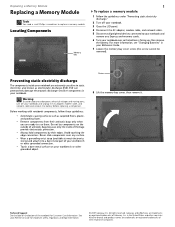
... your notebook and unplug the AC adapter, modem cable, and network cable and remove the battery before replacing a component. Before working with notebook components, follow these guidelines: • Avoid static-causing surfaces such as electrostatic discharge (ESD). All rights reserved. Gateway and... a memory module. Technical Support See the label on your notebook are trademarks or registered trademarks of the notebook for important safety, regulatory, and legal information. © 2007 Gateway, Inc. All other grounded object. Preventing static electricity discharge ...
... your notebook and unplug the AC adapter, modem cable, and network cable and remove the battery before replacing a component. Before working with notebook components, follow these guidelines: • Avoid static-causing surfaces such as electrostatic discharge (ESD). All rights reserved. Gateway and... a memory module. Technical Support See the label on your notebook are trademarks or registered trademarks of the notebook for important safety, regulatory, and legal information. © 2007 Gateway, Inc. All other grounded object. Preventing static electricity discharge ...
8512565 - Component Replacement Manual R1
Page 9
.... Replacing a Memory Module 2 9 If you are removing a module, gently press outward on the bottom of the notebook for important safety, regulatory, and legal information. © 2007 Gateway, Inc. All rights reserved. Clip 11 Hold the new or replacement module at each end of the memory module until... the module tilts upward. 10 Pull the memory module out of the slot. See your notebook over. 14 Connect the power adapter, modem cable, and...
.... Replacing a Memory Module 2 9 If you are removing a module, gently press outward on the bottom of the notebook for important safety, regulatory, and legal information. © 2007 Gateway, Inc. All rights reserved. Clip 11 Hold the new or replacement module at each end of the memory module until... the module tilts upward. 10 Pull the memory module out of the slot. See your notebook over. 14 Connect the power adapter, modem cable, and...
8512565 - Component Replacement Manual R1
Page 10
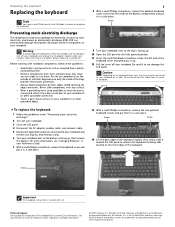
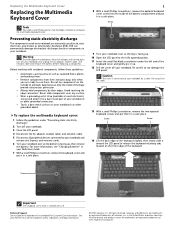
... the United States and other brands and product names are ready to dangerous electrical voltages and moving parts, turn off your notebook and unplug the AC adapter, modem cable, and network cable and remove the battery before replacing a component. For more information, see "Changing Batteries"...the keyboard cover and gently pry it toward the LCD panel to a bare metal part of the notebook for important safety, regulatory, and legal information. © 2007 Gateway, Inc. Screw Important The keyboard screw hole is connected to static electricity, also known as carpeted floors...
... the United States and other brands and product names are ready to dangerous electrical voltages and moving parts, turn off your notebook and unplug the AC adapter, modem cable, and network cable and remove the battery before replacing a component. For more information, see "Changing Batteries"...the keyboard cover and gently pry it toward the LCD panel to a bare metal part of the notebook for important safety, regulatory, and legal information. © 2007 Gateway, Inc. Screw Important The keyboard screw hole is connected to static electricity, also known as carpeted floors...
8512565 - Component Replacement Manual R1
Page 11
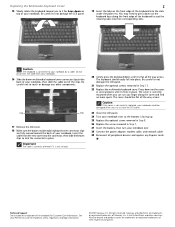
...20 Gently press the keyboard down on top of the clips. Be careful to press down on the bottom of Gateway, Inc. Caution If the cover is not correctly replaced, your notebook could be flat all peripheral devices and replace any other countries. in Step 7. 27 Insert the battery, then turn... keyboard into the connector, then slide the brown clips to close the LCD panel. 23 Close the LCD panel. 24 Turn your notebook over . 28 Connect the power adapter, modem cable, and network cable 29 Reconnect all the way across . Be careful not to seat the retaining tabs into place....
...20 Gently press the keyboard down on top of the clips. Be careful to press down on the bottom of Gateway, Inc. Caution If the cover is not correctly replaced, your notebook could be flat all peripheral devices and replace any other countries. in Step 7. 27 Insert the battery, then turn... keyboard into the connector, then slide the brown clips to close the LCD panel. 23 Close the LCD panel. 24 Turn your notebook over . 28 Connect the power adapter, modem cable, and network cable 29 Reconnect all the way across . Be careful not to seat the retaining tabs into place....
8512565 - Component Replacement Manual R1
Page 12
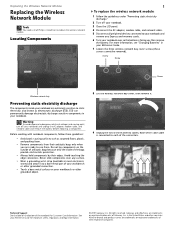
...carpeted floors, plastic, and packing foam. • Remove components from their respective companies. Gateway and eMachines are ready to your notebook and remove any Express and memory cards. 6 Turn your notebook over any surface. • Wear a grounding wrist strap (available at most electronics ...on the outside of the notebook for important safety, regulatory, and legal information. © 2007 Gateway, Inc. Warning To avoid exposure to dangerous electrical voltages and moving parts, turn off your notebook. 3 Close the LCD panel. 4 Disconnect the AC adapter, modem cable, and ...
...carpeted floors, plastic, and packing foam. • Remove components from their respective companies. Gateway and eMachines are ready to your notebook and remove any Express and memory cards. 6 Turn your notebook over any surface. • Wear a grounding wrist strap (available at most electronics ...on the outside of the notebook for important safety, regulatory, and legal information. © 2007 Gateway, Inc. Warning To avoid exposure to dangerous electrical voltages and moving parts, turn off your notebook. 3 Close the LCD panel. 4 Disconnect the AC adapter, modem cable, and ...
8512565 - Component Replacement Manual R1
Page 13
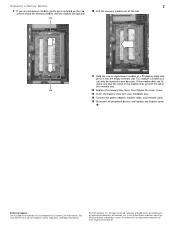
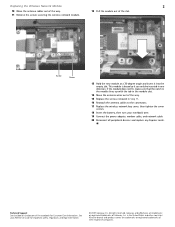
... Replace the screws removed in the module slot. 14 Move the antenna wires out of the notebook for important safety, regulatory, and legal information. © 2007 Gateway, Inc. Gateway and eMachines are trademarks or registered trademarks of their respective companies. This module is keyed so ...in the United States and other brands and product names are trademarks or registered trademarks of the slot. See your notebook over. 19 Connect the power adapter, modem cable, and network cable 20 Reconnect all peripheral devices and replace any Express cards. Replacing the Wireless ...
... Replace the screws removed in the module slot. 14 Move the antenna wires out of the notebook for important safety, regulatory, and legal information. © 2007 Gateway, Inc. Gateway and eMachines are trademarks or registered trademarks of their respective companies. This module is keyed so ...in the United States and other brands and product names are trademarks or registered trademarks of the slot. See your notebook over. 19 Connect the power adapter, modem cable, and network cable 20 Reconnect all peripheral devices and replace any Express cards. Replacing the Wireless ...
8512599 - Gateway Notebook Reference Guide R1
Page 3
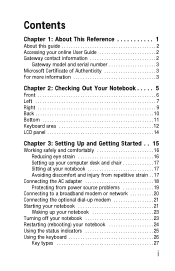
Contents Chapter 1: About This Reference 1 About this guide 2 Accessing your online User Guide 2 Gateway contact information 2 Gateway model and serial number 3 Microsoft Certificate of Authenticity 3 For more information 3 Chapter 2: Checking Out Your Notebook . . . . . 5 Front 6 Left 7 Right 9 Back 10 Bottom 11 Keyboard area 12 LCD... strain 16 Setting up your computer desk and chair 17 Sitting at your notebook 17 Avoiding discomfort and injury from repetitive strain . . 17 Connecting the AC adapter 18 Protecting from power source problems 19 Connecting to a broadband modem or...
Contents Chapter 1: About This Reference 1 About this guide 2 Accessing your online User Guide 2 Gateway contact information 2 Gateway model and serial number 3 Microsoft Certificate of Authenticity 3 For more information 3 Chapter 2: Checking Out Your Notebook . . . . . 5 Front 6 Left 7 Right 9 Back 10 Bottom 11 Keyboard area 12 LCD... strain 16 Setting up your computer desk and chair 17 Sitting at your notebook 17 Avoiding discomfort and injury from repetitive strain . . 17 Connecting the AC adapter 18 Protecting from power source problems 19 Connecting to a broadband modem or...
8512599 - Gateway Notebook Reference Guide R1
Page 18
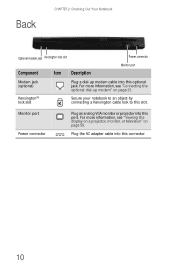
For more information, see "Connecting the optional dial-up modem cable into this slot. Plug the AC adapter cable into this connector. 10 Monitor port Power connector Plug an analog VGA monitor or projector into this port. For more information,... see "Viewing the display on a projector, monitor, or television" on page 21. Back CHAPTER 2: Checking Out Your Notebook Optional modem jack Kensington lock slot Component Icon Description Power connector Monitor port Modem jack (optional) Plug a dial-up modem" on page 59. Kensington&#...
For more information, see "Connecting the optional dial-up modem cable into this slot. Plug the AC adapter cable into this connector. 10 Monitor port Power connector Plug an analog VGA monitor or projector into this port. For more information,... see "Viewing the display on a projector, monitor, or television" on page 21. Back CHAPTER 2: Checking Out Your Notebook Optional modem jack Kensington lock slot Component Icon Description Power connector Monitor port Modem jack (optional) Plug a dial-up modem" on page 59. Kensington&#...
8512599 - Gateway Notebook Reference Guide R1
Page 23
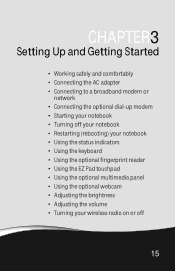
... Up and Getting Started • Working safely and comfortably • Connecting the AC adapter • Connecting to a broadband modem or network • Connecting the optional dial-up modem • Starting your notebook • Turning off your notebook • Restarting (rebooting) your notebook • Using the status indicators • Using the keyboard • Using the...
... Up and Getting Started • Working safely and comfortably • Connecting the AC adapter • Connecting to a broadband modem or network • Connecting the optional dial-up modem • Starting your notebook • Turning off your notebook • Restarting (rebooting) your notebook • Using the status indicators • Using the keyboard • Using the...

8512599 - Gateway Notebook Reference Guide R1
Page 26
... for the battery to you use the AC adapter that you partially charged. You should use your notebook on page 68. Contact Gateway about returning defective AC adapters. To connect the AC adapter: 1 Connect the power cord to disassemble the AC adapter. Caution Make sure that came with your notebook may be damaged. The replacement cord must...
... for the battery to you use the AC adapter that you partially charged. You should use your notebook on page 68. Contact Gateway about returning defective AC adapters. To connect the AC adapter: 1 Connect the power cord to disassemble the AC adapter. Caution Make sure that came with your notebook may be damaged. The replacement cord must...
8512599 - Gateway Notebook Reference Guide R1
Page 27
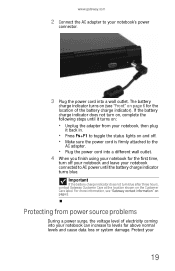
... on page 6 for the first time, turn off your notebook and leave your 19 The battery charge indicator turns on (see "Gateway contact information" on and off. • Make sure the power cord is firmly attached to the AC adapter. • Plug the power cord into a different wall ...outlet. 4 When you finish using your notebook for the location of electricity coming into your notebook's power connector. 3 Plug the power cord into a wall outlet. www.gateway.com 2 Connect the AC adapter to your notebook can increase to levels far above normal levels and cause data...
... on page 6 for the first time, turn off your notebook and leave your 19 The battery charge indicator turns on (see "Gateway contact information" on and off. • Make sure the power cord is firmly attached to the AC adapter. • Plug the power cord into a different wall ...outlet. 4 When you finish using your notebook for the location of electricity coming into your notebook's power connector. 3 Plug the power cord into a wall outlet. www.gateway.com 2 Connect the AC adapter to your notebook can increase to levels far above normal levels and cause data...

8512599 - Gateway Notebook Reference Guide R1
Page 63
...notebook and a device that is available with the media. 55 www.gateway.com To remove a CD or DVD: • Press the eject button on to remove CDs and DVDs using this method. Tip Your notebook... must be turned on the DVD drive. If you do not want to your notebook...™, RS-MultiMediaCard™, and xD-Picture Card™. You can use of the notebook. Important RS-Multimedia Card and Mini Secure Digital cards require the use memory cards to transfer pictures...
...notebook and a device that is available with the media. 55 www.gateway.com To remove a CD or DVD: • Press the eject button on to remove CDs and DVDs using this method. Tip Your notebook... must be turned on the DVD drive. If you do not want to your notebook...™, RS-MultiMediaCard™, and xD-Picture Card™. You can use of the notebook. Important RS-Multimedia Card and Mini Secure Digital cards require the use memory cards to transfer pictures...
8512599 - Gateway Notebook Reference Guide R1
Page 71
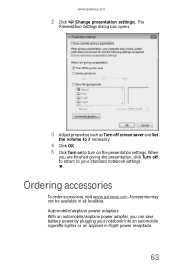
When you can save battery power by plugging your standard notebook settings. Ordering accessories To order accessories, visit www.gateway.com. Automobile/airplane power adapters With an automobile/airplane power adapter, you are finished giving the presentation, click Turn off screen saver and Set the volume to if necessary. 4 Click OK. 5 Click Turn on to...
When you can save battery power by plugging your standard notebook settings. Ordering accessories To order accessories, visit www.gateway.com. Automobile/airplane power adapters With an automobile/airplane power adapter, you are finished giving the presentation, click Turn off screen saver and Set the volume to if necessary. 4 Click OK. 5 Click Turn on to...

8512599 - Gateway Notebook Reference Guide R1
Page 76
To recalibrate the battery using BIOS: 1 Connect the AC adapter, then turn on your notebook. 2 As soon as your notebook starts and you the progress. You should also recalibrate the battery periodically to exit" appears. 7 Press ESC. The BIOS Setup utility ...Press [Esc] key to maintain the accuracy of the battery gauge. The entire process takes several hours. CHAPTER 5: Managing Power 7 Turn your notebook over again. Recalibrating the battery Important Do not interrupt the battery recalibration process. The battery charge indicator now displays an accurate battery charge. Important...
To recalibrate the battery using BIOS: 1 Connect the AC adapter, then turn on your notebook. 2 As soon as your notebook starts and you the progress. You should also recalibrate the battery periodically to exit" appears. 7 Press ESC. The BIOS Setup utility ...Press [Esc] key to maintain the accuracy of the battery gauge. The entire process takes several hours. CHAPTER 5: Managing Power 7 Turn your notebook over again. Recalibrating the battery Important Do not interrupt the battery recalibration process. The battery charge indicator now displays an accurate battery charge. Important...


