8512565 - Component Replacement Manual R1
Page 4
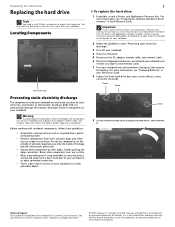
... on the label on your workbench or other countries. Screw Screw Screw 9 Lift the hard drive bay cover using the thumb notch, then remove it to replace the hard drive. Locating Components Hard drive bay Preventing static electricity discharge The components inside of Gateway, Inc. ESD can permanently damage electrostatic discharge-sensitive components in your Reference Guide...
... on the label on your workbench or other countries. Screw Screw Screw 9 Lift the hard drive bay cover using the thumb notch, then remove it to replace the hard drive. Locating Components Hard drive bay Preventing static electricity discharge The components inside of Gateway, Inc. ESD can permanently damage electrostatic discharge-sensitive components in your Reference Guide...
8512565 - Component Replacement Manual R1
Page 5
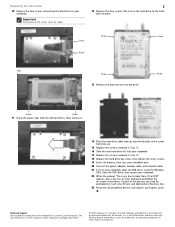
... Support See the label on the bottom of the notebook for important safety, regulatory, and legal information. © 2007 Gateway, Inc. in Step 10. 18 Replace the hard drive bay cover, then tighten the cover screws. 19 Insert the battery, then turn your Reference Guide for Customer Care Information....Reconnect all peripheral devices and replace any key to boot from the old drive. Important The location of Gateway, Inc. Screw Screw 11 Using the plastic tab, slide the old hard drive, then remove it. 14 Place the new drive, label side up, onto the bracket so the screw holes line ...
... Support See the label on the bottom of the notebook for important safety, regulatory, and legal information. © 2007 Gateway, Inc. in Step 10. 18 Replace the hard drive bay cover, then tighten the cover screws. 19 Insert the battery, then turn your Reference Guide for Customer Care Information....Reconnect all peripheral devices and replace any key to boot from the old drive. Important The location of Gateway, Inc. Screw Screw 11 Using the plastic tab, slide the old hard drive, then remove it. 14 Place the new drive, label side up, onto the bracket so the screw holes line ...

8512599 - Gateway Notebook Reference Guide R1
Page 6
... 9: Troubleshooting 113 Safety guidelines 114 First steps 114 Troubleshooting 115 Audio 115 Battery 115 CD drives 115 Diskette drive (external 115 Display 116 DVD drives 117 Ethernet 119 Express Cards 119 File management 119 Fingerprint reader 120 Hard drive 120 Internet 121 Keyboard 122 Media Center 123 Memory 126 Memory card reader 127 Modem (cable... (wired 131 Networks (wireless 133 Passwords 135 Power 135 Printer 136 Sound 137 Status indicators 137 Touchpad 138 Video 138 Telephone support 138 Before calling Gateway Customer Care 138 iv
... 9: Troubleshooting 113 Safety guidelines 114 First steps 114 Troubleshooting 115 Audio 115 Battery 115 CD drives 115 Diskette drive (external 115 Display 116 DVD drives 117 Ethernet 119 Express Cards 119 File management 119 Fingerprint reader 120 Hard drive 120 Internet 121 Keyboard 122 Media Center 123 Memory 126 Memory card reader 127 Modem (cable... (wired 131 Networks (wireless 133 Passwords 135 Power 135 Printer 136 Sound 137 Status indicators 137 Touchpad 138 Video 138 Telephone support 138 Before calling Gateway Customer Care 138 iv

8512599 - Gateway Notebook Reference Guide R1
Page 10
... Playing and recording media • Networking To access your online User Guide: • Click (Start), All Programs, then click Gateway Documentation. Accessing your online User Guide In addition to this section are specific to -read manual that are for informational purposes only...in -depth, easy-to your model of Gateway notebook. Label information varies by model, features ordered, and location. 2 CHAPTER 1: About This Reference About this guide This guide includes information and maintenance instructions that includes information on your hard drive. Your User Guide is an in this...
... Playing and recording media • Networking To access your online User Guide: • Click (Start), All Programs, then click Gateway Documentation. Accessing your online User Guide In addition to this section are specific to -read manual that are for informational purposes only...in -depth, easy-to your model of Gateway notebook. Label information varies by model, features ordered, and location. 2 CHAPTER 1: About This Reference About this guide This guide includes information and maintenance instructions that includes information on your hard drive. Your User Guide is an in this...
8512599 - Gateway Notebook Reference Guide R1
Page 19
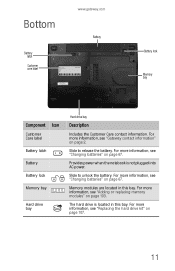
.... For more information, see "Changing batteries" on page 67. For more information, see "Gateway contact information" on page 107. 11 For more information, see "Replacing the hard drive kit" on page 2. The hard drive is not plugged into AC power. Bottom www.gateway.com Battery Battery latch Customer care label Online Support: Tech Support Phone: Hours...
.... For more information, see "Changing batteries" on page 67. For more information, see "Gateway contact information" on page 107. 11 For more information, see "Replacing the hard drive kit" on page 2. The hard drive is not plugged into AC power. Bottom www.gateway.com Battery Battery latch Customer care label Online Support: Tech Support Phone: Hours...
8512599 - Gateway Notebook Reference Guide R1
Page 33
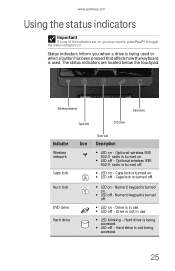
...gateway.com Using the status indicators Important If none of the indicators are located below the touchpad. Status indicators inform you may need to press FN+F1 to toggle the status indicators on - Optional wireless IEEE 802.11 radio is in use . ■ LED off . ■ LED on . Drive is turned off - Drive... how the keyboard is turned off - Hard drive is not being used . The status indicators are on - Wireless network Hard drive Caps lock DVD drive Indicator Wireless network Caps lock Num lock DVD drive Hard drive Num lock Icon Description ■ LED ...
...gateway.com Using the status indicators Important If none of the indicators are located below the touchpad. Status indicators inform you may need to press FN+F1 to toggle the status indicators on - Optional wireless IEEE 802.11 radio is in use . ■ LED off . ■ LED on . Drive is turned off - Drive... how the keyboard is turned off - Hard drive is not being used . The status indicators are on - Wireless network Hard drive Caps lock DVD drive Indicator Wireless network Caps lock Num lock DVD drive Hard drive Num lock Icon Description ■ LED ...
8512599 - Gateway Notebook Reference Guide R1
Page 40
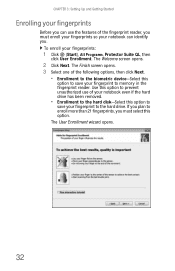
... Enrolling your fingerprints Before you can identify you. The Finish screen opens. 3 Select one of your notebook even if the hard drive has been removed. • Enrollment to the hard disk-Select this option to save your notebook can use of the following options, then click Next. • Enrollment to ...the hard drive. To enroll your fingerprint to the biometric device-Select this option. The User Enrollment wizard opens. 32 Use this option to prevent ...
... Enrolling your fingerprints Before you can identify you. The Finish screen opens. 3 Select one of your notebook even if the hard drive has been removed. • Enrollment to the hard disk-Select this option to save your notebook can use of the following options, then click Next. • Enrollment to ...the hard drive. To enroll your fingerprint to the biometric device-Select this option. The User Enrollment wizard opens. 32 Use this option to prevent ...

8512599 - Gateway Notebook Reference Guide R1
Page 72
Hard drives If you need additional space for accessories or supplies. Printers You can print pictures, banners, and greeting cards, as well as multimedia games or graphics programs, use a lot of printer to your notebook. Inkjet printers and cartridges are relatively inexpensive, but they print much faster than laser printers. Carrying cases Gateway...attach almost any type of memory. Laser printers and cartridges are more memory. See "Replacing the hard drive kit" on page 107 for more information. See "Adding or replacing memory modules" on page 103 for more information....
Hard drives If you need additional space for accessories or supplies. Printers You can print pictures, banners, and greeting cards, as well as multimedia games or graphics programs, use a lot of printer to your notebook. Inkjet printers and cartridges are relatively inexpensive, but they print much faster than laser printers. Carrying cases Gateway...attach almost any type of memory. Laser printers and cartridges are more memory. See "Replacing the hard drive kit" on page 107 for more information. See "Adding or replacing memory modules" on page 103 for more information....

8512599 - Gateway Notebook Reference Guide R1
Page 78
...save features in -flight power receptacle, an automobile power outlet, or an automobile cigarette lighter, use battery power by running optical drives. • Use the DVD drive only when necessary. Using alternate power sources To extend battery life, use alternate power sources whenever possible. • If traveling ...you will have access to an EmPower™ in Microsoft Office and other applications. • Copy programs from CDs or DVDs to the hard drive so you do not use an airplane/ automobile power adapter or power inverter. If you cannot use a power adapter. Save the battery ...
...save features in -flight power receptacle, an automobile power outlet, or an automobile cigarette lighter, use battery power by running optical drives. • Use the DVD drive only when necessary. Using alternate power sources To extend battery life, use alternate power sources whenever possible. • If traveling ...you will have access to an EmPower™ in Microsoft Office and other applications. • Copy programs from CDs or DVDs to the hard drive so you do not use an airplane/ automobile power adapter or power inverter. If you cannot use a power adapter. Save the battery ...
8512599 - Gateway Notebook Reference Guide R1
Page 79
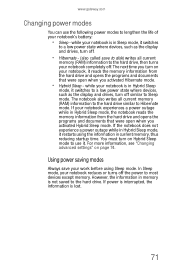
...page 74. www.gateway.com Changing power modes You can use it switches to a low power state where devices, such as the display and drives, turn off similar to most devices except memory. The notebook also writes all current memory (RAM) information to the hard drive. If your notebook... does not experience a power outage while in Sleep mode, it . In Sleep mode, your notebook, it reads the memory information from the hard drive and opens the programs and documents that were open when you activated Hybrid Sleep mode. The next time you activated Hibernate mode. • Hybrid...
...page 74. www.gateway.com Changing power modes You can use it switches to a low power state where devices, such as the display and drives, turn off similar to most devices except memory. The notebook also writes all current memory (RAM) information to the hard drive. If your notebook... does not experience a power outage while in Sleep mode, it . In Sleep mode, your notebook, it reads the memory information from the hard drive and opens the programs and documents that were open when you activated Hybrid Sleep mode. The next time you activated Hibernate mode. • Hybrid...

8512599 - Gateway Notebook Reference Guide R1
Page 80
..., then click Hibernate. mode Hibernate mode Changing notebook power settings You can change power saving options such as when the display or hard drive is automatically turned off . You can customize power settings from AC power outlets for you will be away from the Windows Mobility ... Use this plan if you : • Balanced - On Enter Sleep or Press FN+F3. If your notebook saves all memory information to the hard drive, then turns the power completely off . This is ... In Sleep, Hybrid Exit Sleep, Hybrid Press the power Sleep, or Hibernate Sleep, or button...
..., then click Hibernate. mode Hibernate mode Changing notebook power settings You can change power saving options such as when the display or hard drive is automatically turned off . You can customize power settings from AC power outlets for you will be away from the Windows Mobility ... Use this plan if you : • Balanced - On Enter Sleep or Press FN+F3. If your notebook saves all memory information to the hard drive, then turns the power completely off . This is ... In Sleep, Hybrid Exit Sleep, Hybrid Press the power Sleep, or Hibernate Sleep, or button...
8512599 - Gateway Notebook Reference Guide R1
Page 92
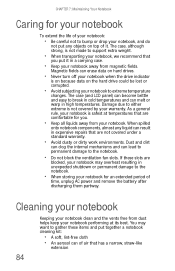
...transporting your notebook clean and the vents free from magnetic fields. The case, although strong, is on because data on hard drives. • Never turn off your notebook when the drive indicator is not made to the notebook. • When storing your notebook for you put it . Magnetic fields can ...erase data on the hard drive could be lost or corrupted. • Avoid subjecting your notebook performing at temperatures that are not covered under a standard warranty. • ...
...transporting your notebook clean and the vents free from magnetic fields. The case, although strong, is on because data on hard drives. • Never turn off your notebook when the drive indicator is not made to the notebook. • When storing your notebook for you put it . Magnetic fields can ...erase data on the hard drive could be lost or corrupted. • Avoid subjecting your notebook performing at temperatures that are not covered under a standard warranty. • ...
8512599 - Gateway Notebook Reference Guide R1
Page 96
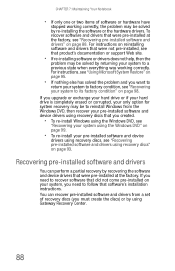
... software and device drivers using recovery discs that were pre-installed at the factory, see "Recovering pre-installed software and drivers using Gateway Recovery Center. 88 To recover software and drivers that product's documentation or support Web site. • If re-installing software or... from the Windows DVD, then recover your system to follow that software's installation instructions. If you upgrade or exchange your hard drive or if your hard drive is completely erased or corrupted, your only option for system recovery may be solved by returning your system, you must create...
... software and device drivers using recovery discs that were pre-installed at the factory, see "Recovering pre-installed software and drivers using Gateway Recovery Center. 88 To recover software and drivers that product's documentation or support Web site. • If re-installing software or... from the Windows DVD, then recover your system to follow that software's installation instructions. If you upgrade or exchange your hard drive or if your hard drive is completely erased or corrupted, your only option for system recovery may be solved by returning your system, you must create...
8512599 - Gateway Notebook Reference Guide R1
Page 97
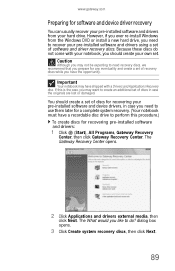
...and create a set . Because these discs do ? www.gateway.com Preparing for software and device driver recovery You can usually recover your pre-installed software and drivers from the Windows DVD or install a new hard drive, you need to do not come with a Drivers and ... your own set of discs for recovering pre-installed software and drivers: 1 Click (Start), All Programs, Gateway Recovery Center, then click Gateway Recovery Center. If this procedure.) To create discs for recovering your hard drive. dialog box opens. 3 Click Create system recovery discs, then click Next. 89
...and create a set . Because these discs do ? www.gateway.com Preparing for software and device driver recovery You can usually recover your pre-installed software and drivers from the Windows DVD or install a new hard drive, you need to do not come with a Drivers and ... your own set of discs for recovering pre-installed software and drivers: 1 Click (Start), All Programs, Gateway Recovery Center, then click Gateway Recovery Center. If this procedure.) To create discs for recovering your hard drive. dialog box opens. 3 Click Create system recovery discs, then click Next. 89

8512599 - Gateway Notebook Reference Guide R1
Page 99
...have recently reinstalled Windows or installed a new hard drive, and your Start menu does not contain Gateway Recovery Center as an option, you must recover your software and drivers using recovery discs" on page 93. 91 The Gateway Recovery Center opens. For instructions, see "...Recovering pre-installed software and drivers using software and driver recovery discs you have created. www.gateway.com Recovering pre-installed software and drivers using Gateway Recovery Center To recover specific drivers ...
...have recently reinstalled Windows or installed a new hard drive, and your Start menu does not contain Gateway Recovery Center as an option, you must recover your software and drivers using recovery discs" on page 93. 91 The Gateway Recovery Center opens. For instructions, see "...Recovering pre-installed software and drivers using software and driver recovery discs you have created. www.gateway.com Recovering pre-installed software and drivers using Gateway Recovery Center To recover specific drivers ...
8512599 - Gateway Notebook Reference Guide R1
Page 106
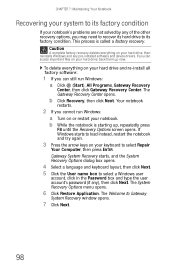
... press F8 until the Recovery Options screen opens. To delete everything on your hard drive, then reinstalls Windows and any pre-installed software and device drivers. b Click Recovery, then click Next. Gateway System Recovery starts, and the System Recovery Options dialog box opens. 4 Select... solved by any ), then click Next. Your notebook restarts. 2 If you may need to recover its hard drive to its factory condition If your notebook. The Gateway Recovery Center opens. CHAPTER 7: Maintaining Your Notebook Recovering your system to its factory condition. The System Recovery...
... press F8 until the Recovery Options screen opens. To delete everything on your hard drive, then reinstalls Windows and any pre-installed software and device drivers. b Click Recovery, then click Next. Gateway System Recovery starts, and the System Recovery Options dialog box opens. 4 Select... solved by any ), then click Next. Your notebook restarts. 2 If you may need to recover its hard drive to its factory condition If your notebook. The Gateway Recovery Center opens. CHAPTER 7: Maintaining Your Notebook Recovering your system to its factory condition. The System Recovery...

8512599 - Gateway Notebook Reference Guide R1
Page 107
...-installed software and drivers:" on page 89. 2 Insert the Windows DVD into your notebook's DVD drive, then turn on your keyboard. If you can find your hard drive is complete window opens. 10 Click Finish, then click Restart. www.gateway.com 8 To perform a recovery with data backup (recommended), click Recovery with automatic data backup...
...-installed software and drivers:" on page 89. 2 Insert the Windows DVD into your notebook's DVD drive, then turn on your keyboard. If you can find your hard drive is complete window opens. 10 Click Finish, then click Restart. www.gateway.com 8 To perform a recovery with data backup (recommended), click Recovery with automatic data backup...
8512599 - Gateway Notebook Reference Guide R1
Page 109
CHAPTER8 Upgrading Your Notebook • Preventing static electricity discharge • Adding or replacing memory modules • Replacing the hard drive kit 101
CHAPTER8 Upgrading Your Notebook • Preventing static electricity discharge • Adding or replacing memory modules • Replacing the hard drive kit 101

8512599 - Gateway Notebook Reference Guide R1
Page 115
www.gateway.com Replacing the hard drive kit Tools You need a small Phillips screwdriver and the Windows Vista DVD to the new hard drive. For more information, see "Recovering pre-installed software and drivers" on page 102. 4 Turn off your notebook. ...your original drive with a higher-capacity drive. For more hard drive capacity, you want to transfer to replace the hard drive kit. If you would like more information, see "Backing up any Express cards. 107 Hard drive bay To replace the hard drive kit: 1 Create a Drivers and Applications Recovery disc using the Gateway Recovery ...
www.gateway.com Replacing the hard drive kit Tools You need a small Phillips screwdriver and the Windows Vista DVD to the new hard drive. For more information, see "Recovering pre-installed software and drivers" on page 102. 4 Turn off your notebook. ...your original drive with a higher-capacity drive. For more hard drive capacity, you want to transfer to replace the hard drive kit. If you would like more information, see "Backing up any Express cards. 107 Hard drive bay To replace the hard drive kit: 1 Create a Drivers and Applications Recovery disc using the Gateway Recovery ...
8512599 - Gateway Notebook Reference Guide R1
Page 116
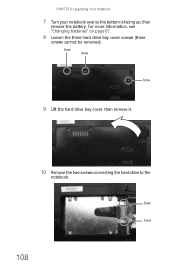
CHAPTER 8: Upgrading Your Notebook 7 Turn your notebook over so the bottom is facing up, then remove the battery. Screw Screw 108 Screw Screw Screw 9 Lift the hard drive bay cover, then remove it. 10 Remove the two screws connecting the hard drive to the notebook. For more information, see "Changing batteries" on page 67. 8 Loosen the three hard drive bay cover screws (these screws cannot be removed).
CHAPTER 8: Upgrading Your Notebook 7 Turn your notebook over so the bottom is facing up, then remove the battery. Screw Screw 108 Screw Screw Screw 9 Lift the hard drive bay cover, then remove it. 10 Remove the two screws connecting the hard drive to the notebook. For more information, see "Changing batteries" on page 67. 8 Loosen the three hard drive bay cover screws (these screws cannot be removed).

