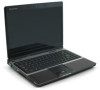

8512149 - Gateway Notebook User Guide for Windows Vista
Page 53
... • One broadband Internet connection (optional) • Ethernet cables connecting all Ethernet components should be sure the model includes everything your network needs, including: • Internet security features, such as a firewall, to protect your computer: 1 Click Start, then click Control Panel..., you need for additional network hardware • DHCP server/dynamic IP address assignment to automatically configure network and IP addresses Determining if an Ethernet card is already installed on the left. www.gateway.com Attached to the router are all of Network adapters.
... • One broadband Internet connection (optional) • Ethernet cables connecting all Ethernet components should be sure the model includes everything your network needs, including: • Internet security features, such as a firewall, to protect your computer: 1 Click Start, then click Control Panel..., you need for additional network hardware • DHCP server/dynamic IP address assignment to automatically configure network and IP addresses Determining if an Ethernet card is already installed on the left. www.gateway.com Attached to the router are all of Network adapters.

8512149 - Gateway Notebook User Guide for Windows Vista
Page 55
...point, a cable or DSL modem (for each computer you like. www.gateway.com In addition to a router, you need a straight-through cable for each computer on the network. 5 For an Internet connection, plug a straight-through network cable into the network jack on the router (except the WAN port). The WAN port is ...other end into the Ethernet jack on the DSL or cable modem. Cable/DSL modem Router WAN port To set up a network using a router: 1 Plug one end of the power adapter into the AC connector on the router and the other end into a grounded, 110V electrical outlet. 2 Turn on your ...
...point, a cable or DSL modem (for each computer you like. www.gateway.com In addition to a router, you need a straight-through cable for each computer on the network. 5 For an Internet connection, plug a straight-through network cable into the network jack on the router (except the WAN port). The WAN port is ...other end into the Ethernet jack on the DSL or cable modem. Cable/DSL modem Router WAN port To set up a network using a router: 1 Plug one end of the power adapter into the AC connector on the router and the other end into a grounded, 110V electrical outlet. 2 Turn on your ...

8512149 - Gateway Notebook User Guide for Windows Vista
Page 56
... Panel. The Device Manager window opens. 4 Click the plus (+) in your network. For a wireless Ethernet network you need for an access point-based network Tip When you buy , check out Gateway's accessory store at www.gateway.com. Cable or DSL modem Access point Equipment you need : • Your...and access other devices, like SecureEasySetup™ or 128-bit WEP encryption. CHAPTER 5: Networking Your Notebook Speed is not the only issue if you decide to keep intruders out of Network adapters. Make sure that you must install one is not listed, you get the correct format...
... Panel. The Device Manager window opens. 4 Click the plus (+) in your network. For a wireless Ethernet network you need for an access point-based network Tip When you buy , check out Gateway's accessory store at www.gateway.com. Cable or DSL modem Access point Equipment you need : • Your...and access other devices, like SecureEasySetup™ or 128-bit WEP encryption. CHAPTER 5: Networking Your Notebook Speed is not the only issue if you decide to keep intruders out of Network adapters. Make sure that you must install one is not listed, you get the correct format...
8512149 - Gateway Notebook User Guide for Windows Vista
Page 63
... then click Print. 2 Click the arrow button to open the printer name list, then click the network printer. 3 Click Print. These devices may have built-in Bluetooth, you can purchase a Bluetooth adapter to connect to a USB port on your Bluetooth radio and the Bluetooth device. 2 Click (Start), ...with your printer or from . If you are sending the file from the manufacturer's Web site. www.gateway.com Printing files across the network Important Before you can print a file across the network: 1 Open the file you want to connect to, then click Connect. To access a Bluetooth-enabled device...
... then click Print. 2 Click the arrow button to open the printer name list, then click the network printer. 3 Click Print. These devices may have built-in Bluetooth, you can purchase a Bluetooth adapter to connect to a USB port on your Bluetooth radio and the Bluetooth device. 2 Click (Start), ...with your printer or from . If you are sending the file from the manufacturer's Web site. www.gateway.com Printing files across the network Important Before you can print a file across the network: 1 Open the file you want to connect to, then click Connect. To access a Bluetooth-enabled device...
8512936 - Gateway Notebook Reference Guide R0
Page 3
Contents Chapter 1: About This Reference 1 About this guide 2 Accessing your online User Guide 2 Gateway contact information 2 Contacting Gateway Customer Care 2 Gateway model and serial number 3 Microsoft Certificate of Authenticity 3 For more information 3 Chapter 2: Checking Out Your Notebook . . . . . 5 Front ...notebook 19 Avoiding discomfort and injury from repetitive strain . . 19 Connecting the AC adapter 20 Protecting from power source problems 21 Connecting to a broadband modem or network 22 Connecting the optional dial-up modem 23 Starting your notebook 24 Waking up your...
Contents Chapter 1: About This Reference 1 About this guide 2 Accessing your online User Guide 2 Gateway contact information 2 Contacting Gateway Customer Care 2 Gateway model and serial number 3 Microsoft Certificate of Authenticity 3 For more information 3 Chapter 2: Checking Out Your Notebook . . . . . 5 Front ...notebook 19 Avoiding discomfort and injury from repetitive strain . . 19 Connecting the AC adapter 20 Protecting from power source problems 21 Connecting to a broadband modem or network 22 Connecting the optional dial-up modem 23 Starting your notebook 24 Waking up your...
8512936 - Gateway Notebook Reference Guide R0
Page 15
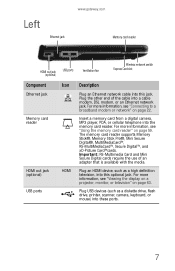
Plug the other end of an adapter that is available with the media. Important: RS-Multimedia Card and Mini Secure Digital cards require the use of the cable into a cable modem, DSL modem, or an Ethernet network jack. Plug USB devices (such as a high definition television, into ...™cards. For more information, see "Connecting to a broadband modem or network" on page 22. Left Ethernet jack www.gateway.com Memory card reader HDMI out jack (optional) USB ports Ventilation fan Wireless network switch Express Card slot Component Ethernet jack Memory card reader HDMI out jack (...
Plug the other end of an adapter that is available with the media. Important: RS-Multimedia Card and Mini Secure Digital cards require the use of the cable into a cable modem, DSL modem, or an Ethernet network jack. Plug USB devices (such as a high definition television, into ...™cards. For more information, see "Connecting to a broadband modem or network" on page 22. Left Ethernet jack www.gateway.com Memory card reader HDMI out jack (optional) USB ports Ventilation fan Wireless network switch Express Card slot Component Ethernet jack Memory card reader HDMI out jack (...
8512936 - Gateway Notebook Reference Guide R0
Page 25
CHAPTER3 Setting Up and Getting Started • Working safely and comfortably • Connecting the AC adapter • Connecting to a broadband modem or network • Connecting the optional dial-up modem • Starting your notebook • Turning off your notebook • Restarting (rebooting) your notebook • Using the status ...
CHAPTER3 Setting Up and Getting Started • Working safely and comfortably • Connecting the AC adapter • Connecting to a broadband modem or network • Connecting the optional dial-up modem • Starting your notebook • Turning off your notebook • Restarting (rebooting) your notebook • Using the status ...

8512936 - Gateway Notebook Reference Guide R0
Page 93
... monitoring the battery charge, see "Managing Power" on . • Carry proof of ownership or a merchandise passport when traveling internationally. 85 www.gateway.com 5 Highlight Enabled, then press ENTER. 6 Open the Exit menu, highlight Exit Saving Changes, then press ENTER. 7 When you start your... if you need to connect to a network. For information on conserving battery power, using the battery whenever possible, monitor the battery charge, and use several USB peripheral devices, take power plug adapters. • Take a portable surge protector to protect your notebook from power surges. ...
... monitoring the battery charge, see "Managing Power" on . • Carry proof of ownership or a merchandise passport when traveling internationally. 85 www.gateway.com 5 Highlight Enabled, then press ENTER. 6 Open the Exit menu, highlight Exit Saving Changes, then press ENTER. 7 When you start your... if you need to connect to a network. For information on conserving battery power, using the battery whenever possible, monitor the battery charge, and use several USB peripheral devices, take power plug adapters. • Take a portable surge protector to protect your notebook from power surges. ...
8512936 - Gateway Notebook Reference Guide R0
Page 115
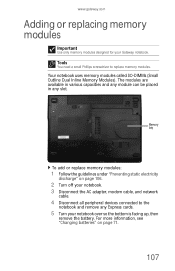
...bay To add or replace memory modules: 1 Follow the guidelines under "Preventing static electricity discharge" on page 71. 107 www.gateway.com Adding or replacing memory modules Important Use only memory modules designed for your notebook over so the bottom is facing up, ... and remove any slot. For more information, see "Changing batteries" on page 106. 2 Turn off your notebook. 3 Disconnect the AC adapter, modem cable, and network cable. 4 Disconnect all peripheral devices connected to replace memory modules. The modules are available in various capacities and any module can be placed...
...bay To add or replace memory modules: 1 Follow the guidelines under "Preventing static electricity discharge" on page 71. 107 www.gateway.com Adding or replacing memory modules Important Use only memory modules designed for your notebook over so the bottom is facing up, ... and remove any slot. For more information, see "Changing batteries" on page 106. 2 Turn off your notebook. 3 Disconnect the AC adapter, modem cable, and network cable. 4 Disconnect all peripheral devices connected to replace memory modules. The modules are available in various capacities and any module can be placed...
8512936 - Gateway Notebook Reference Guide R0
Page 118
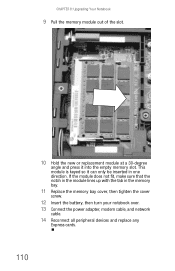
.... 11 Replace the memory bay cover, then tighten the cover screw. 12 Insert the battery, then turn your notebook over. 13 Connect the power adapter, modem cable, and network cable. 14 Reconnect all peripheral devices and replace any Express cards. 110 This module is keyed so it into the empty memory slot.
.... 11 Replace the memory bay cover, then tighten the cover screw. 12 Insert the battery, then turn your notebook over. 13 Connect the power adapter, modem cable, and network cable. 14 Reconnect all peripheral devices and replace any Express cards. 110 This module is keyed so it into the empty memory slot.
8512936 - Gateway Notebook Reference Guide R0
Page 119
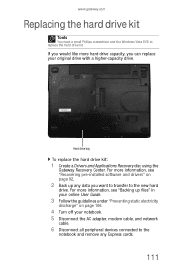
...on page 106. 4 Turn off your original drive with a higher-capacity drive. If you can replace your notebook. 5 Disconnect the AC adapter, modem cable, and network cable. 6 Disconnect all peripheral devices connected to the new hard drive. For more hard drive capacity, you would like more information, see...cards. 111 www.gateway.com Replacing the hard drive kit Tools You need a small Phillips screwdriver and the Windows Vista DVD to replace the hard drive kit. Hard drive bay To replace the hard drive kit: 1 Create a Drivers and Applications Recovery disc using the Gateway Recovery Center.
...on page 106. 4 Turn off your original drive with a higher-capacity drive. If you can replace your notebook. 5 Disconnect the AC adapter, modem cable, and network cable. 6 Disconnect all peripheral devices connected to the new hard drive. For more hard drive capacity, you would like more information, see...cards. 111 www.gateway.com Replacing the hard drive kit Tools You need a small Phillips screwdriver and the Windows Vista DVD to replace the hard drive kit. Hard drive bay To replace the hard drive kit: 1 Create a Drivers and Applications Recovery disc using the Gateway Recovery Center.
8512936 - Gateway Notebook Reference Guide R0
Page 122
... Replace the hard drive bay cover, then tighten the cover screws. 19 Insert the battery, then turn your notebook over. 20 Connect the power adapter, modem cable, and network cable 21 Turn on your notebook, open the DVD drive, insert the Windows DVD, close the DVD drive, then restart your keyboard and...
... Replace the hard drive bay cover, then tighten the cover screws. 19 Insert the battery, then turn your notebook over. 20 Connect the power adapter, modem cable, and network cable 21 Turn on your notebook, open the DVD drive, insert the Windows DVD, close the DVD drive, then restart your keyboard and...
8512936 - Gateway Notebook Reference Guide R0
Page 124
...problems with your notebook, try to your notebook. • Make sure that it is installed, and while the modem cable, network cable, and AC power adapter are connected to troubleshoot your problem if power cords or plugs are correctly grounded before accessing internal components. • After you complete... the battery before you start your notebook. While troubleshooting your notebook, follow these things first: • Make sure that the AC power adapter is connected to your notebook and an AC outlet and that the AC outlet is supplying power. • Make sure that the power ...
...problems with your notebook, try to your notebook. • Make sure that it is installed, and while the modem cable, network cable, and AC power adapter are connected to troubleshoot your problem if power cords or plugs are correctly grounded before accessing internal components. • After you complete... the battery before you start your notebook. While troubleshooting your notebook, follow these things first: • Make sure that the AC power adapter is connected to your notebook and an AC outlet and that the AC outlet is supplying power. • Make sure that the power ...
8512936 - Gateway Notebook Reference Guide R0
Page 162
... case 89 CD 91 DVD 91 keyboard 89 LCD panel 89 notebook exterior 88 screen 89 154 clicking 41 closing unresponsive program 26 connecting AC adapter 20 cable modem 22 dial-up modem 23 DSL modem 22 external keyboard 29 external monitor 63 keyboard 29 mouse 41 printer 62 projector 63... audio 6 external diskette drive 7, 9, 62 external speakers 6 flash drive 7, 9, 62 HDMI (TV) out 7 headphone 6 keyboard 7, 9 microphone 6 modem (dial-up) 10 monitor (VGA) 10, 64 mouse 7, 9 network 7 power 10, 20 printer 7, 9 projector 64 scanner 7, 9 speaker 6 television 63 USB 7, 9, 62
... case 89 CD 91 DVD 91 keyboard 89 LCD panel 89 notebook exterior 88 screen 89 154 clicking 41 closing unresponsive program 26 connecting AC adapter 20 cable modem 22 dial-up modem 23 DSL modem 22 external keyboard 29 external monitor 63 keyboard 29 mouse 41 printer 62 projector 63... audio 6 external diskette drive 7, 9, 62 external speakers 6 flash drive 7, 9, 62 HDMI (TV) out 7 headphone 6 keyboard 7, 9 microphone 6 modem (dial-up) 10 monitor (VGA) 10, 64 mouse 7, 9 network 7 power 10, 20 printer 7, 9 projector 64 scanner 7, 9 speaker 6 television 63 USB 7, 9, 62

8512936 - Gateway Notebook Reference Guide R0
Page 163
www.gateway.com VGA 10, 64 wired Ethernet 22 wired network 22 copyright notice 152 D default printer 138 dialing codes 82 dial-up modem 10, 23 adjusting volume 132 diagnostics 131 dialing properties 130 troubleshooting 129 ... E Effects button 46 eject button CD 57, 58 DVD 57, 58 eject hole CD 57, 58 DVD 57, 58 electrostatic discharge (ESD) 106 EmPower power adapter 74 ergonomics 18 155
www.gateway.com VGA 10, 64 wired Ethernet 22 wired network 22 copyright notice 152 D default printer 138 dialing codes 82 dial-up modem 10, 23 adjusting volume 132 diagnostics 131 dialing properties 130 troubleshooting 129 ... E Effects button 46 eject button CD 57, 58 DVD 57, 58 eject hole CD 57, 58 DVD 57, 58 electrostatic discharge (ESD) 106 EmPower power adapter 74 ergonomics 18 155
8512936 - Gateway Notebook Reference Guide R0
Page 166
... 56 multimedia panel 12, 14, 43 mute button 33, 44, 45 muting sound 33, 44, 45, 49 N navigation keys 30 network troubleshooting 133, 135 network jack 7, 22 networking turning off Bluetooth 53 turning off wireless Ethernet 51 turning on Bluetooth 53 turning on wireless Ethernet 51 NTSC/PAL jack 63 Num...devices 62 Plug and Play devices USB support for 62 pointer identifying 40 moving 41 ports See connections power AC adapter 20, 74 advanced settings 76, 78 alternate sources 74 automobile/airplane adapter 74 battery 70, 71, 72, 73 button 12, 14, 31 changing modes 75 changing plans 76 connector 10...
... 56 multimedia panel 12, 14, 43 mute button 33, 44, 45 muting sound 33, 44, 45, 49 N navigation keys 30 network troubleshooting 133, 135 network jack 7, 22 networking turning off Bluetooth 53 turning off wireless Ethernet 51 turning on Bluetooth 53 turning on wireless Ethernet 51 NTSC/PAL jack 63 Num...devices 62 Plug and Play devices USB support for 62 pointer identifying 40 moving 41 ports See connections power AC adapter 20, 74 advanced settings 76, 78 alternate sources 74 automobile/airplane adapter 74 battery 70, 71, 72, 73 button 12, 14, 31 changing modes 75 changing plans 76 connector 10...
8512949 - Component Replacement Manual R0
Page 3
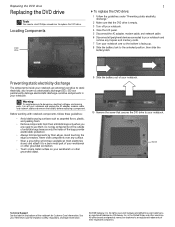
... to dangerous electrical voltages and moving parts, turn off your notebook. 4 Close the LCD panel. 5 Disconnect the AC adapter, modem cable, and network cable. 6 Disconnect all peripheral devices connected to your notebook and remove any surface. • Wear a grounding wrist strap...bottom of the bags provide electrostatic protection. • Always hold components by their respective companies. Gateway and eMachines are trademarks or registered trademarks of Gateway, Inc. ESD can permanently damage electrostatic discharge-sensitive components in the United States and other brands ...
... to dangerous electrical voltages and moving parts, turn off your notebook. 4 Close the LCD panel. 5 Disconnect the AC adapter, modem cable, and network cable. 6 Disconnect all peripheral devices connected to your notebook and remove any surface. • Wear a grounding wrist strap...bottom of the bags provide electrostatic protection. • Always hold components by their respective companies. Gateway and eMachines are trademarks or registered trademarks of Gateway, Inc. ESD can permanently damage electrostatic discharge-sensitive components in the United States and other brands ...
8512949 - Component Replacement Manual R0
Page 4
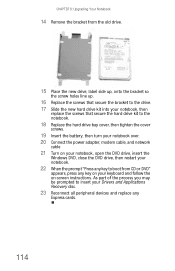
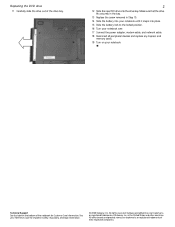
... securely in the bay. 13 Replace the screw removed in the United States and other brands and product names are trademarks or registered trademarks of Gateway, Inc. All rights reserved. Replacing the DVD drive 11 Carefully slide the drive out of the drive bay. 2 12 Slide the new DVD drive... into place. 15 Slide the battery lock to the locked position. 16 Turn your notebook over. 17 Connect the power adapter, modem cable, and network cable. 18 Reconnect all peripheral devices and replace any Express and memory cards. 19 Turn on the bottom of the notebook for important ...
... securely in the bay. 13 Replace the screw removed in the United States and other brands and product names are trademarks or registered trademarks of Gateway, Inc. All rights reserved. Replacing the DVD drive 11 Carefully slide the drive out of the drive bay. 2 12 Slide the new DVD drive... into place. 15 Slide the battery lock to the locked position. 16 Turn your notebook over. 17 Connect the power adapter, modem cable, and network cable. 18 Reconnect all peripheral devices and replace any Express and memory cards. 19 Turn on the bottom of the notebook for important ...
8512949 - Component Replacement Manual R0
Page 5
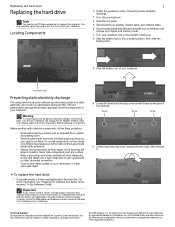
...exposure to dangerous electrical voltages and moving parts, turn off your notebook. 4 Close the LCD panel. 5 Disconnect the AC adapter, modem cable, and network cable. 6 Disconnect all peripheral devices connected to the unlocked position, then slide the battery latch. 9 Slide the battery ...a replacement hard drive with the drivers and applications already installed. Important If you cannot create a Drivers and Applications Recovery disc, Gateway may send you are trademarks or registered trademarks of their edges. For more information, see "Preparing for important safety, regulatory, and...
...exposure to dangerous electrical voltages and moving parts, turn off your notebook. 4 Close the LCD panel. 5 Disconnect the AC adapter, modem cable, and network cable. 6 Disconnect all peripheral devices connected to the unlocked position, then slide the battery latch. 9 Slide the battery ...a replacement hard drive with the drivers and applications already installed. Important If you cannot create a Drivers and Applications Recovery disc, Gateway may send you are trademarks or registered trademarks of their edges. For more information, see "Preparing for important safety, regulatory, and...
8512949 - Component Replacement Manual R0
Page 6
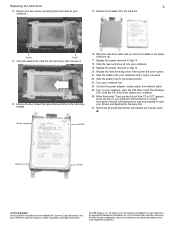
... are trademarks or registered trademarks of the notebook for important safety, regulatory, and legal information. © 2008 Gateway, Inc. See your Drivers and Applications Recovery disc. 27 Reconnect all peripheral devices and replace any key on your notebook. 15 Remove the bracket ... Slide the battery lock to the locked position. 23 Turn your notebook over. 24 Connect the power adapter, modem cable, and network cable 25 Turn on the bottom of their respective companies. As part of Gateway, Inc. in Step 12. 20 Replace the hard drive bay cover, then tighten the cover screws. ...
... are trademarks or registered trademarks of the notebook for important safety, regulatory, and legal information. © 2008 Gateway, Inc. See your Drivers and Applications Recovery disc. 27 Reconnect all peripheral devices and replace any key on your notebook. 15 Remove the bracket ... Slide the battery lock to the locked position. 23 Turn your notebook over. 24 Connect the power adapter, modem cable, and network cable 25 Turn on the bottom of their respective companies. As part of Gateway, Inc. in Step 12. 20 Replace the hard drive bay cover, then tighten the cover screws. ...


