User Guide
Page 7
...177 12 Restoring Software 179 Using the Restoration CDs 180 Reinstalling device drivers 181 Updating device drivers 183 Reinstalling programs 184 Reinstalling Windows 186 13 Upgrading Your Computer 189 Selecting a place to work 190 Gathering the tools you need 190 Preventing static electricity discharge 191 Opening the case 192 Removing... 197 Adding or replacing a CD, DVD, or diskette drive 198 Replacing the hard drive 203 Adding or replacing add-in cards 206 Installing memory 208 Replacing the system battery 212 Replacing the power supply 214 Replacing the system board 216 v
...177 12 Restoring Software 179 Using the Restoration CDs 180 Reinstalling device drivers 181 Updating device drivers 183 Reinstalling programs 184 Reinstalling Windows 186 13 Upgrading Your Computer 189 Selecting a place to work 190 Gathering the tools you need 190 Preventing static electricity discharge 191 Opening the case 192 Removing... 197 Adding or replacing a CD, DVD, or diskette drive 198 Replacing the hard drive 203 Adding or replacing add-in cards 206 Installing memory 208 Replacing the system battery 212 Replacing the power supply 214 Replacing the system board 216 v

User Guide
Page 197
Read this chapter to learn how to: ■ Open and close the computer case ■ Remove and install drives and components ■ Remove and install add-in your computer. 13 Upgrading Your Computer This chapter provides information about upgrading and replacing components in cards ■ Add memory ■ Change the battery ■ Replace system boards You must open the computer case to upgrade or replace components. If you are not comfortable with these procedures, get help from a more experienced computer user or computer service technician. 189
Read this chapter to learn how to: ■ Open and close the computer case ■ Remove and install drives and components ■ Remove and install add-in your computer. 13 Upgrading Your Computer This chapter provides information about upgrading and replacing components in cards ■ Add memory ■ Change the battery ■ Replace system boards You must open the computer case to upgrade or replace components. If you are not comfortable with these procedures, get help from a more experienced computer user or computer service technician. 189
User Guide
Page 216
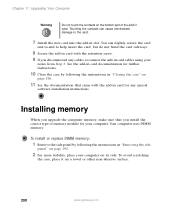
... documentation for your computer. See the add-in "Closing the case" on a towel or other non-abrasive surface. 208 www.gateway.com To avoid scratching the case, place it on page 196. 11 See the documentation that you disconnected any special software installation ...instructions. To install or replace DIMM memory: 1 Remove the side panel by following the instructions in card. Installing memory When you upgrade the computer memory, make sure that came with the retention screw. 9 If you install the correct ...
... documentation for your computer. See the add-in "Closing the case" on a towel or other non-abrasive surface. 208 www.gateway.com To avoid scratching the case, place it on page 196. 11 See the documentation that you disconnected any special software installation ...instructions. To install or replace DIMM memory: 1 Remove the side panel by following the instructions in card. Installing memory When you upgrade the computer memory, make sure that came with the retention screw. 9 If you install the correct ...
User Guide
Page 218
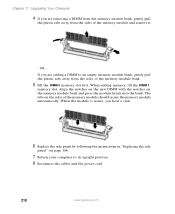
... the sides of the memory module bank. 5 Fill the DIMM 0 memory slot first. When adding memory, fill the DIMM 1 memory slot. Align the notches on the new DIMM with the notches on the memory module bank and press the module firmly into the bank. Chapter 11: Upgrading Your Computer 4 If ...you are adding a DIMM to its upright position. 8 Reconnect the cables and the power cord. 210 www.gateway...
... the sides of the memory module bank. 5 Fill the DIMM 0 memory slot first. When adding memory, fill the DIMM 1 memory slot. Align the notches on the new DIMM with the notches on the memory module bank and press the module firmly into the bank. Chapter 11: Upgrading Your Computer 4 If ...you are adding a DIMM to its upright position. 8 Reconnect the cables and the power cord. 210 www.gateway...

User Guide
Page 226
See the system board documentation for further instructions. 10 Reinstall the memory modules by following the instructions in "Installing memory" on page 208. 11 Reinstall the add-in cards by following the instructions in "Adding or replacing add-in cards" on page 206. 12 Close ..." on the standoffs and secure into the computer case with the screws. 9 Reconnect the power and data cables using your notes from Step 5. Chapter 11: Upgrading Your Computer 7 Lift the system board up and out of the case. 8 Align the new system board on page 196. 218 www...
See the system board documentation for further instructions. 10 Reinstall the memory modules by following the instructions in "Installing memory" on page 208. 11 Reinstall the add-in cards by following the instructions in "Adding or replacing add-in cards" on page 206. 12 Close ..." on the standoffs and secure into the computer case with the screws. 9 Reconnect the power and data cables using your notes from Step 5. Chapter 11: Upgrading Your Computer 7 Lift the system board up and out of the case. 8 Align the new system board on page 196. 218 www...


