8512418 - Gateway Reference Guide
Page 22
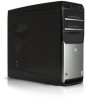
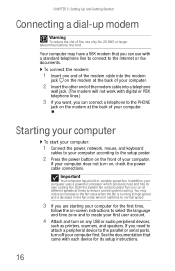
... If you need to attach a peripheral device to the setup poster. 2 Press the power button on , check the power cable connections. Both the system fan and processor fan can connect a telephone to create your first user account. 4 Attach and turn on the modem at high speed and a decrease in , variable-speed... computer: 1 Connect the power, network, mouse, and keyboard cables to your computer first. Your computer may notice an increase in the fan noise when the fan is running at the back of the modem cable into a telephone wall jack. (The modem will not work with each device for the...
... If you need to attach a peripheral device to the setup poster. 2 Press the power button on , check the power cable connections. Both the system fan and processor fan can connect a telephone to create your first user account. 4 Attach and turn on the modem at high speed and a decrease in , variable-speed... computer: 1 Connect the power, network, mouse, and keyboard cables to your computer first. Your computer may notice an increase in the fan noise when the fan is running at the back of the modem cable into a telephone wall jack. (The modem will not work with each device for the...

8512418 - Gateway Reference Guide
Page 55
www.gateway.com Adding or replacing a hard drive To add or replace a hard drive: Tools You need a Phillips screwdriver to add or replace a hard drive. 1 Remove the side panel by following the instructions in "Removing the side panel" on page 35. 2 Disconnect and label all hard drive cables, noting their locations and orientation. (You will reconnect the cables after you install the new drive.) 3 Disconnect the hard drive cage fan cable from the system board. 47
www.gateway.com Adding or replacing a hard drive To add or replace a hard drive: Tools You need a Phillips screwdriver to add or replace a hard drive. 1 Remove the side panel by following the instructions in "Removing the side panel" on page 35. 2 Disconnect and label all hard drive cables, noting their locations and orientation. (You will reconnect the cables after you install the new drive.) 3 Disconnect the hard drive cage fan cable from the system board. 47
8512418 - Gateway Reference Guide
Page 57
... cage tabs Slots on inside of case 10 Tighten the cage thumbscrew, then plug the hard drive cage fan cable back into the case. For more stability, place your computer. To avoid scratching the case, place... it on a towel or other non-abrasive surface. 3 Unplug the heat sink fan cable from Step 2. 12 Replace the side panel by following the instructions in "Removing the side panel" on page...restoring your system, see "Recovering your system" on page 93. www.gateway.com 9 Line up the tabs on the right side of the cage with your computer on its side.
... cage tabs Slots on inside of case 10 Tighten the cage thumbscrew, then plug the hard drive cage fan cable back into the case. For more stability, place your computer. To avoid scratching the case, place... it on a towel or other non-abrasive surface. 3 Unplug the heat sink fan cable from Step 2. 12 Replace the side panel by following the instructions in "Removing the side panel" on page...restoring your system, see "Recovering your system" on page 93. www.gateway.com 9 Line up the tabs on the right side of the cage with your computer on its side.

8512418 - Gateway Reference Guide
Page 58
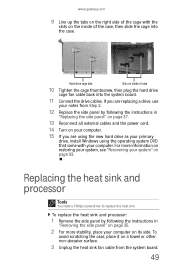
Make sure that secure the heat sink and fan assembly to the system board, then remove the assembly and place it completely up, then lift the processor retention bracket. 6 Remove the processor from the ...
Make sure that secure the heat sink and fan assembly to the system board, then remove the assembly and place it completely up, then lift the processor retention bracket. 6 Remove the processor from the ...

8512418 - Gateway Reference Guide
Page 59
... the size of a pea) to the surface that contacts the processor. 9 Place the heat sink and fan assembly on the processor, then tighten the screws that are attached to the card, noting their locations and ...card, disconnect any cables that secure it to the system board. 10 Connect the heat sink fan cable to the system board. 11 Replace the side panel by following the instructions in "Removing ...the side panel" on the heat sink that covers the gray thermal grease. www.gateway.com 8 If this is a new heat sink, remove the strip on page 35. 2 If you install...
... the size of a pea) to the surface that contacts the processor. 9 Place the heat sink and fan assembly on the processor, then tighten the screws that are attached to the card, noting their locations and ...card, disconnect any cables that secure it to the system board. 10 Connect the heat sink fan cable to the system board. 11 Replace the side panel by following the instructions in "Removing ...the side panel" on the heat sink that covers the gray thermal grease. www.gateway.com 8 If this is a new heat sink, remove the strip on page 35. 2 If you install...

8512418 - Gateway Reference Guide
Page 67
... any objects on the hard drive could be lost or corrupted. • Avoid subjecting your computer to the computer. • Do not block the ventilation fan slots. The case, although strong, is safest at temperatures that are not covered under a standard warranty. • Avoid dusty or dirty work environments. Magnetic fields... your computer for an extended period of your computer: • Be careful not to break in cold temperatures and can result in high temperatures. www.gateway.com Caring for your computer To extend the life of time, unplug AC power. 59
... any objects on the hard drive could be lost or corrupted. • Avoid subjecting your computer to the computer. • Do not block the ventilation fan slots. The case, although strong, is safest at temperatures that are not covered under a standard warranty. • Avoid dusty or dirty work environments. Magnetic fields... your computer for an extended period of your computer: • Be careful not to break in cold temperatures and can result in high temperatures. www.gateway.com Caring for your computer To extend the life of time, unplug AC power. 59
8512418 - Gateway Reference Guide
Page 131
www.gateway.com Warranty 106 D default printer setting 91 defragmenting hard drive 65 deleting files and folders 64 dial-up modem 16 adjusting volume 89 connecting 10 ... (ESD) 34 ergonomics 12 Error-checking 64 Ethernet jack 9 Ethernet network connecting 15 jack 15 expansion card adding 51 replacing 51 external audio jack 9, 10 F fan variable-speed 16 121
www.gateway.com Warranty 106 D default printer setting 91 defragmenting hard drive 65 deleting files and folders 64 dial-up modem 16 adjusting volume 89 connecting 10 ... (ESD) 34 ergonomics 12 Error-checking 64 Ethernet jack 9 Ethernet network connecting 15 jack 15 expansion card adding 51 replacing 51 external audio jack 9, 10 F fan variable-speed 16 121


