
User Manual
Page 1
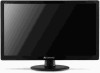
FHX2153L 21.5 -5 inch Widescreen LCD Monitor USERGUIDE ®
FHX2153L 21.5 -5 inch Widescreen LCD Monitor USERGUIDE ®

User Manual
Page 3
Contents Chapter 1: Using Your Gateway Flat-Panel Monitor 1 Connecting the monitor 2 Connecting video inputs 2 Connecting audio input 3 Connecting the power 4 Connecting a security cable 4 Basic front view 5 Adjusting the angle 5 Starting the monitor 6 Adjusting monitor settings 6 Using the shortcut Menu 6 eColor management 7 Operation instruction 7. Features and ...has shadows or "ghosts 15 Color is not uniform 15 Image is not sized or centered correctly 15 The monitor has pixels that are always dark or too bright 15 FAQs 15 General 15 How To 16 Technical 16 ...
Contents Chapter 1: Using Your Gateway Flat-Panel Monitor 1 Connecting the monitor 2 Connecting video inputs 2 Connecting audio input 3 Connecting the power 4 Connecting a security cable 4 Basic front view 5 Adjusting the angle 5 Starting the monitor 6 Adjusting monitor settings 6 Using the shortcut Menu 6 eColor management 7 Operation instruction 7. Features and ...has shadows or "ghosts 15 Color is not uniform 15 Image is not sized or centered correctly 15 The monitor has pixels that are always dark or too bright 15 FAQs 15 General 15 How To 16 Technical 16 ...
User Manual
Page 5
CHAPTER 1 Using Your Gateway Flat-Panel Monitor • Connecting the monitor • Adjusting the angle • Starting the monitor • Adjusting monitor settings • eColor management • Adjusting the OSD settings • Changing Windows screen settings • Power management • Maintenace • Troubleshooting • FAQs 1
CHAPTER 1 Using Your Gateway Flat-Panel Monitor • Connecting the monitor • Adjusting the angle • Starting the monitor • Adjusting monitor settings • eColor management • Adjusting the OSD settings • Changing Windows screen settings • Power management • Maintenace • Troubleshooting • FAQs 1
User Manual
Page 6
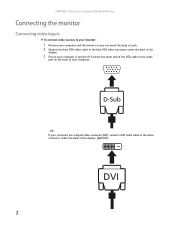
Connect the other end of the VGA cable to the video port on the back of your computer is turned off. CHAPTER 1: Using Your Gateway Flat-Panel Monitor Connecting the monitor Connecting video inputs To connect video sources to your monitor: 1 Position your computer and the monitor so you can reach the back of each. 2 Connect the blue VGA video cable to the blue VGA video connector under the back of the display. (option) 2 OR If your computer has a digital video connector (DVI), connect a DVI video cable to the white connector under the back of the display. 3 Ensure your computer. -
Connect the other end of the VGA cable to the video port on the back of your computer is turned off. CHAPTER 1: Using Your Gateway Flat-Panel Monitor Connecting the monitor Connecting video inputs To connect video sources to your monitor: 1 Position your computer and the monitor so you can reach the back of each. 2 Connect the blue VGA video cable to the blue VGA video connector under the back of the display. (option) 2 OR If your computer has a digital video connector (DVI), connect a DVI video cable to the white connector under the back of the display. 3 Ensure your computer. -

User Manual
Page 7
www.gateway.com - OR If your computer has a High-Definition Multimedia Interface (HDMI), connect a HDMI cable to the black connector under the back of the display. (option) Connecting audio input (option) To connect audio source to your monitor: 1 Position your computer and the monitor so you can reach the back of each. 2 Connect the audio cable to the audio port on the back of the display. 3 Ensure your computer. 3 Connect the other end of the audio cable to the audio connector under the back of your computer is turned off.
www.gateway.com - OR If your computer has a High-Definition Multimedia Interface (HDMI), connect a HDMI cable to the black connector under the back of the display. (option) Connecting audio input (option) To connect audio source to your monitor: 1 Position your computer and the monitor so you can reach the back of each. 2 Connect the audio cable to the audio port on the back of the display. 3 Ensure your computer. 3 Connect the other end of the audio cable to the audio connector under the back of your computer is turned off.
User Manual
Page 8
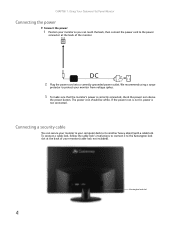
...using a surge protector to protect your computer desk (or to the power connector at the back of your monitor so you can secure your monitor to your monitor from voltage spikes. 3 To make sure that the monitor's power is not connected. Kensington lock slot 4 If the power icon is not lit, power is ... power outlet. To connect a cable lock, follow the cable lock's instructions to connect it to the Kensington lock slot at the back of the monitor. The power icon should be white. CHAPTER 1: Using Your Gateway Flat-Panel Monitor Connecting the power Connect the power: 1 Position your...
...using a surge protector to protect your computer desk (or to the power connector at the back of your monitor so you can secure your monitor to your monitor from voltage spikes. 3 To make sure that the monitor's power is not connected. Kensington lock slot 4 If the power icon is not lit, power is ... power outlet. To connect a cable lock, follow the cable lock's instructions to connect it to the Kensington lock slot at the back of the monitor. The power icon should be white. CHAPTER 1: Using Your Gateway Flat-Panel Monitor Connecting the power Connect the power: 1 Position your...

User Manual
Page 9
... distance when scanning from the user, then adjusted back and forth to avoid screen glare when the screen is based upon the following guildelines. www.gateway.com Basic front view Your monitor has menu buttons to 15° viewing angle for bifocal use .
... distance when scanning from the user, then adjusted back and forth to avoid screen glare when the screen is based upon the following guildelines. www.gateway.com Basic front view Your monitor has menu buttons to 15° viewing angle for bifocal use .

User Manual
Page 10
...Management OSD and access the scenario modes. The shortcut menu lets you will see the following messages on right top side of screen to your monitor. (a) VGA input (b) DVI input (c) HDMI input As you cycle through the sources you quickly select the most commonly accessed settings. AUTO ...Auto Adjust: Press this botton to activate the Auto Adjustment function. CHAPTER 1: Using Your Gateway Flat-Panel Monitor Starting the monitor Power Switch / Power LED: To turn the monitor ON or OFF. VGA or DVI or HDMI If either VGA or DVI input is turned ON. INPUT ...
...Management OSD and access the scenario modes. The shortcut menu lets you will see the following messages on right top side of screen to your monitor. (a) VGA input (b) DVI input (c) HDMI input As you cycle through the sources you quickly select the most commonly accessed settings. AUTO ...Auto Adjust: Press this botton to activate the Auto Adjustment function. CHAPTER 1: Using Your Gateway Flat-Panel Monitor Starting the monitor Power Switch / Power LED: To turn the monitor ON or OFF. VGA or DVI or HDMI If either VGA or DVI input is turned ON. INPUT ...

User Manual
Page 12
...and general settings. Actual product specifications may vary. For advanced settings, please refer to following content is for adjusting the settings of your LCD Monitor. Press the MENU key to bring up the OSD. 2 Using the / keys, select Picture from the OSD. Then navigate to the ...use the OSD to adjust the current Brightness, Contrast, Colour Temp, Auto Config and other image-related qualities. 8 CHAPTER 1: Using Your Gateway Flat-Panel Monitor Adjusting the OSD settings Note: The following page: Adjusting the picture quality 1 Press the MENU key to open the OSD. The OSD can...
...and general settings. Actual product specifications may vary. For advanced settings, please refer to following content is for adjusting the settings of your LCD Monitor. Press the MENU key to bring up the OSD. 2 Using the / keys, select Picture from the OSD. Then navigate to the ...use the OSD to adjust the current Brightness, Contrast, Colour Temp, Auto Config and other image-related qualities. 8 CHAPTER 1: Using Your Gateway Flat-Panel Monitor Adjusting the OSD settings Note: The following page: Adjusting the picture quality 1 Press the MENU key to open the OSD. The OSD can...
User Manual
Page 14
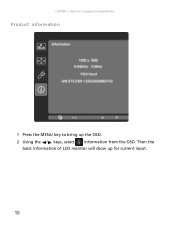
CHAPTER 1: Using Your Gateway Flat-Panel Monitor Product information 1 Press the MENU key to bring up for current input. 10 Then the basic information of LCD monitor will show up the OSD. 2 Using the / keys, select Information from the OSD.
CHAPTER 1: Using Your Gateway Flat-Panel Monitor Product information 1 Press the MENU key to bring up for current input. 10 Then the basic information of LCD monitor will show up the OSD. 2 Using the / keys, select Information from the OSD.

User Manual
Page 15
...check the color depth setting and return it to the highest color setting, if necessary. Screen resolution is the number of colors available. www.gateway.com Changing Windows screen settings Adjusting the color depth and screen area are two of the most basic display settings you may need to change... is the number of pixels (individual colored dots) your computer uses to display images on your needs. You can be displayed on the monitor. If the new settings do not look best displayed with the maximum number of colors your computer uses to their previous values after you ...
...check the color depth setting and return it to the highest color setting, if necessary. Screen resolution is the number of colors available. www.gateway.com Changing Windows screen settings Adjusting the color depth and screen area are two of the most basic display settings you may need to change... is the number of pixels (individual colored dots) your computer uses to display images on your needs. You can be displayed on the monitor. If the new settings do not look best displayed with the maximum number of colors your computer uses to their previous values after you ...

User Manual
Page 16
CHAPTER 1: Using Your Gateway Flat-Panel Monitor Standard Timing Table Mode 1 2 3 4 5 6 7 8 9 10 11 12 13 14 MAC VESA SVGA SVGA XGA XGA VESA SXGA VESA WXGA WXGA+ WSXGA+ UXGA Resolution 640x480 60 Hz 640x480 66.66 Hz 720x400 70 Hz 800x600 56 Hz 800x600 60 Hz 1024x768 60 Hz 1024x768 70 Hz 1152x864 75 Hz 1280x1024 60 Hz 1280x720 60 Hz 1280x800 60 Hz 1440x900 60 Hz 1680x1050 60 Hz 1920x1080 60 Hz 12
CHAPTER 1: Using Your Gateway Flat-Panel Monitor Standard Timing Table Mode 1 2 3 4 5 6 7 8 9 10 11 12 13 14 MAC VESA SVGA SVGA XGA XGA VESA SXGA VESA WXGA WXGA+ WSXGA+ UXGA Resolution 640x480 60 Hz 640x480 66.66 Hz 720x400 70 Hz 800x600 56 Hz 800x600 60 Hz 1024x768 60 Hz 1024x768 70 Hz 1152x864 75 Hz 1280x1024 60 Hz 1280x720 60 Hz 1280x800 60 Hz 1440x900 60 Hz 1680x1050 60 Hz 1920x1080 60 Hz 12

User Manual
Page 17
...any type of non-use a soft cloth slightly moistened with water only. You will permanently scratch the screen. • To clean the monitor, use . You can conserve significant energy by reducing power consumption during periods of abrasive pad or glass cleaner. Your settings are saved,... and the dialog box closes. www.gateway.com Power management Energy declaration When connected to a computer that supports the VESA Display Power Management Signaling (DPMS) Protocol, the monitor can change to Standby mode. 4 Click OK.
...any type of non-use a soft cloth slightly moistened with water only. You will permanently scratch the screen. • To clean the monitor, use . You can conserve significant energy by reducing power consumption during periods of abrasive pad or glass cleaner. Your settings are saved,... and the dialog box closes. www.gateway.com Power management Energy declaration When connected to a computer that supports the VESA Display Power Management Signaling (DPMS) Protocol, the monitor can change to Standby mode. 4 Click OK.

User Manual
Page 18
...Make sure that the power cord is functioning correctly, a "No Signal" message appears. CHAPTER 1: Using Your Gateway Flat-Panel Monitor Troubleshooting Important Make sure that the monitor has warmed up for approximately 30 minutes before making any judgments about connecting the power cord, see "Connecting the...you solve them. For more information about connecting the power cord, see "Connecting the monitor" on page 2. If the monitor is connected correctly to bring the monitor out of the monitor and computer. No power Make sure that the power cord is connected securely to the...
...Make sure that the power cord is functioning correctly, a "No Signal" message appears. CHAPTER 1: Using Your Gateway Flat-Panel Monitor Troubleshooting Important Make sure that the monitor has warmed up for approximately 30 minutes before making any judgments about connecting the power cord, see "Connecting the...you solve them. For more information about connecting the power cord, see "Connecting the monitor" on page 2. If the monitor is connected correctly to bring the monitor out of the monitor and computer. No power Make sure that the power cord is connected securely to the...

User Manual
Page 19
... Image is connected securely to the back of pixels affected. FAQs General This section contains answers to a minimum. On Gateway notebooks, this monitor as your display, contact Gateway Customer Care to identify whether a repair or replacement is located along the top row of the video cable for more ... to my notebook's VGA port and I have two options: • If your notebook supports dual displays, you toggle between your monitor. www.gateway.com Picture has shadows or "ghosts" • Press (Auto) to automatically adjust the display image to the ideal settings. • ...
... Image is connected securely to the back of pixels affected. FAQs General This section contains answers to a minimum. On Gateway notebooks, this monitor as your display, contact Gateway Customer Care to identify whether a repair or replacement is located along the top row of the video cable for more ... to my notebook's VGA port and I have two options: • If your notebook supports dual displays, you toggle between your monitor. www.gateway.com Picture has shadows or "ghosts" • Press (Auto) to automatically adjust the display image to the ideal settings. • ...

User Manual
Page 20
... digital content, but only to protect the integrity of unique secret device keys to the Windows System Registry. CHAPTER 1: Using Your Gateway Flat-Panel Monitor How To Technical Setup Why does the image looks stretched or fuzzy when I do not see 1920 × 1080 available in ...by the Intel® Corporation to my computer? I connect the monitor to protect digital entertainment content that is HDCP and how do I see "noise" or "trash" on a HDCP-equipped component? See the Gateway support Web site (support.gateway.com) for updated video drivers for updates. Newer games are ...
... digital content, but only to protect the integrity of unique secret device keys to the Windows System Registry. CHAPTER 1: Using Your Gateway Flat-Panel Monitor How To Technical Setup Why does the image looks stretched or fuzzy when I do not see 1920 × 1080 available in ...by the Intel® Corporation to my computer? I connect the monitor to protect digital entertainment content that is HDCP and how do I see "noise" or "trash" on a HDCP-equipped component? See the Gateway support Web site (support.gateway.com) for updated video drivers for updates. Newer games are ...

User Manual
Page 21
.... If the video source device does not have a DVI or HDMI connection, it is not HDCP compliant. 17 However, you change the receiving device (DTV, monitor, or projector) input to watch broadcast TV, then change the input back to watch the movie. The receiving device is not HDCP compatible or it...
.... If the video source device does not have a DVI or HDMI connection, it is not HDCP compliant. 17 However, you change the receiving device (DTV, monitor, or projector) input to watch broadcast TV, then change the input back to watch the movie. The receiving device is not HDCP compatible or it...

User Manual
Page 22
CHAPTER 1: Using Your Gateway Flat-Panel Monitor 18
CHAPTER 1: Using Your Gateway Flat-Panel Monitor 18
User Manual
Page 25
...rating on the products plugged into the extension cord does not exceed the extension cord ampere rating. ■ If your Gateway product. No user serviceable parts inside. If the monitor does get exposed to moisture, unplug it and allow anything on the system. Such areas include patient care areas of medical... Care for 24 hours. The voltage selector switch is set up your system. ■ Do not expose the monitor to rain or use Gateway products in areas classified as a radiator. ■ Set up your system. Make sure you provide adequate space, at the factory to the correct voltage. ...
...rating on the products plugged into the extension cord does not exceed the extension cord ampere rating. ■ If your Gateway product. No user serviceable parts inside. If the monitor does get exposed to moisture, unplug it and allow anything on the system. Such areas include patient care areas of medical... Care for 24 hours. The voltage selector switch is set up your system. ■ Do not expose the monitor to rain or use Gateway products in areas classified as a radiator. ■ Set up your system. Make sure you provide adequate space, at the factory to the correct voltage. ...


