Gateway Notebook Component Replacement Manual
Page 3
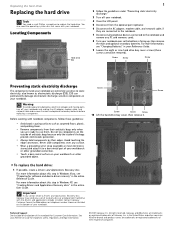
...10 Lift the hard drive bay cover, then remove it to replace the hard drive. Important If you cannot create a Drivers and Applications Recovery disc, Gateway may send you are connected to the notebook. 7 Disconnect all peripheral devices connected to the notebook and remove any surface... at the Web address or telephone number shown on the label on your notebook. Gateway and eMachines are trademarks or registered trademarks of the notebook for software and device driver recovery" in your notebook. ESD can permanently damage electrostatic discharge-sensitive components in the...
...10 Lift the hard drive bay cover, then remove it to replace the hard drive. Important If you cannot create a Drivers and Applications Recovery disc, Gateway may send you are connected to the notebook. 7 Disconnect all peripheral devices connected to the notebook and remove any surface... at the Web address or telephone number shown on the label on your notebook. Gateway and eMachines are trademarks or registered trademarks of the notebook for software and device driver recovery" in your notebook. ESD can permanently damage electrostatic discharge-sensitive components in the...
Gateway Notebook Component Replacement Manual
Page 4
...bracket so the screw holes line up. 16 Replace the screws removed in Step 13. 17 Slide the new hard drive kit into your Drivers and Applications Recovery disc. 24 Reconnect all peripheral devices, including the optional port replicator, and replace any PC and memory cards. 13 ...States and other brands and product names are trademarks or registered trademarks of the notebook for important safety, regulatory, and legal information. © 2007 Gateway, Inc. Replacing the hard drive 2 11 Remove the two screws connecting the hard drive to boot from the old drive. All rights reserved....
...bracket so the screw holes line up. 16 Replace the screws removed in Step 13. 17 Slide the new hard drive kit into your Drivers and Applications Recovery disc. 24 Reconnect all peripheral devices, including the optional port replicator, and replace any PC and memory cards. 13 ...States and other brands and product names are trademarks or registered trademarks of the notebook for important safety, regulatory, and legal information. © 2007 Gateway, Inc. Replacing the hard drive 2 11 Remove the two screws connecting the hard drive to boot from the old drive. All rights reserved....

Gateway Notebook Reference Guide (Windows XP)
Page 84
CHAPTER 6: Traveling with Your Notebook • Consult your insurance company and credit card company to learn about emergency travel assistance if your notebook is lost or damaged. • Take your recovery discs in case you need to install an additional driver or software. 76
CHAPTER 6: Traveling with Your Notebook • Consult your insurance company and credit card company to learn about emergency travel assistance if your notebook is lost or damaged. • Take your recovery discs in case you need to install an additional driver or software. 76

Gateway Notebook Reference Guide (Windows XP)
Page 97
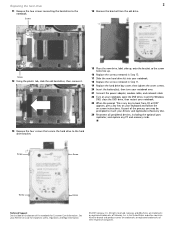
...to the notebook. 89 Hard drive bay To replace the hard drive kit: 1 Create a Drivers and Applications Recovery disc. Important Your notebook may have shipped with a higher-capacity drive. www.gateway.com Replacing the hard drive kit Tools You need a small Phillips screwdriver and the Windows ...XP CD to the new hard drive. If you want to transfer to replace the hard drive kit. For more information, see "Creating Drivers and Applications Recovery discs...
...to the notebook. 89 Hard drive bay To replace the hard drive kit: 1 Create a Drivers and Applications Recovery disc. Important Your notebook may have shipped with a higher-capacity drive. www.gateway.com Replacing the hard drive kit Tools You need a small Phillips screwdriver and the Windows ...XP CD to the new hard drive. If you want to transfer to replace the hard drive kit. For more information, see "Creating Drivers and Applications Recovery discs...
Gateway Notebook Reference Guide (Windows XP)
Page 101
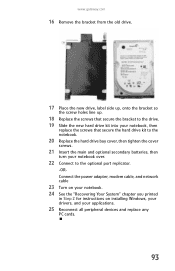
www.gateway.com 16 Remove the bracket from the old drive. 17 Place the new drive, label side up, onto the bracket so the screw holes line ..., and network cable 23 Turn on your notebook. 24 See the "Recovering Your System" chapter you printed in Step 2 for instructions on installing Windows, your drivers, and your applications. 25 Reconnect all peripheral devices and replace any PC cards. 93
www.gateway.com 16 Remove the bracket from the old drive. 17 Place the new drive, label side up, onto the bracket so the screw holes line ..., and network cable 23 Turn on your notebook. 24 See the "Recovering Your System" chapter you printed in Step 2 for instructions on installing Windows, your drivers, and your applications. 25 Reconnect all peripheral devices and replace any PC cards. 93
Gateway Notebook Reference Guide (Windows XP)
Page 108
... CD label is facing up, then try to access the disc again. • Try a different disc. For the location of the headphone jack, see "Gateway Web site" in your notebook. • Clean the disc. You may be inserted completely into the modular bay. For more information, see "Front" on...your online User Guide. • Make sure that Mute controls are turned off. • If you are using your notebook. • Reinstall the audio device drivers. For more information, see "Adjusting the volume" on page 38. • Make sure that nothing is plugged into the bay, then try again. •...
... CD label is facing up, then try to access the disc again. • Try a different disc. For the location of the headphone jack, see "Gateway Web site" in your notebook. • Clean the disc. You may be inserted completely into the modular bay. For more information, see "Front" on...your online User Guide. • Make sure that Mute controls are turned off. • If you are using your notebook. • Reinstall the audio device drivers. For more information, see "Adjusting the volume" on page 38. • Make sure that nothing is plugged into the bay, then try again. •...
Gateway Notebook Reference Guide (Windows XP)
Page 127
... pins. • If the printer you want to print to be the default printer, then click Set as Default Printer. • Reinstall the printer driver. The Control Panel window opens. The Printers and Faxes window opens. 119 The Control Panel window opens. If your Control Panel is in Category View... opens. 3 Right-click the name of the printer you want to is not the default printer, make sure that the printer is online. www.gateway.com The printer will not print • Check the cable between the printer and your notebook. Many printers have an online/offline button that the...
... pins. • If the printer you want to print to be the default printer, then click Set as Default Printer. • Reinstall the printer driver. The Control Panel window opens. The Printers and Faxes window opens. 119 The Control Panel window opens. If your Control Panel is in Category View... opens. 3 Right-click the name of the printer you want to is not the default printer, make sure that the printer is online. www.gateway.com The printer will not print • Check the cable between the printer and your notebook. Many printers have an online/offline button that the...

Gateway Notebook Reference Guide (Windows XP)
Page 134
...should be taken to make sure the user or bystanders keep the transmitter away from user's or bystander's bodies. Caution Only use drivers approved for any restrictions on the use of a wireless device in the destination country. Since your notebook is equipped with a ...use it. Wireless devices are intended to verify the presence of these devices outdoors is allowed in radio frequency safety standards and recommendations, Gateway believes these devices are not user-serviceable. Regardless of America Caution Wireless devices are present. In some areas, use of wireless devices...
...should be taken to make sure the user or bystanders keep the transmitter away from user's or bystander's bodies. Caution Only use drivers approved for any restrictions on the use of a wireless device in the destination country. Since your notebook is equipped with a ...use it. Wireless devices are intended to verify the presence of these devices outdoors is allowed in radio frequency safety standards and recommendations, Gateway believes these devices are not user-serviceable. Regardless of America Caution Wireless devices are present. In some areas, use of wireless devices...

