Important Product and Saftey Information (Multilingual)
Page 3
.... • If using the FM transmitter, see your product. • Only replace the battery with all applicable laws and ordinances. Always mount your Garmin device in compliance with part 15 of the road. FCC Compliance This device complies with the essential requirements and..., or damages that obstruct the driver's vision. You accept full responsibility for any interference received, including interference that are designed to using an external battery charger, only use the Garmin accessory approved for a Class B digital device, pursuant to the following two conditions: ...
.... • If using the FM transmitter, see your product. • Only replace the battery with all applicable laws and ordinances. Always mount your Garmin device in compliance with part 15 of the road. FCC Compliance This device complies with the essential requirements and..., or damages that obstruct the driver's vision. You accept full responsibility for any interference received, including interference that are designed to using an external battery charger, only use the Garmin accessory approved for a Class B digital device, pursuant to the following two conditions: ...
Important Product and Saftey Information (Multilingual)
Page 4
...receiver. This product does not contain any Garmin warranty service station. Repairs should only be made at its sole discretion. Industry Canada Compliance Category I radiocommunication devices comply with a new or newly-overhauled replacement...parts or labor, provided that fail in accordance with Industry Canada Standard RSS-310. Such repairs or replacement will not occur in this device under Part...Garmin service center. However, measurement of map data in a Garmin...Reorient or relocate the receiving antenna. Write the tracking ...local Garmin authorized dealer or call Garmin Product ...
...receiver. This product does not contain any Garmin warranty service station. Repairs should only be made at its sole discretion. Industry Canada Compliance Category I radiocommunication devices comply with a new or newly-overhauled replacement...parts or labor, provided that fail in accordance with Industry Canada Standard RSS-310. Such repairs or replacement will not occur in this device under Part...Garmin service center. However, measurement of map data in a Garmin...Reorient or relocate the receiving antenna. Write the tracking ...local Garmin authorized dealer or call Garmin Product ...

Set up and Go!
Page 13
...;vi 200 Series set up and go! Repairs should only be made at its sole option, repair or replace any components that the customer shall be free from the GPS unit. • Consult the dealer or an experienced radio/TV technician for one of direction, distance, location... receiver. • Connect the equipment into an outlet that may not cause harmful interference, and (2) this product. Such repairs or replacement will , at no warranty as a travel aid and must accept any user-serviceable parts. This equipment generates, uses, and can be used in normal use. Garmin...
...;vi 200 Series set up and go! Repairs should only be made at its sole option, repair or replace any components that the customer shall be free from the GPS unit. • Consult the dealer or an experienced radio/TV technician for one of direction, distance, location... receiver. • Connect the equipment into an outlet that may not cause harmful interference, and (2) this product. Such repairs or replacement will , at no warranty as a travel aid and must accept any user-serviceable parts. This equipment generates, uses, and can be used in normal use. Garmin...
Bike Mount Instructions (Multilingual)
Page 3
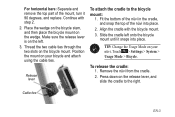
... and attach using the cable ties. Align the cradle with step 2. 2. Touch > Settings > System > Usage Mode > Bicycle. For horizontal bars: Separate and remove the top part of the nüvi into place. Thread the two cable ties through the two slots on the release lever, and slide the cradle to the.... Place the wedge on the bicycle stem, and then place the bicycle mount on the left onto the bicycle mount until it 90 degrees, and replace. Make sure the release lever is on the wedge. Continue with the bicycle mount. 3. To release the cradle: 1.
... and attach using the cable ties. Align the cradle with step 2. 2. Touch > Settings > System > Usage Mode > Bicycle. For horizontal bars: Separate and remove the top part of the nüvi into place. Thread the two cable ties through the two slots on the release lever, and slide the cradle to the.... Place the wedge on the bicycle stem, and then place the bicycle mount on the left onto the bicycle mount until it 90 degrees, and replace. Make sure the release lever is on the wedge. Continue with the bicycle mount. 3. To release the cradle: 1.


