Installation Instructions
Page 1
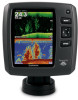
... a hole through the mounting surface at the location you are not running the power and transducer cables under the Mounting Surface NOTICE Use pan-head screws or bolts when securing the swivel-... or bolts with the dashboard using the appropriate flush-mount kit (sold separately). Contacting Garmin Product Support • Go to Run Cables under the mounting surface and through holes ... be long enough to connect the components to each other important information. echo™ Installation Instructions Important Safety Information WARNING See the Important Safety and Product Information guide...
... a hole through the mounting surface at the location you are not running the power and transducer cables under the Mounting Surface NOTICE Use pan-head screws or bolts when securing the swivel-... or bolts with the dashboard using the appropriate flush-mount kit (sold separately). Contacting Garmin Product Support • Go to Run Cables under the mounting surface and through holes ... be long enough to connect the components to each other important information. echo™ Installation Instructions Important Safety Information WARNING See the Important Safety and Product Information guide...
Installation Instructions
Page 2
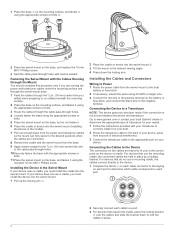
... the bracket down the locking arm. Go to www.garmin.com or contact your local Garmin® dealer to determine the appropriate type of your device does not use the mounting cradle, the connected cables are held in place. 2 Installing the Device in . (16 mm) center hole you... base on the mounting surface, and fasten it on your boat. 2 Route the transducer cable to the back of transducer for your needs. 1 Follow the instructions provided with marine sealant. Connecting the Device to correctly install it using the appropriate screws or bolts. 3 Route the cables through the cable pass...
... the bracket down the locking arm. Go to www.garmin.com or contact your local Garmin® dealer to determine the appropriate type of your device does not use the mounting cradle, the connected cables are held in place. 2 Installing the Device in . (16 mm) center hole you... base on the mounting surface, and fasten it on your boat. 2 Route the transducer cable to the back of transducer for your needs. 1 Follow the instructions provided with marine sealant. Connecting the Device to correctly install it using the appropriate screws or bolts. 3 Route the cables through the cable pass...

Installation Instructions
Page 3
...Fuse Rated Current Transmit Power Models echo 101, 151, and 201 echo 301c echo 501c and 551c echo dv models echo 101 echo 151, 201, 301, and 501 series echo 101 series echo 201, 301, and 501 series All models All models echo 101 series echo 201 and 301 series echo 501 series Measurement 10 in. (...Beam. • If you have a 200/50 kHz dual-frequency transducer, select Dual Frequency. • If you have a DownVü transducer, select DownVü. • If you have connected the cables to the cradle, you have . Installing the Device in the Cradle If your device uses a cradle and ...
...Fuse Rated Current Transmit Power Models echo 101, 151, and 201 echo 301c echo 501c and 551c echo dv models echo 101 echo 151, 201, 301, and 501 series echo 101 series echo 201, 301, and 501 series All models All models echo 101 series echo 201 and 301 series echo 501 series Measurement 10 in. (...Beam. • If you have a 200/50 kHz dual-frequency transducer, select Dual Frequency. • If you have a DownVü transducer, select DownVü. • If you have connected the cables to the cradle, you have . Installing the Device in the Cradle If your device uses a cradle and ...

Owner's Manual
Page 9
...the water temperature. Water Temperature: Sounds when the water temperature varies more than it actually is installed at the water line , measure the distance from the transducer to show the water speed. Battery: Displays the battery voltage. System Unit Settings Select MENU ...1. 1 °C). Number Size: Sets the number size. Enter this alarm. Alarm settings are displayed on the location of the transducer: • If the transducer is installed at the bottom of a keel, making it actually is turned off. Language: Sets the on -screen instructions. System Information: ...
...the water temperature. Water Temperature: Sounds when the water temperature varies more than it actually is installed at the water line , measure the distance from the transducer to show the water speed. Battery: Displays the battery voltage. System Unit Settings Select MENU ...1. 1 °C). Number Size: Sets the number size. Enter this alarm. Alarm settings are displayed on the location of the transducer: • If the transducer is installed at the bottom of a keel, making it actually is turned off. Language: Sets the on -screen instructions. System Information: ...


