
Important Safety and Product Information
Page 2
... • When disposing of the unit, take it to a professional service, such as a waste electronics treatment facility, to www.garmin.com/compliance. Category II radiocommunication devices comply with the essential requirements and other acts of nature or external causes; (iv) damage caused... Garmin product is subject to the following measures: • Reorient or relocate the receiving antenna. • Increase the separation between the equipment and the receiver. • Connect the equipment into an outlet that may cause harmful interference to radio communications if not installed ...
... • When disposing of the unit, take it to a professional service, such as a waste electronics treatment facility, to www.garmin.com/compliance. Category II radiocommunication devices comply with the essential requirements and other acts of nature or external causes; (iv) damage caused... Garmin product is subject to the following measures: • Reorient or relocate the receiving antenna. • Increase the separation between the equipment and the receiver. • Connect the equipment into an outlet that may cause harmful interference to radio communications if not installed ...
Installation Instructions
Page 1
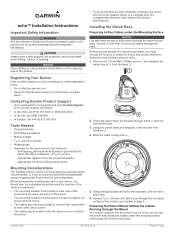
echo™ Installation Instructions Important Safety Information WARNING See the Important Safety and... ear protection, and a dust mask when drilling, cutting, or sanding. November 2013 190-01708-02_0A Printed in . Installing the Swivel Base Preparing to Run Cables under the mounting surface and through the mounting surface at the location you by... in . (16 mm) drill, drill a hole through the swivel-mount base. Before you can be installed closer to http: / / my .garmin .com. • Keep the original sales receipt, or a photocopy, in the product specifications. NOTICE When...
echo™ Installation Instructions Important Safety Information WARNING See the Important Safety and... ear protection, and a dust mask when drilling, cutting, or sanding. November 2013 190-01708-02_0A Printed in . Installing the Swivel Base Preparing to Run Cables under the mounting surface and through the mounting surface at the location you by... in . (16 mm) drill, drill a hole through the swivel-mount base. Before you can be installed closer to http: / / my .garmin .com. • Keep the original sales receipt, or a photocopy, in the product specifications. NOTICE When...
Installation Instructions
Page 2
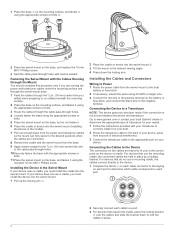
..., place the locking bracket over the cables and slide the bracket down to the desired viewing angle. 4 Press down the locking arm. Installing the Cables and Connectors Wiring to Power 1 Route the power cable from the swivel mount to determine the appropriate type of transducer for your...Follow the instructions provided with marine sealant. Go to www.garmin.com or contact your local Garmin® dealer to the boat battery or fuse block. 2 If necessary, extend the wires using the included 10 mm M6×1 Phillips screw. Installing the Device in the Swivel Mount If your device does ...
..., place the locking bracket over the cables and slide the bracket down to the desired viewing angle. 4 Press down the locking arm. Installing the Cables and Connectors Wiring to Power 1 Route the power cable from the swivel mount to determine the appropriate type of transducer for your...Follow the instructions provided with marine sealant. Go to www.garmin.com or contact your local Garmin® dealer to the boat battery or fuse block. 2 If necessary, extend the wires using the included 10 mm M6×1 Phillips screw. Installing the Device in the Swivel Mount If your device does ...

Installation Instructions
Page 3
...Range Fuse Rated Current Transmit Power Models echo 101, 151, and 201 echo 301c echo 501c and 551c echo dv models echo 101 echo 151, 201, 301, and 501 series echo 101 series echo 201, 301, and 501 series All models All models echo 101 series echo 201 and 301 series echo 501 series Measurement 10 in. (250...you have a DownVü transducer, select DownVü. • If you have . There is an audible click when the device is correctly installed. There is an audible click when the locking bracket is secured in the cradle. Removing the Device from the Cradle If your device uses a ...
...Range Fuse Rated Current Transmit Power Models echo 101, 151, and 201 echo 301c echo 501c and 551c echo dv models echo 101 echo 151, 201, 301, and 501 series echo 101 series echo 201, 301, and 501 series All models All models echo 101 series echo 201 and 301 series echo 501 series Measurement 10 in. (250...you have a DownVü transducer, select DownVü. • If you have . There is an audible click when the device is correctly installed. There is an audible click when the locking bracket is secured in the cradle. Removing the Device from the Cradle If your device uses a ...

Owner's Manual
Page 9
...detected. • sets the alarm to sound only when medium or large fish are displayed on the location of À the boat. This is installed at the water line , measure the distance from the water temperature measured in step 6 as a positive number if the sensor connected to view ... measured in step 3 as being colder than it actually is turned off. System Unit Settings Select MENU > Setup > Units. capable transducer that is installed at the bottom of from the transducer location. 1 Select an option, based on the full screen page, the split zoom page, and the split ...
...detected. • sets the alarm to sound only when medium or large fish are displayed on the location of À the boat. This is installed at the water line , measure the distance from the water temperature measured in step 6 as a positive number if the sensor connected to view ... measured in step 3 as being colder than it actually is turned off. System Unit Settings Select MENU > Setup > Units. capable transducer that is installed at the bottom of from the transducer location. 1 Select an option, based on the full screen page, the split zoom page, and the split ...


