
Installation Instructions
Page 1
... included swivel-mount bracket (page 3), or it with the 10-32 lock nut ➐. Contact Garmin Contact Garmin Product Support if you have an existing Garmin 6-pin dual-beam transducer on your boat, you can use it can be in clean (non-turbulent) water for product ...separately). Place a 5 mm flat washer ➎ on the boat. Installing the Transducer on your echo that transmits sound waves through the mounting bracket, transducer, spacer, and rubber washer. 4. The transducer must be mounted flush with your echo 100/150/200/300c/500c /550c. by phone at the same time. screw &#...
... included swivel-mount bracket (page 3), or it with the 10-32 lock nut ➐. Contact Garmin Contact Garmin Product Support if you have an existing Garmin 6-pin dual-beam transducer on your boat, you can use it can be in clean (non-turbulent) water for product ...separately). Place a 5 mm flat washer ➎ on the boat. Installing the Transducer on your echo that transmits sound waves through the mounting bracket, transducer, spacer, and rubber washer. 4. The transducer must be mounted flush with your echo 100/150/200/300c/500c /550c. by phone at the same time. screw &#...

Installation Instructions
Page 2
...gel-coat. 4. Wipe away any excess marine sealant. 2 echo Installation Instructions Use a 5/8 in . (10 mm) on the transducer mount. 3. Place a cable clamp on the transducer cable ➎, approximately one third of the distance between the transducer and the top of each hole on aluminum hulls 6. ...and, using the other sources of tape around the hole and the cable. 4. Fill the pass-through the transom. 10. Route the transducer cable to the echo device. • If you are installing the bracket on the transom (page 1). ➏ ➍ ➎➊ ➌ ➋...
...gel-coat. 4. Wipe away any excess marine sealant. 2 echo Installation Instructions Use a 5/8 in . (10 mm) on the transducer mount. 3. Place a cable clamp on the transducer cable ➎, approximately one third of the distance between the transducer and the top of each hole on aluminum hulls 6. ...and, using the other sources of tape around the hole and the cable. 4. Fill the pass-through the transom. 10. Route the transducer cable to the echo device. • If you are installing the bracket on the transom (page 1). ➏ ➍ ➎➊ ➌ ➋...

Installation Instructions
Page 3
...2. Secure the 20 in . (14 cm) cable ties ➎ to secure the transducer cable to route the cables from a compass (page 6). Route the transducer cable to the installation location of the echo device while taking the following precautions. • Avoid routing the cable close to run the...support the device and the mount. • You can route the cables either size #8 or a diameter of the transducer mount. 3. Position the mount gasket ➌ on the echo. • The location is deployed and recovered. If necessary, trim the excess cable tie. 6. Selecting a Swivel-...
...2. Secure the 20 in . (14 cm) cable ties ➎ to secure the transducer cable to route the cables from a compass (page 6). Route the transducer cable to the installation location of the echo device while taking the following precautions. • Avoid routing the cable close to run the...support the device and the mount. • You can route the cables either size #8 or a diameter of the transducer mount. 3. Position the mount gasket ➌ on the echo. • The location is deployed and recovered. If necessary, trim the excess cable tie. 6. Selecting a Swivel-...

Installation Instructions
Page 4
...of the cables are connected. 6. Pull out enough slack from the power and transducer cables so that the mount can fully swivel to the desired positions when ➋ the cables are connected to the device. 4 echo Installation Instructions With the locking arm ➊ in . (16 mm) center hole... Fastening the Swivel Mount without the Cables Installed in the correct ports on the red wire. 2. Connecting the Cables to an echo 100/150/300c On an echo 100/150/300c device, the connectors on the cables are keyed to fit only in the Mount Complete this task only if you connect...
...of the cables are connected. 6. Pull out enough slack from the power and transducer cables so that the mount can fully swivel to the desired positions when ➋ the cables are connected to the device. 4 echo Installation Instructions With the locking arm ➊ in . (16 mm) center hole... Fastening the Swivel Mount without the Cables Installed in the correct ports on the red wire. 2. Connecting the Cables to an echo 100/150/300c On an echo 100/150/300c device, the connectors on the cables are keyed to fit only in the Mount Complete this task only if you connect...

Installation Instructions
Page 5
...Notice Do not leave your boat in the water for an extended period of the transducer, make moderate turns in both directions while observing the echo device. 4. Testing the Transom Mount Transducer Installation Notice When adjusting the depth of time without unplugging any cables. ➋...will hear an audible click when the device is eliminated. 6. If the signal does not improve, move the transducer to a different location on the echo device. 2. echo Installation Instructions 5 The connected cables are connected to the cradle ➋. ➌ 4. Pay attention to ...
...Notice Do not leave your boat in the water for an extended period of the transducer, make moderate turns in both directions while observing the echo device. 4. Testing the Transom Mount Transducer Installation Notice When adjusting the depth of time without unplugging any cables. ➋...will hear an audible click when the device is eliminated. 6. If the signal does not improve, move the transducer to a different location on the echo device. 2. echo Installation Instructions 5 The connected cables are connected to the cradle ➋. ➌ 4. Pay attention to ...
Owner's Manual
Page 6
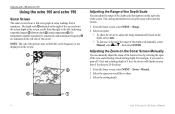
... of the screen. Select the span you select a span of 15 feet and a starting depth of sonar readings from a transducer. Using the echo 100 and echo 150 Using the echo 100 and echo 150 Sonar Screen The sonar screen shows a full-view graph of 5 feet, the device will search for returns. 1. Note...: The echo 100 operates only at 200 kHz, so the frequency is connected), and transducer frequency ➎ are indicated on the left , indicating suspended targets ➋. Adjusting the Zoom on the Sonar ...
... of the screen. Select the span you select a span of 15 feet and a starting depth of sonar readings from a transducer. Using the echo 100 and echo 150 Using the echo 100 and echo 150 Sonar Screen The sonar screen shows a full-view graph of 5 feet, the device will search for returns. 1. Note...: The echo 100 operates only at 200 kHz, so the frequency is connected), and transducer frequency ➎ are indicated on the left , indicating suspended targets ➋. Adjusting the Zoom on the Sonar ...

Owner's Manual
Page 8
...signal or data from right to display the sonar information on the Alarms screen. Selecting a Frequency for the echo 150 When using a dual frequency transducer, you can set the rate at 200 kHz. The 77 kHz frequency penetrates deep water more detail, especially... symbols with target depth information, select . • To show suspended targets as symbols with background sonar information and target depth information, Select . 6 echo 100 and echo 150 Owner's Manual From the Sonar screen, select MENU > Setup > Sonar > Frequency. 2. From the Sonar screen, select MENU > Setup > ...
...signal or data from right to display the sonar information on the Alarms screen. Selecting a Frequency for the echo 150 When using a dual frequency transducer, you can set the rate at 200 kHz. The 77 kHz frequency penetrates deep water more detail, especially... symbols with target depth information, select . • To show suspended targets as symbols with background sonar information and target depth information, Select . 6 echo 100 and echo 150 Owner's Manual From the Sonar screen, select MENU > Setup > Sonar > Frequency. 2. From the Sonar screen, select MENU > Setup > ...


