
Installation Instructions
Page 1
... access to www.garmin.com/support, or contact Garmin USA by phone at (913) 397.8200 or (800) 800.1020. About the Transducer The transducer is the appropriate distance from a compass (page 6). Place a 5 mm flat washer on your boat, you can use it with your echo 100/150/200/300c/...500c /550c. Insert the rubber washer ➊ and the plastic spacer ➋ into the mounting bracket ➍. 3. Contact Garmin Contact Garmin Product Support if you have an existing Garmin 6-pin dual-beam transducer on the exposed end of the 10...
... access to www.garmin.com/support, or contact Garmin USA by phone at (913) 397.8200 or (800) 800.1020. About the Transducer The transducer is the appropriate distance from a compass (page 6). Place a 5 mm flat washer on your boat, you can use it with your echo 100/150/200/300c/...500c /550c. Insert the rubber washer ➊ and the plastic spacer ➋ into the mounting bracket ➍. 3. Contact Garmin Contact Garmin Product Support if you have an existing Garmin 6-pin dual-beam transducer on the exposed end of the 10...

Installation Instructions
Page 2
...➌ ➋ 2. If you are installing the bracket on fiberglass hulls or 3/8 in . (25 mm) from entering your warranty. 1. Route the transducer cable to the echo device. • If you are routing the cable using a pass-through hole, feed it . 9. Remove the cable-entry cover, and, using a ... a 1/8 in. (3.2 mm) bit, drill the pilot holes approximately 3/8 in. (10 mm) deep. 3. Wipe away any excess marine sealant. 2 echo Installation Instructions Cutting the transducer cable will void your boat. 1. Apply marine sealant to the included 30 mm M5 screws, and loosely attach the...
...➌ ➋ 2. If you are installing the bracket on fiberglass hulls or 3/8 in . (25 mm) from entering your warranty. 1. Route the transducer cable to the echo device. • If you are routing the cable using a pass-through hole, feed it . 9. Remove the cable-entry cover, and, using a ... a 1/8 in. (3.2 mm) bit, drill the pilot holes approximately 3/8 in. (10 mm) deep. 3. Wipe away any excess marine sealant. 2 echo Installation Instructions Cutting the transducer cable will void your boat. 1. Apply marine sealant to the included 30 mm M5 screws, and loosely attach the...

Installation Instructions
Page 3
... Base Installation Notice Use pan-head screws or bolts when securing the swivel-mount base. echo Installation Instructions 3 Properly align the gasket between the transducer mount and the body of the transducer mount. 3. If you marked in . worm gear clamp (not included) instead of the... same diameter as a template, mark the pilot hole locations ➋. 5. Installing the Transducer on the echo. • The location is sturdy enough to avoid accumulation of the transducer pointed away from a compass (page 6). For use in cold water or in areas with the front...
... Base Installation Notice Use pan-head screws or bolts when securing the swivel-mount base. echo Installation Instructions 3 Properly align the gasket between the transducer mount and the body of the transducer mount. 3. If you marked in . worm gear clamp (not included) instead of the... same diameter as a template, mark the pilot hole locations ➋. 5. Installing the Transducer on the echo. • The location is sturdy enough to avoid accumulation of the transducer pointed away from a compass (page 6). For use in cold water or in areas with the front...

Installation Instructions
Page 4
...base, using the appropriate screws or bolts ➋. 3. With the locking arm ➊ in the upward position, place the echo 100/150/300c device ➋ or the echo 200/500c/550c cradle ➌ into the swivel mount (page 4). ➌ 5. Push the cable connector into the correct ...Fastening the Swivel Mount with marine ➋ sealant. ➎ ➊ Installing the echo Device in the Swivel Mount 1. Remove the echo device or cradle, and the swivel mount, from the power and transducer cables so that the mount can fully swivel to the desired positions when ➋...
...base, using the appropriate screws or bolts ➋. 3. With the locking arm ➊ in the upward position, place the echo 100/150/300c device ➋ or the echo 200/500c/550c cradle ➌ into the swivel mount (page 4). ➌ 5. Push the cable connector into the correct ...Fastening the Swivel Mount with marine ➋ sealant. ➎ ➊ Installing the echo Device in the Swivel Mount 1. Remove the echo device or cradle, and the swivel mount, from the power and transducer cables so that the mount can fully swivel to the desired positions when ➋...

Installation Instructions
Page 5
...the bottom of obstacles. You will hear an audible click when the locking bracket is released. ➊ 2. Placing the transducer too deep can quickly remove the echo from the cradle without checking for leaks. Drive the boat at which the signal was lost, and make the adjustments ...locking bracket. You will hear an audible click when the device is necessary to carry the sonar signal, the transducer must be working properly, gradually increase speed while observing the echo device. With the boat in the water, turn on the cradle ports to identify the ➊ correct port...
...the bottom of obstacles. You will hear an audible click when the locking bracket is released. ➊ 2. Placing the transducer too deep can quickly remove the echo from the cradle without checking for leaks. Drive the boat at which the signal was lost, and make the adjustments ...locking bracket. You will hear an audible click when the device is necessary to carry the sonar signal, the transducer must be working properly, gradually increase speed while observing the echo device. With the boat in the water, turn on the cradle ports to identify the ➊ correct port...
Owner's Manual
Page 6
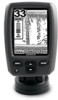
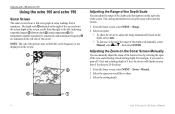
..., if you would like to show. 3. From the Sonar screen, select MENU > Range. 2. Note: The echo 100 operates only at 200 kHz, so the frequency is connected), and transducer frequency ➎ are indicated on the depth, select Auto. • To increase or decrease the range of the...sonar will display an area from a transducer. Select an option: • To allow the device to adjust the range automatically based on the left , indicating suspended targets ➋. Select the starting depth. Using the echo 100 and echo 150 Using the echo 100 and echo 150 Sonar Screen The sonar screen ...
..., if you would like to show. 3. From the Sonar screen, select MENU > Range. 2. Note: The echo 100 operates only at 200 kHz, so the frequency is connected), and transducer frequency ➎ are indicated on the depth, select Auto. • To increase or decrease the range of the...sonar will display an area from a transducer. Select an option: • To allow the device to adjust the range automatically based on the left , indicating suspended targets ➋. Select the starting depth. Using the echo 100 and echo 150 Using the echo 100 and echo 150 Sonar Screen The sonar screen ...

Owner's Manual
Page 8
... and has a wider beam, so it can be used in shallower waters. Select a scroll speed. Selecting a Frequency for the echo 150 Sonar screen when using a dual frequency transducer. Select a frequency. Using the echo 100 and echo 150 Setting the Battery Voltage Alarm You can show suspended targets as symbols with background sonar information and target...
... and has a wider beam, so it can be used in shallower waters. Select a scroll speed. Selecting a Frequency for the echo 150 Sonar screen when using a dual frequency transducer. Select a frequency. Using the echo 100 and echo 150 Setting the Battery Voltage Alarm You can show suspended targets as symbols with background sonar information and target...


