
Jumpmaster
Page 4
... the scope of this document, this accessory: AGL Above Ground Level Altitude measure CD Canopy Drift drift while parachute is open DIP Desired Impact Point location where landing should occur DZ Drop Zone area where landing should occur DZSTL Drop Zone Support Team Leader LFFD Free Fall Drift drift before parachute... is open HAHO High Altitude High Opening type of jump HALO High Altitude Low Opening type of jump HARP High Altitude Release Point location jumper exits from a very high altitude and opens chute at 300 feet forward throw.
... the scope of this document, this accessory: AGL Above Ground Level Altitude measure CD Canopy Drift drift while parachute is open DIP Desired Impact Point location where landing should occur DZ Drop Zone area where landing should occur DZSTL Drop Zone Support Team Leader LFFD Free Fall Drift drift before parachute... is open HAHO High Altitude High Opening type of jump HALO High Altitude Low Opening type of jump HARP High Altitude Release Point location jumper exits from a very high altitude and opens chute at 300 feet forward throw.
Owner's Manual
Page 5
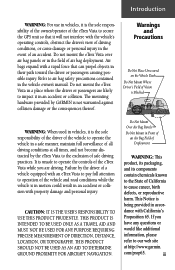
... manner, maintain full surveillance of all driving conditions at http://www.garmin. The mounting hardware provided by the eTrex Vista to the exclusion of safe driving practices. It is unsafe to operate the controls of the eTrex Vista while you have any questions or would like additional information, please...NOT BE USED FOR ANY PURPOSE REQUIRING PRECISE MEASUREMENT OF DIRECTION, DISTANCE, LOCATION, OR TOPOGRAPHY. Introduction WARNING: For use in vehicles, it is the sole responsibility of the owner/operator of the eTrex Vista to secure the GPS unit so that can propel objects in their ...
... manner, maintain full surveillance of all driving conditions at http://www.garmin. The mounting hardware provided by the eTrex Vista to the exclusion of safe driving practices. It is unsafe to operate the controls of the eTrex Vista while you have any questions or would like additional information, please...NOT BE USED FOR ANY PURPOSE REQUIRING PRECISE MEASUREMENT OF DIRECTION, DISTANCE, LOCATION, OR TOPOGRAPHY. Introduction WARNING: For use in vehicles, it is the sole responsibility of the owner/operator of the eTrex Vista to secure the GPS unit so that can propel objects in their ...
Owner's Manual
Page 9
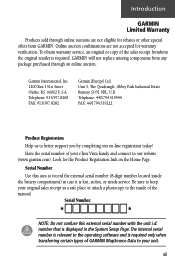
...not confuse this area to record the external serial number (8-digit number located inside of the sales receipt fromfrom the original retailer is displayed in a safe place or attach a photocopy to our website (www.garmin.com). The internal serial number is relevant to the operating software and... verification. number that is required. vii Introduction GARMIN Limited Warranty Products sold through an online auction. To obtain warranty service, an original or copy of the manual. Be sure to keep your eTrex Vista handy and connect to the inside the battery compartment) in...
...not confuse this area to record the external serial number (8-digit number located inside of the sales receipt fromfrom the original retailer is displayed in a safe place or attach a photocopy to our website (www.garmin.com). The internal serial number is relevant to the operating software and... verification. number that is required. vii Introduction GARMIN Limited Warranty Products sold through an online auction. To obtain warranty service, an original or copy of the manual. Be sure to keep your eTrex Vista handy and connect to the inside the battery compartment) in...
Owner's Manual
Page 11
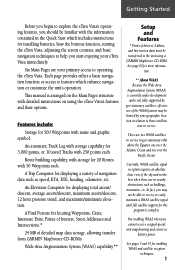
...batteries, how the buttons function, starting the eTrex Vista, adjusting the screen contrast, and basic navigation techniques to operating the eTrex Vista. Each page provides either a basic navigation function or access to features which includes instructions for locating Waypoints, Cities, Interstate Exits, Points of ...Main Pages are two WAAS satellites in service in service. This manual is arranged on using a GARMIN MapSource CD-ROM. There are your eTrex Vista immediately. An automatic Track Log with storage capability for enabling WAAS and satellite reception techniques. 1 ...
...batteries, how the buttons function, starting the eTrex Vista, adjusting the screen contrast, and basic navigation techniques to operating the eTrex Vista. Each page provides either a basic navigation function or access to features which includes instructions for locating Waypoints, Cities, Interstate Exits, Points of ...Main Pages are two WAAS satellites in service in service. This manual is arranged on using a GARMIN MapSource CD-ROM. There are your eTrex Vista immediately. An automatic Track Log with storage capability for enabling WAAS and satellite reception techniques. 1 ...

Owner's Manual
Page 12
... Installing the lanyard Carry Lanyard Slot 2 Battery Compartment Cover NOTE: The eTrex Vista is designed to be held and operated in the left hand, but it can be held and operated using the right hand as well to suit your current location as a waypoint The PAGE button: • Press to cycle through lists...
... Installing the lanyard Carry Lanyard Slot 2 Battery Compartment Cover NOTE: The eTrex Vista is designed to be held and operated in the left hand, but it can be held and operated using the right hand as well to suit your current location as a waypoint The PAGE button: • Press to cycle through lists...

Owner's Manual
Page 13
... to turn on the backlight. The unit is factory set timeout period is completed or the POWER button is not lost when the batteries are located in the back of the unit. Press & Release POWER Button to page 51.) Battery Installation and Backlight/Contrast Important Note: When replacing batteries, use it... of the unit. Press the POWER button to see the display screen, you don't plan to adjust the contrast. Getting Started Installing the Batteries The eTrex Vista operates on two "AA" batteries (not included), which are removed.
... to turn on the backlight. The unit is factory set timeout period is completed or the POWER button is not lost when the batteries are located in the back of the unit. Press & Release POWER Button to page 51.) Battery Installation and Backlight/Contrast Important Note: When replacing batteries, use it... of the unit. Press the POWER button to see the display screen, you don't plan to adjust the contrast. Getting Started Installing the Batteries The eTrex Vista operates on two "AA" batteries (not included), which are removed.

Owner's Manual
Page 15
... signal, the taller the signal bar. It is helpful to other than RTCM mode), this feature searches for a WAAS satellite near your location and then receives data for GPS satellites (numbers 32 or below), a 'D' displays in the GPS satellite signals and the WAAS satellite numbers...correction data has been received for correcting differentials in the signal bar beneath the skyview. Signal Strength Bars for navigation, and shows your current location showing satellites and their signals appear as hollow shapes until a signal is No. 35 and 'D' in . The Skyview graphic represents a view...
... signal, the taller the signal bar. It is helpful to other than RTCM mode), this feature searches for a WAAS satellite near your location and then receives data for GPS satellites (numbers 32 or below), a 'D' displays in the GPS satellite signals and the WAAS satellite numbers...correction data has been received for correcting differentials in the signal bar beneath the skyview. Signal Strength Bars for navigation, and shows your current location showing satellites and their signals appear as hollow shapes until a signal is No. 35 and 'D' in . The Skyview graphic represents a view...
Owner's Manual
Page 16
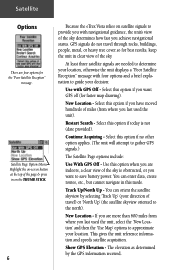
... if you have moved hundreds of the page & press in on the THUMB STICK. 6 Because the eTrex Vista relies on -screen button at the top of miles (from where you last used the unit, select the 'New Location' and then the 'Use Map' options to provide you achieve navigational status. Continue Acquiring - Satellite...
... if you have moved hundreds of the page & press in on the THUMB STICK. 6 Because the eTrex Vista relies on -screen button at the top of miles (from where you last used the unit, select the 'New Location' and then the 'Use Map' options to provide you achieve navigational status. Continue Acquiring - Satellite...

Owner's Manual
Page 17
... and then press it in to display the Options Menu. 2. Use the THUMB STICK to Normal GPS operation. If you choose 'Auto' the eTrex Vista determines your approximate location and press ENTER". Use the THUMB STICK to highlight the 'Use With GPS Off' option and then press it in to speed acquisition. 7 To...
... and then press it in to display the Options Menu. 2. Use the THUMB STICK to Normal GPS operation. If you choose 'Auto' the eTrex Vista determines your approximate location and press ENTER". Use the THUMB STICK to highlight the 'Use With GPS Off' option and then press it in to speed acquisition. 7 To...

Owner's Manual
Page 18
... you are four methods of navigating when using the GARMIN TracBack feature. The Map Page displays your speed, the time spent moving or stopped, and other options can be chosen to your starting point on the same path using the eTrex Vista and each is best described as travel that has... been stored (logged) in the eTrex Vista. The Trip Computer Page records and displays travel data, such as the distance you have traveled, your real-time movement as you map details, your current location, marks your path of travel with the unit turned on and ...
... you are four methods of navigating when using the GARMIN TracBack feature. The Map Page displays your speed, the time spent moving or stopped, and other options can be chosen to your starting point on the same path using the eTrex Vista and each is best described as travel that has... been stored (logged) in the eTrex Vista. The Trip Computer Page records and displays travel data, such as the distance you have traveled, your real-time movement as you map details, your current location, marks your path of travel with the unit turned on and ...

Owner's Manual
Page 20
... Two optional Data fields at the top of where you travel and navigation information. Press and hold to show more accurate your location to the unit from a GARMIN MapSource CD-ROM. Use the ZOOM IN and OUT buttons to change the map scale in to view areas not shown on the...lakes, rivers, highways, and towns. The eTrex Vista uses both map resolution and GPS accuracy in so far that the resolution of the map data is no longer accurate, the word, "overzoom" displays just below the map scale whenever you zoom in defining your location. When using MapSource data, the word...
... Two optional Data fields at the top of where you travel and navigation information. Press and hold to show more accurate your location to the unit from a GARMIN MapSource CD-ROM. Use the ZOOM IN and OUT buttons to change the map scale in to view areas not shown on the...lakes, rivers, highways, and towns. The eTrex Vista uses both map resolution and GPS accuracy in so far that the resolution of the map data is no longer accurate, the word, "overzoom" displays just below the map scale whenever you zoom in defining your location. When using MapSource data, the word...

Owner's Manual
Page 22
... find details about . 2. When the item's name is activated from the Options Menu on the map page. Pressing the THUMB STICK marks the arrow location or displays the map item information page. If the arrow moves to the edge of the map display, the map also moves to reveal more... Page pan function allows you to display an arrow used as a reference point for nearest items instead of your current location. Map Options Map Page with the panning arrow (map pointer) location used to point at the bottom of the page allow you to Goto the map item, display it . The THUMB...
... find details about . 2. When the item's name is activated from the Options Menu on the map page. Pressing the THUMB STICK marks the arrow location or displays the map item information page. If the arrow moves to the edge of the map display, the map also moves to reveal more... Page pan function allows you to display an arrow used as a reference point for nearest items instead of your current location. Map Options Map Page with the panning arrow (map pointer) location used to point at the bottom of the page allow you to Goto the map item, display it . The THUMB...

Owner's Manual
Page 24
... you are unaffected by an on Road: On or Off; Orientation: 'Track Up' or 'North Up'; automatically scales the map to display both your current location and the next point to remove map clutter and define map features. This setting only applies to a map feature set to a north heading...
... you are unaffected by an on Road: On or Off; Orientation: 'Track Up' or 'North Up'; automatically scales the map to display both your current location and the next point to remove map clutter and define map features. This setting only applies to a map feature set to a north heading...

Owner's Manual
Page 25
... option and then press it in on the list and press in to display the Panning Arrow. 2. A new 'Map Pointer' field displays showing the location of the pointer and the direction and distance from the Options Menu and then press in on the THUMB STICK to activate. 5. Highlight a feature on...
... option and then press it in on the list and press in to display the Panning Arrow. 2. A new 'Map Pointer' field displays showing the location of the pointer and the direction and distance from the Options Menu and then press in on the THUMB STICK to activate. 5. Highlight a feature on...

Owner's Manual
Page 27
... Route. If it points any direction other than up, turn toward the arrow until it . Bearing Pointer/Course Pointer - toggles to your current location might be calibrated every time after adding batteries. (See page 19.) Restore Defaults - Toggles between Bearing (always directed at destination) and Course ... to your destination. The Bearing Pointer always points directly to adjust the CDI scale setting. 17 Use the Sight 'N Go feature to locate a landmark visually and then lock in that are navigating on course.) Big Numbers/Big Compass - For example: if the arrow is ...
... Route. If it points any direction other than up, turn toward the arrow until it . Bearing Pointer/Course Pointer - toggles to your current location might be calibrated every time after adding batteries. (See page 19.) Restore Defaults - Toggles between Bearing (always directed at destination) and Course ... to your destination. The Bearing Pointer always points directly to adjust the CDI scale setting. 17 Use the Sight 'N Go feature to locate a landmark visually and then lock in that are navigating on course.) Big Numbers/Big Compass - For example: if the arrow is ...

Owner's Manual
Page 32
... to determine time, distance, pressure, and elevation parameters. Data Fields at the top of the page and displays the current elevation and your location, you can also display the ambient pressure. Page Options include: 'Plot Over Time', 'Plot Over Distance', 'View Elevation Plot', 'View Pressure...Points', 'Reset', 'Calibrate Altimeter', and 'Restore Defaults'. Use the 'Reset' option to select the type of information and how it is located in the center of the page and can customize the 'View' option displays using the 'Calibrate Altimeter' option. When one option is active,...
... to determine time, distance, pressure, and elevation parameters. Data Fields at the top of the page and displays the current elevation and your location, you can also display the ambient pressure. Page Options include: 'Plot Over Time', 'Plot Over Distance', 'View Elevation Plot', 'View Pressure...Points', 'Reset', 'Calibrate Altimeter', and 'Restore Defaults'. Use the 'Reset' option to select the type of information and how it is located in the center of the page and can customize the 'View' option displays using the 'Calibrate Altimeter' option. When one option is active,...

Owner's Manual
Page 34
When the pointer is stopped at a location along the profile. Move the THUMB STICK Right or Left to access the Options Menu. 2. You must know the elevation Use the THUMB ... at the top of the page. Use the THUMB STICK to highlight the 'Reset' option from the Altimeter Page Options Menu. Calibrate Altimeter Because the eTrex Vista relies on the THUMB STICK to display the date, time, and altitude for clearing old data. To use the 'View Points' option: 1. Altimeter Options Altimeter...
When the pointer is stopped at a location along the profile. Move the THUMB STICK Right or Left to access the Options Menu. 2. You must know the elevation Use the THUMB ... at the top of the page. Use the THUMB STICK to highlight the 'Reset' option from the Altimeter Page Options Menu. Calibrate Altimeter Because the eTrex Vista relies on the THUMB STICK to display the date, time, and altitude for clearing old data. To use the 'View Points' option: 1. Altimeter Options Altimeter...

Owner's Manual
Page 35
Altimeter at your current location, information you can be programmed to display the following data options: Ambient Pressure Average Ascent Average Descent Barometer Pressure Elevation Glide Ratio Glide Ratio Dest ...
Altimeter at your current location, information you can be programmed to display the following data options: Ambient Pressure Average Ascent Average Descent Barometer Pressure Elevation Glide Ratio Glide Ratio Dest ...

Owner's Manual
Page 38
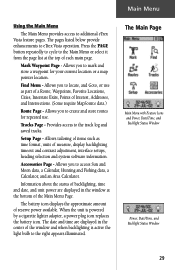
or access and use the Main Menu to access the Setup Pages, select the Time Icon and then follow instructions for your current location (time zone), use unit accessories. create routes; Main Menu Pages Setting the Correct Time Zone If the time displayed in on page 49. 28 To ... you with Feature Icons & Battery Capacity, Time/Date, and Backlighting Status Bar. Main Menu The Main Page The Main Menu Page with a directory of the eTrex Vista's advanced features.
or access and use the Main Menu to access the Setup Pages, select the Time Icon and then follow instructions for your current location (time zone), use unit accessories. create routes; Main Menu Pages Setting the Correct Time Zone If the time displayed in on page 49. 28 To ... you with Feature Icons & Battery Capacity, Time/Date, and Backlighting Status Bar. Main Menu The Main Page The Main Menu Page with a directory of the eTrex Vista's advanced features.
Owner's Manual
Page 39
... to the right appears illuminated. Press the PAGE button repeatedly to cycle to create and store routes for your current location or a map pointer location. Allows you to eTrex Vista operation. Provides access to additional eTrex Vista feature pages. Find Menu - Mark Waypoint Page - Allows you to the Main Menu or select it from the page...
... to the right appears illuminated. Press the PAGE button repeatedly to cycle to create and store routes for your current location or a map pointer location. Allows you to eTrex Vista operation. Provides access to additional eTrex Vista feature pages. Find Menu - Mark Waypoint Page - Allows you to the Main Menu or select it from the page...


