
Owner's Manual
Page 3
... Installation Angle 2 Performing a Static Zero Calibration 2 Calibrating Vector Before Each Ride 2 Customizing the Data Fields 3 Training 3 Pedal-Based Power 3 Maintenance Tips 3 Vector Data 3 Sending Your Ride to Garmin Connect 3 Garmin Connect 3 Disconnecting the USB Cable 3 Device Information 3 Vector Device Care 3 Removing the Pedal Pod and Pedal 4 Replacing the Pedals and Cartridges 4 Vector Storage 4 Vector Specifications 4 USB ANT Stick™ Specifications 4 Battery...
... Installation Angle 2 Performing a Static Zero Calibration 2 Calibrating Vector Before Each Ride 2 Customizing the Data Fields 3 Training 3 Pedal-Based Power 3 Maintenance Tips 3 Vector Data 3 Sending Your Ride to Garmin Connect 3 Garmin Connect 3 Disconnecting the USB Cable 3 Device Information 3 Vector Device Care 3 Removing the Pedal Pod and Pedal 4 Replacing the Pedals and Cartridges 4 Vector Storage 4 Vector Specifications 4 USB ANT Stick™ Specifications 4 Battery...

Owner's Manual
Page 5
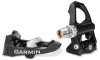
... the Vector components (page 1). 2 Pair Vector with your Vector, go to provide an outstanding experience of your Edge® (page 2). 3 Go for product warnings and other important information. Vector was designed for cyclists, by cyclists, to www.garmin.com/ vectorowner. Improper use . Now it contacts the pedal spindle. Á Introduction 3 On the pedal spindle, stack the pedal pod...
... the Vector components (page 1). 2 Pair Vector with your Vector, go to provide an outstanding experience of your Edge® (page 2). 3 Go for product warnings and other important information. Vector was designed for cyclists, by cyclists, to www.garmin.com/ vectorowner. Improper use . Now it contacts the pedal spindle. Á Introduction 3 On the pedal spindle, stack the pedal pod...

Owner's Manual
Page 6
... the sensor, and select Search. 7 Rotate the crank arm a few times in the forward position, the pedal pod should not interfere with Vector for clearance. 10 Repeat steps 2-9 to tighten the spindle. Garmin® recommends placement of the pedal pod on the cleat bolt threads. 2 Align the cleat , washers , and bolts . À Á Â...
... the sensor, and select Search. 7 Rotate the crank arm a few times in the forward position, the pedal pod should not interfere with Vector for clearance. 10 Repeat steps 2-9 to tighten the spindle. Garmin® recommends placement of the pedal pod on the cleat bolt threads. 2 Align the cleat , washers , and bolts . À Á Â...

Owner's Manual
Page 7
... components clean and free of the crank arm, and time, Vector can determine power (watts). Customizing the Data Fields This procedure contains instructions for clearance. • Calibrate Vector at the start . Training Pedal-Based Power Vector measures pedal-based power. By measuring the force, the direction of force,...wax paper or a towel between the tool and the hardware. • After any bike adjustments, rotate the crank arm to Garmin Connect and keep track of Vector components. Record the events of the USB cable into a computer USB port. 4 Go to your computer as you have ...
... components clean and free of the crank arm, and time, Vector can determine power (watts). Customizing the Data Fields This procedure contains instructions for clearance. • Calibrate Vector at the start . Training Pedal-Based Power Vector measures pedal-based power. By measuring the force, the direction of force,...wax paper or a towel between the tool and the hardware. • After any bike adjustments, rotate the crank arm to Garmin Connect and keep track of Vector components. Record the events of the USB cable into a computer USB port. 4 Go to your computer as you have ...

Owner's Manual
Page 8
...you can be used on the end of time, Garmin recommends removing Vector and storing it onto the cartridge until there is no gap. WARNING Garmin recommends torque of riding time NOTE: The pedal pod used . NOTE: The right pedal has a left -handed (reverse) thread. From ... loosen the pedal . À Á NOTE: The right pedal has a left -handed (reverse) thread. 3 Remove the pedal body. 4 While securely holding the cartridge with Garmin parts only. Vector Storage If you are damaged or show significant wear, you unscrew the pedal, the pedal pod cable ...
...you can be used on the end of time, Garmin recommends removing Vector and storing it onto the cartridge until there is no gap. WARNING Garmin recommends torque of riding time NOTE: The pedal pod used . NOTE: The right pedal has a left -handed (reverse) thread. From ... loosen the pedal . À Á NOTE: The right pedal has a left -handed (reverse) thread. 3 Remove the pedal body. 4 While securely holding the cartridge with Garmin parts only. Vector Storage If you are damaged or show significant wear, you unscrew the pedal, the pedal pod cable ...

Owner's Manual
Page 9
...a magnet to remove the Ä battery from the locked to properly recycle the batteries. You can be in order to activate Vector. battery warning, you must be touching the pedals. 1 Select MENU > > Bike Settings > Bike Profiles. 2 Select a profile. 3 Select ANT + Power > Calibrate. ...your Edge device, a message appears, and appears solid on the Edge device. Appendix Registering Vector Help us better support you by completing our online registration today. • Go to www.garmin.com/ vectorowner. • Keep the original sales receipt, or a photocopy, in order ...
...a magnet to remove the Ä battery from the locked to properly recycle the batteries. You can be in order to activate Vector. battery warning, you must be touching the pedals. 1 Select MENU > > Bike Settings > Bike Profiles. 2 Select a profile. 3 Select ANT + Power > Calibrate. ...your Edge device, a message appears, and appears solid on the Edge device. Appendix Registering Vector Help us better support you by completing our online registration today. • Go to www.garmin.com/ vectorowner. • Keep the original sales receipt, or a photocopy, in order ...

Owner's Manual
Page 10
... This list contains power data fields for the current lap. If you have functioning batteries installed. 1 Go to www.garmin.com/ vectorowner, and download the Vector Updater application. 2 Bring Vector within range (3 m) of functional threshold power. Lap: The average left / right power balance. Cadence - Power - .... When the zero reference is not functioning properly, you can run the Vector Updater application, you can try these tips. • Insert the USB ANT Stick directly into each pedal pod, wait 20 seconds, and replace the batteries. Power: The current ...
... This list contains power data fields for the current lap. If you have functioning batteries installed. 1 Go to www.garmin.com/ vectorowner, and download the Vector Updater application. 2 Bring Vector within range (3 m) of functional threshold power. Lap: The average left / right power balance. Cadence - Power - .... When the zero reference is not functioning properly, you can run the Vector Updater application, you can try these tips. • Insert the USB ANT Stick directly into each pedal pod, wait 20 seconds, and replace the batteries. Power: The current ...

Owner's Manual
Page 11
Index B battery life 4 replacing 5 type 4 C calibrating 2, 5, 6 cleaning the device 3 cleats 2 compatibility 6 customizing the device 3, 6 D data storing 3 transferring 3 data fields 3, 6 E Edge 2, 5 G Garmin Connect 3 storing data 3 H history 3 sending to computer 3 I installing 1, 2 M memory 3 P pairing 2, 5 pedal pods 1, 4, 5 pedals 1-4 power 3 product registration 5 R registering the device 5 replacement parts 4 S software, updating 6 specifications 4 storing data 3 storing the device 4 T tools 1 training 3 U updates, software...
Index B battery life 4 replacing 5 type 4 C calibrating 2, 5, 6 cleaning the device 3 cleats 2 compatibility 6 customizing the device 3, 6 D data storing 3 transferring 3 data fields 3, 6 E Edge 2, 5 G Garmin Connect 3 storing data 3 H history 3 sending to computer 3 I installing 1, 2 M memory 3 P pairing 2, 5 pedal pods 1, 4, 5 pedals 1-4 power 3 product registration 5 R registering the device 5 replacement parts 4 S software, updating 6 specifications 4 storing data 3 storing the device 4 T tools 1 training 3 U updates, software...

Quick Start Manual
Page 1
... instructions carefully before installing and using the Vector™ system. NOTE: You must confirm bicycle chain clearance. Installing the Pedal Pod and Pedal NOTE: The left and right pedal pods are not impacted by the orientation of the pedal pod. TIP: Power and cadence calculations are...on the leading edge of the pedal pod on the pedal spindle ➎ and the pedal pod ➏ where it contacts the pedal spindle. ➎➐ ➒ ➏ ➑ 3 On the pedal spindle, stack the pedal pod and any required washers ➐. Garmin recommends placement of the crank....
... instructions carefully before installing and using the Vector™ system. NOTE: You must confirm bicycle chain clearance. Installing the Pedal Pod and Pedal NOTE: The left and right pedal pods are not impacted by the orientation of the pedal pod. TIP: Power and cadence calculations are...on the leading edge of the pedal pod on the pedal spindle ➎ and the pedal pod ➏ where it contacts the pedal spindle. ➎➐ ➒ ➏ ➑ 3 On the pedal spindle, stack the pedal pod and any required washers ➐. Garmin recommends placement of the crank....

Quick Start Manual
Page 2
...; ➋ ➊ 3 Use a 4 mm hex key to loosely attach each pedal. Calibrating Vector Before Each Ride For best results, Garmin recommends calibrating Vector at the start of every ride. 1 Perform a static zero calibration (page 2). 2 Go for clearance. 10 Repeat steps 2-9 to install the right pedal. Garmin recommends torque of 25 to 30 lbf-ft. (34 to...
...; ➋ ➊ 3 Use a 4 mm hex key to loosely attach each pedal. Calibrating Vector Before Each Ride For best results, Garmin recommends calibrating Vector at the start of every ride. 1 Perform a static zero calibration (page 2). 2 Go for clearance. 10 Repeat steps 2-9 to install the right pedal. Garmin recommends torque of 25 to 30 lbf-ft. (34 to...
