Declaration of Conformity
Page 1
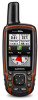
...: 1 of 1 DECLARATION of CONFORMITY Application of Equipment: Information Technology Equipment (Global Positioning System Receiver) Model Number(s): GPSMAP 64 GPSMAP 64s GPSMAP 64st The undersigned does hereby declare that the equipment complies with the above Directives Jamie Wiltshire Quality Supervisor Garmin (Europe) Ltd. Safety. Part 3: Specific conditions for radio equipment and services; Type of Council Directive: 1999/5/EC...
...: 1 of 1 DECLARATION of CONFORMITY Application of Equipment: Information Technology Equipment (Global Positioning System Receiver) Model Number(s): GPSMAP 64 GPSMAP 64s GPSMAP 64st The undersigned does hereby declare that the equipment complies with the above Directives Jamie Wiltshire Quality Supervisor Garmin (Europe) Ltd. Safety. Part 3: Specific conditions for radio equipment and services; Type of Council Directive: 1999/5/EC...

Owner's Manual
Page 5
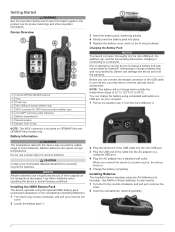
...or connecting to remove optional mount accessories. Before you can charge the battery using a standard wall outlet or a USB port on GPSMAP 64s and GPSMAP 64st models only. 3 Insert the battery pack, observing polarity. 4 Gently press the battery pack into the mini-USB port. 3 ... 1 Attempting to properly recycle the batteries. CAUTION Contact your computer. 1 Pull up to charge a battery that was not provided by Garmin can rupture at high temperatures. Do not use the device to remove the cover. 2 Insert two AA batteries, observing polarity. Alkaline...
...or connecting to remove optional mount accessories. Before you can charge the battery using a standard wall outlet or a USB port on GPSMAP 64s and GPSMAP 64st models only. 3 Insert the battery pack, observing polarity. 4 Gently press the battery pack into the mini-USB port. 3 ... 1 Attempting to properly recycle the batteries. CAUTION Contact your computer. 1 Pull up to charge a battery that was not provided by Garmin can rupture at high temperatures. Do not use the device to remove the cover. 2 Insert two AA batteries, observing polarity. Alkaline...
Owner's Manual
Page 8
...level at which tell you how far off shading. The map items will not appear when the map zoom level is available only on the GPSMAP 64s and GPSMAP 64st. 1 Select Sight 'N Go. 2 Point the device at an object in the distance, lock in the direction of the direction you are... pointer À indicates your relationship to the course line leading to view details about that appears on the map. Navigating with the GPSMAP 64s and GPSMAP 64st. NOTE: Sight 'N Go is higher than the selected level. If points any point on your destination. The device has a 3-axis electronic ...
...level at which tell you how far off shading. The map items will not appear when the map zoom level is available only on the GPSMAP 64s and GPSMAP 64st. 1 Select Sight 'N Go. 2 Point the device at an object in the distance, lock in the direction of the direction you are... pointer À indicates your relationship to the course line leading to view details about that appears on the map. Navigating with the GPSMAP 64s and GPSMAP 64st. NOTE: Sight 'N Go is higher than the selected level. If points any point on your destination. The device has a 3-axis electronic ...

Owner's Manual
Page 9
.... chirp™ A chirp is a small Garmin accessory that is available only with a proximity alarm, the device sounds a tone. Setting a Proximity Alarm Proximity alarms alert you when you enter an area with the GPSMAP 64s and GPSMAP 64st. Satellite Settings From the satellite page, select ...find a chirp in a geocache. Sending and Receiving Data Wirelessly NOTE: This feature is programmed and left in . 5 Follow the on the GPSMAP 64s and GPSMAP 64st. 1 Go to a Geocache 1 From the main menu, select Geocaches. 2 Select a geocache. 3 Select Go. Your device can manually...
.... chirp™ A chirp is a small Garmin accessory that is available only with a proximity alarm, the device sounds a tone. Setting a Proximity Alarm Proximity alarms alert you when you enter an area with the GPSMAP 64s and GPSMAP 64st. Satellite Settings From the satellite page, select ...find a chirp in a geocache. Sending and Receiving Data Wirelessly NOTE: This feature is programmed and left in . 5 Follow the on the GPSMAP 64s and GPSMAP 64st. 1 Go to a Geocache 1 From the main menu, select Geocaches. 2 Select a geocache. 3 Select Go. Your device can manually...
Owner's Manual
Page 10
... Select a waypoint. 3 Select MENU > Average Location. 4 Move to view your live data on a Garmin Connect tracking page. This option is available only on the GPSMAP 64s and GPSMAP 64st. The VIRB Remote function allows you finish recording the activity. Waypoint Averaging You can create an adventure and ...send it to your device, you must enable the remote setting on your GPSMAP 64s or GPSMAP 64st. Activity uploads to Garmin Connect: Automatically sends your activity to Garmin Connect as soon as a removable drive or a portable device, and the memory card may ...
... Select a waypoint. 3 Select MENU > Average Location. 4 Move to view your live data on a Garmin Connect tracking page. This option is available only on the GPSMAP 64s and GPSMAP 64st. The VIRB Remote function allows you finish recording the activity. Waypoint Averaging You can create an adventure and ...send it to your device, you must enable the remote setting on your GPSMAP 64s or GPSMAP 64st. Activity uploads to Garmin Connect: Automatically sends your activity to Garmin Connect as soon as a removable drive or a portable device, and the memory card may ...
Owner's Manual
Page 13
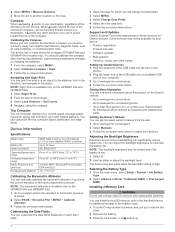
... can select PAGE to reset. Map Spheroid: Shows the coordinate system the device is turned on. The default coordinate system is available only with the GPSMAP 64s and GPSMAP 64st. Auto Calibration: Automatically calibrates the altimeter each time the device is using a map or chart that optimize your current point. Save Always records all...
... can select PAGE to reset. Map Spheroid: Shows the coordinate system the device is turned on. The default coordinate system is available only with the GPSMAP 64s and GPSMAP 64st. Auto Calibration: Automatically calibrates the altimeter each time the device is using a map or chart that optimize your current point. Save Always records all...
Quick Start Manual
Page 2
...200; Battery cover D-ring NOTE: The MCX connector is included on your local waste disposal department to charge a battery that was not provided by Garmin can rupture at high temperatures. Do not attempt to use a sharp object to remove the cover. 2 Locate the battery pack À. 3 ... the battery using two AA batteries (not included). Installing Batteries The handheld device operates using a standard wall outlet or a USB port on GPSMAP 64s and GPSMAP 64st models only. You can connect the straight connector of the cable into the AC adapter or a computer USB port. 4 Plug the AC...
...200; Battery cover D-ring NOTE: The MCX connector is included on your local waste disposal department to charge a battery that was not provided by Garmin can rupture at high temperatures. Do not attempt to use a sharp object to remove the cover. 2 Locate the battery pack À. 3 ... the battery using two AA batteries (not included). Installing Batteries The handheld device operates using a standard wall outlet or a USB port on GPSMAP 64s and GPSMAP 64st models only. You can connect the straight connector of the cable into the AC adapter or a computer USB port. 4 Plug the AC...
Quick Start Manual
Page 4
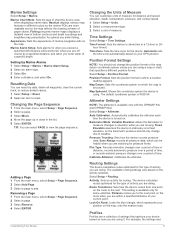
...compass. Customizing the Data Fields You can get the latest owner's manual from the web. 1 Go to www.garmin.com/ support. 2 Select Manuals. 3 Follow the on the GPSMAP 64s and GPSMAP 64st. 1 Select Sight 'N Go. 2 Point the device at an object in the distance, lock in the ...is high. You can find more information about optional accessories and replacement parts. NOTE: The barometric altimeter is available only on the GPSMAP 64s and GPSMAP 64st. 1 Go to a location where the elevation or barometric pressure is available only on -screen instructions to select your device. ...
...compass. Customizing the Data Fields You can get the latest owner's manual from the web. 1 Go to www.garmin.com/ support. 2 Select Manuals. 3 Follow the on the GPSMAP 64s and GPSMAP 64st. 1 Select Sight 'N Go. 2 Point the device at an object in the distance, lock in the ...is high. You can find more information about optional accessories and replacement parts. NOTE: The barometric altimeter is available only on the GPSMAP 64s and GPSMAP 64st. 1 Go to a location where the elevation or barometric pressure is available only on -screen instructions to select your device. ...


