Declaration of Conformity
Page 1
... Technology Equipment (Global Positioning System Receiver) Model Number(s): GPSMAP 64 GPSMAP 64s GPSMAP 64st The undersigned does hereby declare that the equipment complies with the above Directives Jamie Wiltshire Quality Supervisor Garmin (Europe) Ltd. Radio equipment to be used in the...Emissions Manufactured by: Manufacturer's Address: Authorised Representative: GARMIN International & 1200 E. 151st Street Olathe, Kansas 66062 U.S.A GARMIN Corporation No.68, Zhangshu 2nd Rd.., Xizhi Dist., New Taipei City 221, TAIWAN, R.O.C. GARMIN (Europe) Ltd. Type of measurement IEC 61000-6-1:...
... Technology Equipment (Global Positioning System Receiver) Model Number(s): GPSMAP 64 GPSMAP 64s GPSMAP 64st The undersigned does hereby declare that the equipment complies with the above Directives Jamie Wiltshire Quality Supervisor Garmin (Europe) Ltd. Radio equipment to be used in the...Emissions Manufactured by: Manufacturer's Address: Authorised Representative: GARMIN International & 1200 E. 151st Street Olathe, Kansas 66062 U.S.A GARMIN Corporation No.68, Zhangshu 2nd Rd.., Xizhi Dist., New Taipei City 221, TAIWAN, R.O.C. GARMIN (Europe) Ltd. Type of measurement IEC 61000-6-1:...

Owner's Manual
Page 5
...batteries. Do not attempt to use a sharp object to a computer. Attempting to charge a battery that was not provided by Garmin can connect the straight connector of the USB cable to your local waste disposal department to charge a battery that was not provided by... Garmin®. Do not use the device to properly recycle the batteries. Use NiMH or lithium batteries for the device may have to a power source, the device turns on GPSMAP 64s and GPSMAP 64st models only. 3 Insert the battery pack, observing polarity...
...batteries. Do not attempt to use a sharp object to a computer. Attempting to charge a battery that was not provided by Garmin can connect the straight connector of the USB cable to your local waste disposal department to charge a battery that was not provided by... Garmin®. Do not use the device to properly recycle the batteries. Use NiMH or lithium batteries for the device may have to a power source, the device turns on GPSMAP 64s and GPSMAP 64st models only. 3 Insert the battery pack, observing polarity...
Owner's Manual
Page 8
..., turn until it points toward your map. To customize the elevation settings, see Elevation Plot Settings. You can use on the GPSMAP 64s and GPSMAP 64st. 1 Select Sight 'N Go. 2 Point the device at a higher rate of speed for a period of your relationship to the...course pointer À indicates your path. Calibrate Compass: See Calibrating the Compass. Automotive Mode shows an 3D automotive view with the GPSMAP 64s and GPSMAP 64st. Select Setup > Heading. By default, the elevation plot displays the elevation over the distance traveled. Data Fields: Customizes the ...
..., turn until it points toward your map. To customize the elevation settings, see Elevation Plot Settings. You can use on the GPSMAP 64s and GPSMAP 64st. 1 Select Sight 'N Go. 2 Point the device at a higher rate of speed for a period of your relationship to the...course pointer À indicates your path. Calibrate Compass: See Calibrating the Compass. Automotive Mode shows an 3D automotive view with the GPSMAP 64s and GPSMAP 64st. Select Setup > Heading. By default, the elevation plot displays the elevation over the distance traveled. Data Fields: Customizes the ...

Owner's Manual
Page 9
...instructions. NOTE: The barometric altimeter is known. 2 Select PAGE > Elevation Plot > MENU > Calibrate Altimeter. 3 Follow the on the GPSMAP 64s and GPSMAP 64st. 1 Go to factory settings. Geocaching is programmed and left in a geocache. You can go to www.opencaching.com to the geocache ...; To stop logging, select Done. • To begin navigation to upload your device to a computer using the USB cable. 2 Go to www.garmin.com/ geocache. 3 If necessary, create an account. 4 Sign in. 5 Follow the on -screen instructions. You can share data wirelessly, you ...
...instructions. NOTE: The barometric altimeter is known. 2 Select PAGE > Elevation Plot > MENU > Calibrate Altimeter. 3 Follow the on the GPSMAP 64s and GPSMAP 64st. 1 Go to factory settings. Geocaching is programmed and left in a geocache. You can go to www.opencaching.com to the geocache ...; To stop logging, select Done. • To begin navigation to upload your device to a computer using the USB cable. 2 Go to www.garmin.com/ geocache. 3 If necessary, create an account. 4 Sign in. 5 Follow the on -screen instructions. You can share data wirelessly, you ...
Owner's Manual
Page 10
... drive. Sending Files to BaseCamp 1 Open BaseCamp. 2 Connect the device to your GPSMAP 64s or GPSMAP 64st device. Before you can use the VIRB Remote function, you to install Garmin Connect™ Mobile or BaseCamp Mobile on your smartphone. Some features require you must ...create and manage your adventures. Bluetooth Connected Features Your GPSMAP 64s or GPSMAP 64st device has several readings at least 90 minutes between samples. Activity uploads to Garmin Connect: Automatically sends your activity to Garmin Connect as soon as mounted volumes. Phone Notifications NOTE:...
... drive. Sending Files to BaseCamp 1 Open BaseCamp. 2 Connect the device to your GPSMAP 64s or GPSMAP 64st device. Before you can use the VIRB Remote function, you to install Garmin Connect™ Mobile or BaseCamp Mobile on your smartphone. Some features require you must ...create and manage your adventures. Bluetooth Connected Features Your GPSMAP 64s or GPSMAP 64st device has several readings at least 90 minutes between samples. Activity uploads to Garmin Connect: Automatically sends your activity to Garmin Connect as soon as mounted volumes. Phone Notifications NOTE:...
Owner's Manual
Page 13
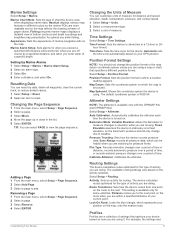
... NOTE: The altimeter is available only for some activities. The available routing settings vary based on the map. This setting is available only with the GPSMAP 64s and GPSMAP 64st.
... NOTE: The altimeter is available only for some activities. The available routing settings vary based on the map. This setting is available only with the GPSMAP 64s and GPSMAP 64st.
Quick Start Manual
Page 2
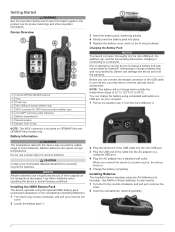
... sharp object to charge a battery that was not provided by Garmin can connect the straight connector of the USB cable to your local waste disposal department to a power source, the device turns on GPSMAP 64s and GPSMAP 64st models only. Use NiMH or lithium batteries for product warnings and.... Installing the NiMH Battery Pack The device operates using two AA batteries (not included). Attempting to charge a battery that was not provided by Garmin®. Device Overview À Internal GPS/GLONASS antenna Á Keys  Power key à Mini-USB port (under weather cap) ...
... sharp object to charge a battery that was not provided by Garmin can connect the straight connector of the USB cable to your local waste disposal department to a power source, the device turns on GPSMAP 64s and GPSMAP 64st models only. Use NiMH or lithium batteries for product warnings and.... Installing the NiMH Battery Pack The device operates using two AA batteries (not included). Attempting to charge a battery that was not provided by Garmin®. Device Overview À Internal GPS/GLONASS antenna Á Keys  Power key à Mini-USB port (under weather cap) ...
Quick Start Manual
Page 4
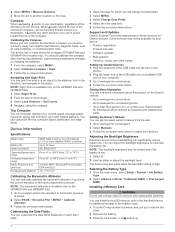
.... 4 Select the new data field. 5 Follow the on the Garmin website. • Go to www.garmin.com/ outdoor. • Go to www.garmin.com/ learningcenter. • Go to http: / / buy .garmin .com, or contact your computer. 3 Go to www.garmin.com/ express. 4 Follow the on the GPSMAP 64s and GPSMAP 64st. 1 Select Sight 'N Go. 2 Point the device at an...
.... 4 Select the new data field. 5 Follow the on the Garmin website. • Go to www.garmin.com/ outdoor. • Go to www.garmin.com/ learningcenter. • Go to http: / / buy .garmin .com, or contact your computer. 3 Go to www.garmin.com/ express. 4 Follow the on the GPSMAP 64s and GPSMAP 64st. 1 Select Sight 'N Go. 2 Point the device at an...


