
Important Safety and Product Information
Page 2
... screen while driving. • Do not input destinations, change settings, or access any functions requiring prolonged use of direct sunlight, such as the steering wheel, the foot pedals, or the transmission levers. See www .garmin.com/prop65 for driver attentiveness and good judgement. To prevent damage, remove the device from children. •...
... screen while driving. • Do not input destinations, change settings, or access any functions requiring prolonged use of direct sunlight, such as the steering wheel, the foot pedals, or the transmission levers. See www .garmin.com/prop65 for driver attentiveness and good judgement. To prevent damage, remove the device from children. •...
Important Safety and Product Information
Page 3
...your warranty and your authority to radio or drive. Category II radiocommunication Declaration of Garmin. This equipment generates, uses, and can be determined by an authorized Garmin relating to be located only in specific locations on the windshield. However, there...restrictions against harmful interference in a residential installation. Unauthorized repairs or modifications could Map Data Information Garmin uses a combination of your Garmin device. Garmin does not assume any responsibility for one of any transportation cost. This warranty does not apply to: ...
...your warranty and your authority to radio or drive. Category II radiocommunication Declaration of Garmin. This equipment generates, uses, and can be determined by an authorized Garmin relating to be located only in specific locations on the windshield. However, there...restrictions against harmful interference in a residential installation. Unauthorized repairs or modifications could Map Data Information Garmin uses a combination of your Garmin device. Garmin does not assume any responsibility for one of any transportation cost. This warranty does not apply to: ...
Important Safety and Product Information
Page 4
.... THIS WARRANTY GIVES YOU SPECIFIC LEGAL RIGHTS, WHICH MAY VARY FROM STATE TO STATE. Distributor warranties are obtained and/or used for any country. Garmin makes no warranty as to repair or replace (with a new or newly-overhauled replacement product) the device or software or... offer a full refund of direction, distance, location or topography. Garmin will not replace missing components from the original retailer is required as a travel aid and must be used in -country distributor and this warranty is intended to any package purchased through services...
.... THIS WARRANTY GIVES YOU SPECIFIC LEGAL RIGHTS, WHICH MAY VARY FROM STATE TO STATE. Distributor warranties are obtained and/or used for any country. Garmin makes no warranty as to repair or replace (with a new or newly-overhauled replacement product) the device or software or... offer a full refund of direction, distance, location or topography. Garmin will not replace missing components from the original retailer is required as a travel aid and must be used in -country distributor and this warranty is intended to any package purchased through services...
Declaration of Conformity
Page 1
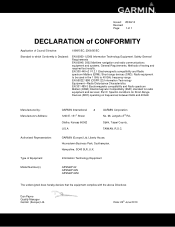
...Information Technology Equipment-Radio Disturbance Characteristics EN 301 489-3 Electromagnetic compatibility and Radio spectrum Matters (ERM); GARMIN (Europe) Ltd. Radio equipment to be used in the 1 GHz to which Conformity is Declared: EN 60950-1:2006 Information Technology Equipment. Liberty...compatibility and Radio spectrum Matters (ERM); Information Technology Equipment GPSMAP 62 GPSMAP 62S GPSMAP 62St The undersigned does hereby declare that the equipment complies with the above Directives Dan Payne Quality Manager Garmin (Europe) Ltd. Methods of testing and required test...
...Information Technology Equipment-Radio Disturbance Characteristics EN 301 489-3 Electromagnetic compatibility and Radio spectrum Matters (ERM); GARMIN (Europe) Ltd. Radio equipment to be used in the 1 GHz to which Conformity is Declared: EN 60950-1:2006 Information Technology Equipment. Liberty...compatibility and Radio spectrum Matters (ERM); Information Technology Equipment GPSMAP 62 GPSMAP 62S GPSMAP 62St The undersigned does hereby declare that the equipment complies with the above Directives Dan Payne Quality Manager Garmin (Europe) Ltd. Methods of testing and required test...
Owner's Manual
Page 1
GPSMAP® 62 series owner's manual For use with the GPSMAP 62, 62s and, 62st
GPSMAP® 62 series owner's manual For use with the GPSMAP 62, 62s and, 62st
Owner's Manual
Page 2
... registered trademark of their respective owners. Garmin hereby grants permission to change without the express permission of Garmin. Windows® is a trademark of Apple Computer, Inc. Garmin®, BlueChart®, City Navigator®, and GPSMAP® are those of Microsoft Corporation ...in any storage medium, for current updates and supplemental information concerning the use and operation of Garmin Ltd. These trademarks may be used without notice....
... registered trademark of their respective owners. Garmin hereby grants permission to change without the express permission of Garmin. Windows® is a trademark of Apple Computer, Inc. Garmin®, BlueChart®, City Navigator®, and GPSMAP® are those of Microsoft Corporation ...in any storage medium, for current updates and supplemental information concerning the use and operation of Garmin Ltd. These trademarks may be used without notice....

Owner's Manual
Page 3
... Main Pages........11 Customizing the Data Fields.....11 Restoring Default Page Settings 11 Map 11 Compass 13 Using the Compass 14 Using Sight 'N Go 14 Elevation Plot 15 Opening the Main Menu........... 16 Trip Computer 17 Main Menu Features and Settings 18 Geocaches 18 Share Wirelessly 18 ...
... Main Pages........11 Customizing the Data Fields.....11 Restoring Default Page Settings 11 Map 11 Compass 13 Using the Compass 14 Using Sight 'N Go 14 Elevation Plot 15 Opening the Main Menu........... 16 Trip Computer 17 Main Menu Features and Settings 18 Geocaches 18 Share Wirelessly 18 ...
Owner's Manual
Page 4
... 34 Registering Your Device........... 34 Updating the Software 34 Viewing Important Device Information 34 Contacting Garmin Product Support 34 Using the Backlight 35 Specifications 35 Maximizing Battery Life 36 About the Batteries 37 Buying Optional Accessories... 38 Using Optional Fitness Accessories 38 Data Management 39 Attaching the Wrist Strap......... 42 Attaching the Carabiner...
... 34 Registering Your Device........... 34 Updating the Software 34 Viewing Important Device Information 34 Contacting Garmin Product Support 34 Using the Backlight 35 Specifications 35 Maximizing Battery Life 36 About the Batteries 37 Buying Optional Accessories... 38 Using Optional Fitness Accessories 38 Data Management 39 Attaching the Wrist Strap......... 42 Attaching the Carabiner...
Owner's Manual
Page 5
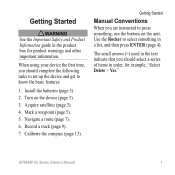
... 7). 6. Getting Started Manual Conventions When you are instructed to press something in a list, and then press ENTER (page 4). The small arrows (>) used in the text indicate that you should select a series of items in the product box for example, "Select Delete > Yes." Record a track (...should complete the following tasks to set up the device and get to select something , use the buttons on the device (page 3). 3. Calibrate the compass (page 13). Use the Rocker to know the basic features. 1. GPSMAP 62 Series Owner's Manual 1 Mark a waypoint (page 5). 5. Install the batteries ...
... 7). 6. Getting Started Manual Conventions When you are instructed to press something in a list, and then press ENTER (page 4). The small arrows (>) used in the text indicate that you should select a series of items in the product box for example, "Select Delete > Yes." Record a track (...should complete the following tasks to set up the device and get to select something , use the buttons on the device (page 3). 3. Calibrate the compass (page 13). Use the Rocker to know the basic features. 1. GPSMAP 62 Series Owner's Manual 1 Mark a waypoint (page 5). 5. Install the batteries ...
Owner's Manual
Page 6
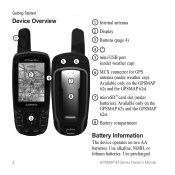
Available only on two AA batteries. Getting Started Device Overview 1 56 2 4 7 8 3 2 1 Internal antenna 2 Display 3 Buttons (page 4) 4 5 mini-USB port (under weather cap) 6 MCX connector for GPS antenna (under batteries). Use precharged GPSMAP 62 Series Owner's Manual Available only on the GPSMAP 62s and the GPSMAP 62st. 8 Battery compartment Battery Information The device operates on the GPSMAP 62s and the GPSMAP 62st. 7 microSD™ card slot (under weather cap). Use alkaline, NiMH, or lithium batteries.
Available only on two AA batteries. Getting Started Device Overview 1 56 2 4 7 8 3 2 1 Internal antenna 2 Display 3 Buttons (page 4) 4 5 mini-USB port (under weather cap) 6 MCX connector for GPS antenna (under batteries). Use precharged GPSMAP 62 Series Owner's Manual Available only on the GPSMAP 62s and the GPSMAP 62st. 8 Battery compartment Battery Information The device operates on the GPSMAP 62s and the GPSMAP 62st. 7 microSD™ card slot (under weather cap). Use alkaline, NiMH, or lithium batteries.
Owner's Manual
Page 7
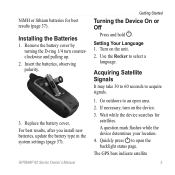
... Acquiring Satellite Signals It may take 30 to 60 seconds to select a language. The GPS bars indicate satellite 3 Replace the battery cover. Use the Rocker to acquire signals. 1. Wait while the device searches for best results (page 37). Turn on the device. 3. Go outdoors to... open area. 2. A question mark flashes while the device determines your location. 4. Setting Your Language 1. GPSMAP 62 Series Owner's Manual Getting Started Turning the Device On or Off Press and hold . NiMH or lithium batteries for satellites. Quickly press...
... Acquiring Satellite Signals It may take 30 to 60 seconds to select a language. The GPS bars indicate satellite 3 Replace the battery cover. Use the Rocker to acquire signals. 1. Wait while the device searches for best results (page 37). Turn on the device. 3. Go outdoors to... open area. 2. A question mark flashes while the device determines your location. 4. Setting Your Language 1. GPSMAP 62 Series Owner's Manual Getting Started Turning the Device On or Off Press and hold . NiMH or lithium batteries for satellites. Quickly press...
Owner's Manual
Page 9
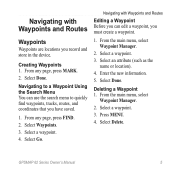
.... Select Waypoints. 3. Select an attribute (such as the name or location). 4. Deleting a Waypoint 1. Select a waypoint. 3. GPSMAP 62 Series Owner's Manual 5 Creating Waypoints 1. From the main menu, select Waypoint Manager. 2. Navigating with Waypoints and Routes Editing a Waypoint ...Before you can use the search menu to a Waypoint Using the Search Menu You can edit a waypoint, you have saved. 1. From any page, press MARK. 2. Select a waypoint...
.... Select Waypoints. 3. Select an attribute (such as the name or location). 4. Deleting a Waypoint 1. Select a waypoint. 3. GPSMAP 62 Series Owner's Manual 5 Creating Waypoints 1. From the main menu, select Waypoint Manager. 2. Navigating with Waypoints and Routes Editing a Waypoint ...Before you can use the search menu to a Waypoint Using the Search Menu You can edit a waypoint, you have saved. 1. From any page, press MARK. 2. Select a waypoint...
Owner's Manual
Page 10
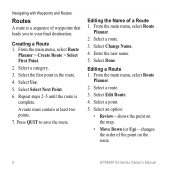
...4. From the main menu, select Route Planner > Create Route > Select First Point. 2. Select Select Next Point. 6. Editing the Name of the point on the route. 6 GPSMAP 62 Series Owner's Manual Select a category. 3. Repeat steps 2-5 until the route is a sequence of waypoints that leads you to save the route. From the main... Route Planner. 2. Select the first point in the route. 4. Select Change Name. 4. Select a point. 5. Navigating with Waypoints and Routes Routes A route is complete. Select Use. 5. A route must contain at least two points. 7. Select a route. 3.
...4. From the main menu, select Route Planner > Create Route > Select First Point. 2. Select Select Next Point. 6. Editing the Name of the point on the route. 6 GPSMAP 62 Series Owner's Manual Select a category. 3. Repeat steps 2-5 until the route is a sequence of waypoints that leads you to save the route. From the main... Route Planner. 2. Select the first point in the route. 4. Select Change Name. 4. Select a point. 5. Navigating with Waypoints and Routes Routes A route is complete. Select Use. 5. A route must contain at least two points. 7. Select a route. 3.

Owner's Manual
Page 12
.... 8. Select Addresses. 3. Select the city. 6. Enter the country. 4. Enter the house number. 7. Select Go. 8 GPSMAP 62 Series Owner's Manual Navigating with City Navigator® You can use optional City Navigator maps to http://buy.garmin.com or contact your Garmin dealer. NOTE: Not all map data provides postal code searching. 5. The detailed maps contain...
.... 8. Select Addresses. 3. Select the city. 6. Enter the country. 4. Enter the house number. 7. Select Go. 8 GPSMAP 62 Series Owner's Manual Navigating with City Navigator® You can use optional City Navigator maps to http://buy.garmin.com or contact your Garmin dealer. NOTE: Not all map data provides postal code searching. 5. The detailed maps contain...
Owner's Manual
Page 13
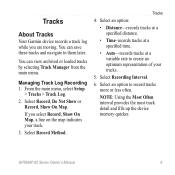
...You can save these tracks and navigate to them later. Tracks 4. Select Recording Interval. 6. GPSMAP 62 Series Owner's Manual 9 From the main menu, select Setup > Tracks > Track Log. 2. NOTE: Using the Most Often interval provides the most track detail and fills up the device memory quicker. Managing...records tracks at a specified time. • Auto-records tracks at a variable rate to record tracks more or less often. Tracks About Tracks Your Garmin device records a track log while you select Record, Show On Map, a line on the map indicates your tracks. 5. Select an option to ...
...You can save these tracks and navigate to them later. Tracks 4. Select Recording Interval. 6. GPSMAP 62 Series Owner's Manual 9 From the main menu, select Setup > Tracks > Track Log. 2. NOTE: Using the Most Often interval provides the most track detail and fills up the device memory quicker. Managing...records tracks at a specified time. • Auto-records tracks at a variable rate to record tracks more or less often. Tracks About Tracks Your Garmin device records a track log while you select Record, Show On Map, a line on the map indicates your tracks. 5. Select an option to ...
Owner's Manual
Page 14
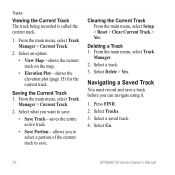
... Current Track From the main menu, select Setup > Reset > Clear Current Track > Yes. Deleting a Track 1. Select Delete > Yes. Press FIND. 2. Select Tracks. 3. Select Go. 10 GPSMAP 62 Series Owner's Manual Tracks Viewing the Current Track The track being recorded is called the current track. 1. Select an option: • View Map-shows... you to select a portion of the current track to save : • Save Track-saves the entire active track. • Save Portion-allows you can navigate using it. 1.
... Current Track From the main menu, select Setup > Reset > Clear Current Track > Yes. Deleting a Track 1. Select Delete > Yes. Press FIND. 2. Select Tracks. 3. Select Go. 10 GPSMAP 62 Series Owner's Manual Tracks Viewing the Current Track The track being recorded is called the current track. 1. Select an option: • View Map-shows... you to select a portion of the current track to save : • Save Track-saves the entire active track. • Save Portion-allows you can navigate using it. 1.
Owner's Manual
Page 15
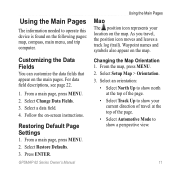
...: map, compass, main menu, and trip computer. Customizing the Data Fields You can customize the data fields that appear on the map. GPSMAP 62 Series Owner's Manual Using the Main Pages Map The position icon represents your current direction of travel , the position icon moves and leaves a track log (trail).... -screen instructions. Select a data field. 4. Changing the Map Orientation 1. For data field descriptions, see page 22. 1. From a main page, press meNu. 2. Press enter. Using the Main Pages The information needed to show a perspective view. 11 From the map, press MENU. 2.
...: map, compass, main menu, and trip computer. Customizing the Data Fields You can customize the data fields that appear on the map. GPSMAP 62 Series Owner's Manual Using the Main Pages Map The position icon represents your current direction of travel , the position icon moves and leaves a track log (trail).... -screen instructions. Select a data field. 4. Changing the Map Orientation 1. For data field descriptions, see page 22. 1. From a main page, press meNu. 2. Press enter. Using the Main Pages The information needed to show a perspective view. 11 From the map, press MENU. 2.
Owner's Manual
Page 16
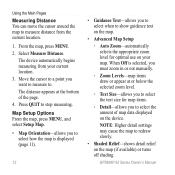
... the current location. 1. Press quit to redraw slowly. • Shaded Relief-shows detail relief on the map (if available) or turns off shading. GPSMAP 62 Series Owner's Manual Map Setup Options From the map, press menu, and select Setup Map. • Map Orientation-allows you to select how the... selected zoom level. ◦◦ Text Size-allows you to select the text size for optimal use on the device. note: Higher detail settings may cause the map to stop measuring. Using the Main Pages Measuring Distance You can move the cursor around the map to measure distance from your...
... the current location. 1. Press quit to redraw slowly. • Shaded Relief-shows detail relief on the map (if available) or turns off shading. GPSMAP 62 Series Owner's Manual Map Setup Options From the map, press menu, and select Setup Map. • Map Orientation-allows you to select how the... selected zoom level. ◦◦ Text Size-allows you to select the text size for optimal use on the device. note: Higher detail settings may cause the map to stop measuring. Using the Main Pages Measuring Distance You can move the cursor around the map to measure distance from your...
Owner's Manual
Page 17
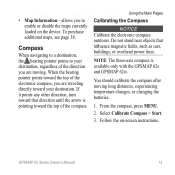
...the device. From the compass, press MENU. 2. GPSMAP 62 Series Owner's Manual 13 If it points any other direction, turn toward the top of the electronic compass, you are moving long distances, experiencing temperature changes, or changing the batteries. 1. Using the Main Pages Calibrating the Compass notice Calibrate the ...disable the maps currently loaded on -screen instructions. Do not stand near objects that direction until the arrow is available only with the GPSMAP 62s and GPSMAP 62st. • Map Information-allows you are traveling directly toward the top of the compass.
...the device. From the compass, press MENU. 2. GPSMAP 62 Series Owner's Manual 13 If it points any other direction, turn toward the top of the electronic compass, you are moving long distances, experiencing temperature changes, or changing the batteries. 1. Using the Main Pages Calibrating the Compass notice Calibrate the ...disable the maps currently loaded on -screen instructions. Do not stand near objects that direction until the arrow is available only with the GPSMAP 62s and GPSMAP 62st. • Map Information-allows you are traveling directly toward the top of the compass.
Owner's Manual
Page 18
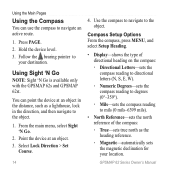
...; Magnetic-automatically sets the magnetic declination for your destination. Hold the device level. 3. GPSMAP 62 Series Owner's Manual Using Sight 'N Go NOTE: Sight 'N Go is available only with the GPSMAP 62s and GPSMAP 62st. You can use the compass to navigate an active route. 1. Press page. 2. Point the device at...;◦ Numeric Degrees-sets the compass reading to degrees (0°-359°). ◦◦ Mils-sets the compass reading to the object. 1. Using the Main Pages Using the Compass You can point the device at an object. 3. Select Lock Direction > Set Course. 14 4.
...; Magnetic-automatically sets the magnetic declination for your destination. Hold the device level. 3. GPSMAP 62 Series Owner's Manual Using Sight 'N Go NOTE: Sight 'N Go is available only with the GPSMAP 62s and GPSMAP 62st. You can use the compass to navigate an active route. 1. Press page. 2. Point the device at...;◦ Numeric Degrees-sets the compass reading to degrees (0°-359°). ◦◦ Mils-sets the compass reading to the object. 1. Using the Main Pages Using the Compass You can point the device at an object. 3. Select Lock Direction > Set Course. 14 4.


