Owner's Manual
Page 1
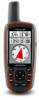
GPSMAP® 62 series owner's manual For use with the GPSMAP 62, 62s and, 62st
GPSMAP® 62 series owner's manual For use with the GPSMAP 62, 62s and, 62st
Owner's Manual
Page 5
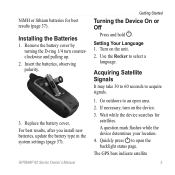
...). Getting Started Manual Conventions When you are instructed to select something , use the buttons on the device (page 3). 3. GPSMAP 62 Series Owner's Manual 1 The small arrows (>) used in the text indicate that you should select a series of items in the product box for example, "Select Delete > Yes." When using your device the first time...
...). Getting Started Manual Conventions When you are instructed to select something , use the buttons on the device (page 3). 3. GPSMAP 62 Series Owner's Manual 1 The small arrows (>) used in the text indicate that you should select a series of items in the product box for example, "Select Delete > Yes." When using your device the first time...
Owner's Manual
Page 6
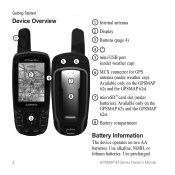
Available only on the GPSMAP 62s and the GPSMAP 62st. 8 Battery compartment Battery Information The device operates on the GPSMAP 62s and the GPSMAP 62st. 7 microSD™ card slot (under weather cap). Use precharged GPSMAP 62 Series Owner's Manual Getting Started Device Overview 1 56 2 4 7 8 3 2 1 Internal antenna 2 Display 3 Buttons (page 4) 4 5 mini-USB port (under weather cap) 6 MCX connector for GPS antenna (under batteries). Available only on two AA batteries. Use alkaline, NiMH, or lithium batteries.
Available only on the GPSMAP 62s and the GPSMAP 62st. 8 Battery compartment Battery Information The device operates on the GPSMAP 62s and the GPSMAP 62st. 7 microSD™ card slot (under weather cap). Use precharged GPSMAP 62 Series Owner's Manual Getting Started Device Overview 1 56 2 4 7 8 3 2 1 Internal antenna 2 Display 3 Buttons (page 4) 4 5 mini-USB port (under weather cap) 6 MCX connector for GPS antenna (under batteries). Available only on two AA batteries. Use alkaline, NiMH, or lithium batteries.
Owner's Manual
Page 7
... signals. 1. Acquiring Satellite Signals It may take 30 to 60 seconds to select a language. Go outdoors to open area. 2. NiMH or lithium batteries for satellites. GPSMAP 62 Series Owner's Manual Getting Started Turning the Device On or Off Press and hold . Wait while the device searches for best results (page 37). Insert the...
... signals. 1. Acquiring Satellite Signals It may take 30 to 60 seconds to select a language. Go outdoors to open area. 2. NiMH or lithium batteries for satellites. GPSMAP 62 Series Owner's Manual Getting Started Turning the Device On or Off Press and hold . Wait while the device searches for best results (page 37). Insert the...
Owner's Manual
Page 8
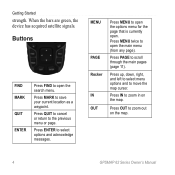
... strength. Press MARK to the previous menu or page. Press IN to zoom out on the map. Press OUT to zoom in on the map. 4 GPSMAP 62 Series Owner's Manual Press QUIT to cancel or return to save your current location as a waypoint. Press PAGE to move the map cursor. MENU PAGE Rocker...
... strength. Press MARK to the previous menu or page. Press IN to zoom out on the map. Press OUT to zoom in on the map. 4 GPSMAP 62 Series Owner's Manual Press QUIT to cancel or return to save your current location as a waypoint. Press PAGE to move the map cursor. MENU PAGE Rocker...
Owner's Manual
Page 9
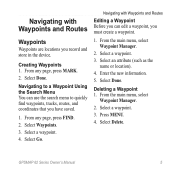
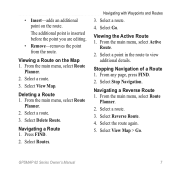
Select a waypoint. 4. Select Go. From the main menu, select Waypoint Manager. 2. Enter the new information. 5. Deleting a Waypoint 1. GPSMAP 62 Series Owner's Manual 5 Navigating to a Waypoint Using the Search Menu You can edit a waypoint, you must create a waypoint. 1. Navigating with Waypoints and Routes Waypoints Waypoints are ...
Select a waypoint. 4. Select Go. From the main menu, select Waypoint Manager. 2. Enter the new information. 5. Deleting a Waypoint 1. GPSMAP 62 Series Owner's Manual 5 Navigating to a Waypoint Using the Search Menu You can edit a waypoint, you must create a waypoint. 1. Navigating with Waypoints and Routes Waypoints Waypoints are ...
Owner's Manual
Page 10
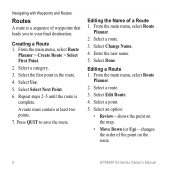
... the map. • Move Down (or Up)-changes the order of a Route 1. Select Select Next Point. 6. Editing the Name of the point on the route. 6 GPSMAP 62 Series Owner's Manual From the main menu, select Route Planner. 2. Creating a Route 1. Repeat steps 2-5 until the route is a sequence of waypoints that leads you to save...
... the map. • Move Down (or Up)-changes the order of a Route 1. Select Select Next Point. 6. Editing the Name of the point on the route. 6 GPSMAP 62 Series Owner's Manual From the main menu, select Route Planner. 2. Creating a Route 1. Repeat steps 2-5 until the route is a sequence of waypoints that leads you to save...
Owner's Manual
Page 11
..., select Route Planner. 2. Select Go. Select a point in the route to view additional details. Select View Map > Go. Select Routes. From any page, press FIND. 2. GPSMAP 62 Series Owner's Manual 7 Select a route. 4. From the main menu, select Route Planner. 2. Navigating a Reverse Route 1. From the main menu, select Route Planner. 2. Select Reverse Route. 4. Select...
..., select Route Planner. 2. Select Go. Select a point in the route to view additional details. Select View Map > Go. Select Routes. From any page, press FIND. 2. GPSMAP 62 Series Owner's Manual 7 Select a route. 4. From the main menu, select Route Planner. 2. Navigating a Reverse Route 1. From the main menu, select Route Planner. 2. Select Reverse Route. 4. Select...

Owner's Manual
Page 12
... City Navigator® You can use optional City Navigator maps to http://buy.garmin.com or contact your Garmin dealer. Enter the country. 4. Enter the house number. 7. NOTE: Not all map data provides postal code searching. 5. Press FIND. 2. Select Go. 8 GPSMAP 62 Series Owner's Manual Finding an Address with Waypoints and Routes Additional Maps To...
... City Navigator® You can use optional City Navigator maps to http://buy.garmin.com or contact your Garmin dealer. Enter the country. 4. Enter the house number. 7. NOTE: Not all map data provides postal code searching. 5. Press FIND. 2. Select Go. 8 GPSMAP 62 Series Owner's Manual Finding an Address with Waypoints and Routes Additional Maps To...
Owner's Manual
Page 13
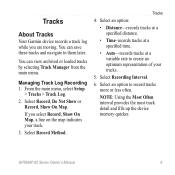
Tracks 4. Select Recording Interval. 6. Tracks About Tracks Your Garmin device records a track log while you select Record, Show On Map, a line on the map indicates your tracks. 5. NOTE: Using the Most Often interval provides ... or loaded tracks by selecting Track Manager from the main menu. Select Record, Do Not Show or Record, Show On Map. If you are moving. GPSMAP 62 Series Owner's Manual 9 Select Record Method. Managing Track Log Recording 1. You can save these tracks and navigate to them later. Select an option to create an...
Tracks 4. Select Recording Interval. 6. Tracks About Tracks Your Garmin device records a track log while you select Record, Show On Map, a line on the map indicates your tracks. 5. NOTE: Using the Most Often interval provides ... or loaded tracks by selecting Track Manager from the main menu. Select Record, Do Not Show or Record, Show On Map. If you are moving. GPSMAP 62 Series Owner's Manual 9 Select Record Method. Managing Track Log Recording 1. You can save these tracks and navigate to them later. Select an option to create an...
Owner's Manual
Page 14
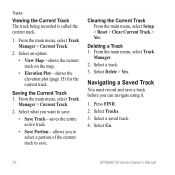
... Track-saves the entire active track. • Save Portion-allows you can navigate using it. 1. From the main menu, select Track Manager. 2. Select Go. 10 GPSMAP 62 Series Owner's Manual Clearing the Current Track From the main menu, select Setup > Reset > Clear Current Track > Yes. Press FIND. 2. Select Delete > Yes. Deleting a Track 1. Select...
... Track-saves the entire active track. • Save Portion-allows you can navigate using it. 1. From the main menu, select Track Manager. 2. Select Go. 10 GPSMAP 62 Series Owner's Manual Clearing the Current Track From the main menu, select Setup > Reset > Clear Current Track > Yes. Press FIND. 2. Select Delete > Yes. Deleting a Track 1. Select...
Owner's Manual
Page 15
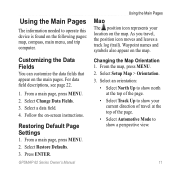
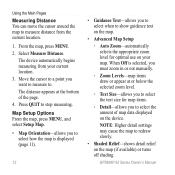
... information needed to operate this device is found on the map. For data field descriptions, see page 22. 1. Select Setup Map > Orientation. 3. Select Restore Defaults. 3. GPSMAP 62 Series Owner's Manual Using the Main Pages Map The position icon represents your current direction of travel , the position icon moves and leaves a track log (trail...
... information needed to operate this device is found on the map. For data field descriptions, see page 22. 1. Select Setup Map > Orientation. 3. Select Restore Defaults. 3. GPSMAP 62 Series Owner's Manual Using the Main Pages Map The position icon represents your current direction of travel , the position icon moves and leaves a track log (trail...
Owner's Manual
Page 16
... zoom in or out manually. ◦◦ Zoom Levels-map items draw or appear at the bottom of map data displayed on your current location. 3. GPSMAP 62 Series Owner's Manual The distance appears at or below the selected zoom level. ◦◦ Text Size-allows you to select the text size for optimal...
... zoom in or out manually. ◦◦ Zoom Levels-map items draw or appear at the bottom of map data displayed on your current location. 3. GPSMAP 62 Series Owner's Manual The distance appears at or below the selected zoom level. ◦◦ Text Size-allows you to select the text size for optimal...
Owner's Manual
Page 17
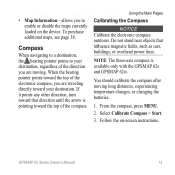
... cars, buildings, or overhead power lines. Select Calibrate Compass > Start. 3. Do not stand near objects that direction until the arrow is available only with the GPSMAP 62s and GPSMAP 62st. GPSMAP 62 Series Owner's Manual 13 From the compass, press MENU. 2. To purchase additional maps, see page 38.
... cars, buildings, or overhead power lines. Select Calibrate Compass > Start. 3. Do not stand near objects that direction until the arrow is available only with the GPSMAP 62s and GPSMAP 62st. GPSMAP 62 Series Owner's Manual 13 From the compass, press MENU. 2. To purchase additional maps, see page 38.
Owner's Manual
Page 18
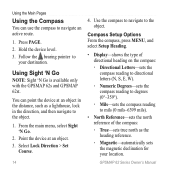
... navigate to navigate an active route. 1. From the main menu, select Sight 'N Go. 2. Using Sight 'N Go NOTE: Sight 'N Go is available only with the GPSMAP 62s and GPSMAP 62st. Compass Setup Options From the compass, press menu, and select Setup Heading. • Display-shows the type of directional heading on the compass: ◦.... ◦◦ Magnetic-automatically sets the magnetic declination for your destination. Press page. 2. You can use the compass to the object. Hold the device level. 3. GPSMAP 62 Series Owner's Manual
... navigate to navigate an active route. 1. From the main menu, select Sight 'N Go. 2. Using Sight 'N Go NOTE: Sight 'N Go is available only with the GPSMAP 62s and GPSMAP 62st. Compass Setup Options From the compass, press menu, and select Setup Heading. • Display-shows the type of directional heading on the compass: ◦.... ◦◦ Magnetic-automatically sets the magnetic declination for your destination. Press page. 2. You can use the compass to the object. Hold the device level. 3. GPSMAP 62 Series Owner's Manual

Owner's Manual
Page 19
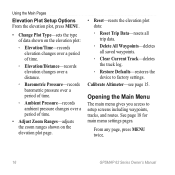
... rate of speed for a set period of time, or turns the compass off. • Calibrate Compass-starts the compass calibration (page 13). GPSMAP 62 Series Owner's Manual 15 From the elevation plot, press menu. 2. Select Calibrate Altimeter. 3. Follow the on-screen instructions. ◦◦ Grid-sets...-sets the magnetic variation value. • Go To Line/Pointer-allows you to select how the course is available only with the GPSMAP 62s and GPSMAP 62st. Using the Main Pages Elevation Plot note: The elevation plot page is displayed. ◦◦ Bearing (Small/Large) indicates ...
... rate of speed for a set period of time, or turns the compass off. • Calibrate Compass-starts the compass calibration (page 13). GPSMAP 62 Series Owner's Manual 15 From the elevation plot, press menu. 2. Select Calibrate Altimeter. 3. Follow the on-screen instructions. ◦◦ Grid-sets...-sets the magnetic variation value. • Go To Line/Pointer-allows you to select how the course is available only with the GPSMAP 62s and GPSMAP 62st. Using the Main Pages Elevation Plot note: The elevation plot page is displayed. ◦◦ Bearing (Small/Large) indicates ...
Owner's Manual
Page 20
From any page, press MENU twice. 16 GPSMAP 62 Series Owner's Manual Using the Main Pages Elevation Plot Setup Options From the elevation plot, press menu. • Change Plot Type-sets the type of data ...
From any page, press MENU twice. 16 GPSMAP 62 Series Owner's Manual Using the Main Pages Elevation Plot Setup Options From the elevation plot, press menu. • Change Plot Type-sets the type of data ...

Owner's Manual
Page 21
... numbers shown on the dashboard. note: Your customized settings are remembered by the dashboard, and will not be lost when you change profiles (page 19). GPSMAP 62 Series Owner's Manual 17 Trip Computer The trip computer displays your current speed, average speed, maximum speed, trip odometer, and other helpful statistics. Using the Main...
... numbers shown on the dashboard. note: Your customized settings are remembered by the dashboard, and will not be lost when you change profiles (page 19). GPSMAP 62 Series Owner's Manual 17 Trip Computer The trip computer displays your current speed, average speed, maximum speed, trip odometer, and other helpful statistics. Using the Main...
Owner's Manual
Page 22
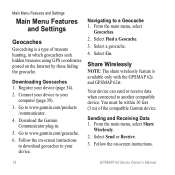
... is available only with the GPSMAP 62s and GPSMAP 62st. Connect your device to your device. Go to www.garmin.com/products /communicator. 4. From the main menu, select Geocaches. 2. Select Go. Follow the on -screen instructions to download geocaches to your device (page 34). 2. Follow the on -screen instructions. 18 GPSMAP 62 Series Owner's Manual Select a geocache...
... is available only with the GPSMAP 62s and GPSMAP 62st. Connect your device to your device. Go to www.garmin.com/products /communicator. 4. From the main menu, select Geocaches. 2. Select Go. Follow the on -screen instructions to download geocaches to your device (page 34). 2. Follow the on -screen instructions. 18 GPSMAP 62 Series Owner's Manual Select a geocache...
Owner's Manual
Page 23
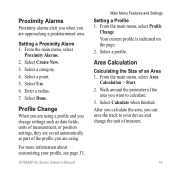
Enter a radius. 7. Select Done. GPSMAP 62 Series Owner's Manual Main Menu Features and Settings Setting a Profile 1. Area Calculation Calculating the Size of the area you are using . From the main menu, select ...
Enter a radius. 7. Select Done. GPSMAP 62 Series Owner's Manual Main Menu Features and Settings Setting a Profile 1. Area Calculation Calculating the Size of the area you are using . From the main menu, select ...


