Owner's Manual
Page 18
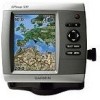
... Object Information Use the map pointer ( ) to highlight a tide-station icon ( ), and press SELECT. High-resolution satellite imagery is connected to a compatible marine wind sensor. 12 GPSMAP 400/500 Series Owner's Manual On the Navigation chart, highlight an item with a detailed icon showing the relevant tide level. Tides/Currents-turns tides...-sets the high-resolution satellite images to help predict the tide level at different times or on or off (page 32). Service Points-turns marine service points on different days. Selected item 2. You can view an in the area, select...
... Object Information Use the map pointer ( ) to highlight a tide-station icon ( ), and press SELECT. High-resolution satellite imagery is connected to a compatible marine wind sensor. 12 GPSMAP 400/500 Series Owner's Manual On the Navigation chart, highlight an item with a detailed icon showing the relevant tide level. Tides/Currents-turns tides...-sets the high-resolution satellite images to help predict the tide level at different times or on or off (page 32). Service Points-turns marine service points on different days. Selected item 2. You can view an in the area, select...
Owner's Manual
Page 26
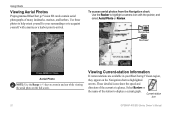
...Preprogrammed BlueChart g2 Vision SD cards contain aerial photographs of the station to display a current graph. Current-station icon 20 GPSMAP 400/500 Series Owner's Manual Select Review or the name of many landmarks, marinas, and harbors. These detailed icons show the speed and direction of the ... to arrival. Use these photos to help orient yourself to your surroundings or to acquaint yourself with the pointer, and select Aerial Photo or Review. To access aerial photos from the Navigation chart: Use the Rocker to highlight a camera icon with a marina or a harbor prior to...
...Preprogrammed BlueChart g2 Vision SD cards contain aerial photographs of the station to display a current graph. Current-station icon 20 GPSMAP 400/500 Series Owner's Manual Select Review or the name of many landmarks, marinas, and harbors. These detailed icons show the speed and direction of the ... to arrival. Use these photos to help orient yourself to your surroundings or to acquaint yourself with the pointer, and select Aerial Photo or Review. To access aerial photos from the Navigation chart: Use the Rocker to highlight a camera icon with a marina or a harbor prior to...

Owner's Manual
Page 30
... an existing waypoint: 1. Where To? Select the waypoint you want to change (Name, Symbol, Depth, Water Temp, Comment, or Position). Select Review. (The Review button is only shown when more than one waypoint is in the vicinity.) 3. Creating and Using Waypoints You can store up to 1,500 waypoints (3,000... waypoints for models GPSMAP 421/451/521/551/526/556, including "s" models) with a user-defined name, symbol, depth, water temperature, and ...
... an existing waypoint: 1. Where To? Select the waypoint you want to change (Name, Symbol, Depth, Water Temp, Comment, or Position). Select Review. (The Review button is only shown when more than one waypoint is in the vicinity.) 3. Creating and Using Waypoints You can store up to 1,500 waypoints (3,000... waypoints for models GPSMAP 421/451/521/551/526/556, including "s" models) with a user-defined name, symbol, depth, water temperature, and ...

Owner's Manual
Page 31
...want to start the new route. From the Navigation chart, use the map pointer ( ) to add additional turns. 5. Select Review > Delete (The Review button is only shown when more than one waypoint is complete. Press MENU to cancel, to undo the last turn and press ... ) to begin navigating the route. Select Navigate To > Route To. 3. From the Home screen, select Information > User Data > Routes > New Route. 2. GPSMAP 400/500 Series Owner's Manual 25 To delete a waypoint or an MOB: 1. OR From the Home screen, select Information > User Data > Waypoints. 2. To create...
...want to start the new route. From the Navigation chart, use the map pointer ( ) to add additional turns. 5. Select Review > Delete (The Review button is only shown when more than one waypoint is complete. Press MENU to cancel, to undo the last turn and press ... ) to begin navigating the route. Select Navigate To > Route To. 3. From the Home screen, select Information > User Data > Routes > New Route. 2. GPSMAP 400/500 Series Owner's Manual 25 To delete a waypoint or an MOB: 1. OR From the Home screen, select Information > User Data > Waypoints. 2. To create...
Owner's Manual
Page 45
Review the placement of the Auto Guidance line is satisfactory, select MENU > Navigation Options > Stop Navigation. Proceed to step 11. • If the Auto Guidance line is too close to previously. 5. GPSMAP 400/500 Series Owner's Manual 39 From Home screen, select Where To? > Waypoints... Home screen, select Configure > Preferences > Navigation > Auto Guidance > Shoreline Distance > Far. • If the turns in step 7, review the placement of the Auto Guidance line. If you change this setting while navigating. Determine whether the line safely avoids known obstacles, and whether...
Review the placement of the Auto Guidance line is satisfactory, select MENU > Navigation Options > Stop Navigation. Proceed to step 11. • If the Auto Guidance line is too close to previously. 5. GPSMAP 400/500 Series Owner's Manual 39 From Home screen, select Where To? > Waypoints... Home screen, select Configure > Preferences > Navigation > Auto Guidance > Shoreline Distance > Far. • If the turns in step 7, review the placement of the Auto Guidance line. If you change this setting while navigating. Determine whether the line safely avoids known obstacles, and whether...
Owner's Manual
Page 46
...Garmin software. • Garmin Remote Sonar Transfer (GPSMAP 40 420/450/520/550/525/555)-supports the input or output of Garmin-proprietary sonar data for communicating with the functionality of the Shoreline Distance setting. Serial Port 2 (if supported)-configures the input/output format for most AIS receivers. GPSMAP... 2 to use when connecting your chartplotter to external NMEA devices, a computer, or other Garmin devices. Configuring the Chartplotter • If the turns in step 9, review the placement of the Auto Guidance line. Precision-adjust the number of digits (Two Digits...
...Garmin software. • Garmin Remote Sonar Transfer (GPSMAP 40 420/450/520/550/525/555)-supports the input or output of Garmin-proprietary sonar data for communicating with the functionality of the Shoreline Distance setting. Serial Port 2 (if supported)-configures the input/output format for most AIS receivers. GPSMAP... 2 to use when connecting your chartplotter to external NMEA devices, a computer, or other Garmin devices. Configuring the Chartplotter • If the turns in step 9, review the placement of the Auto Guidance line. Precision-adjust the number of digits (Two Digits...
Owner's Manual
Page 57
...connected via NMEA 0183 or NMEA 2000, your chartplotter alerts you when your Garmin chartplotter and VHF radio are using a Garmin NMEA 2000compatible VHF radio. • Select Edit to edit the vessel name and add a comment. Select Review to view details about the call report. Use the Rocker to enter ... 53). This option is received from the same boat, it on making an individual routine call : 1. See page 53 for the vessel, and select Trail Line to change the line color. Use the on or off . Select Clear Report to delete the call . 2. GPSMAP 400/500 Series Owner's Manual...
...connected via NMEA 0183 or NMEA 2000, your chartplotter alerts you when your Garmin chartplotter and VHF radio are using a Garmin NMEA 2000compatible VHF radio. • Select Edit to edit the vessel name and add a comment. Select Review to view details about the call report. Use the Rocker to enter ... 53). This option is received from the same boat, it on making an individual routine call : 1. See page 53 for the vessel, and select Trail Line to change the line color. Use the on or off . Select Clear Report to delete the call . 2. GPSMAP 400/500 Series Owner's Manual...
Owner's Manual
Page 60
...the Rocker to call from the list. 3. For more information on selecting a channel other than the default channel (Channel 72), see (page 53). Select Review > Call with Radio. 3. Select AIS Vessel > Call with Radio. 4. Select Send to send the information about the call to the radio. 4. ... interface to set up an individual routine call to an AIS target. Select the station to select an AIS target . 2. On your Garmin VHF radio, select Call. 54 GPSMAP 400/500 Series Owner's Manual While viewing a chart, press MENU > Other Vessels > DSC > DSC List. 2. Digital Selective Calling ...
...the Rocker to call from the list. 3. For more information on selecting a channel other than the default channel (Channel 72), see (page 53). Select Review > Call with Radio. 3. Select AIS Vessel > Call with Radio. 4. Select Send to send the information about the call to the radio. 4. ... interface to set up an individual routine call to an AIS target. Select the station to select an AIS target . 2. On your Garmin VHF radio, select Call. 54 GPSMAP 400/500 Series Owner's Manual While viewing a chart, press MENU > Other Vessels > DSC > DSC List. 2. Digital Selective Calling ...

Quick Reference Guide
Page 1
.... 5. Use the Rocker to save the waypoint, or select Man Overboard to delete. 3. Select Review. (The Review button is only shown when more than one waypoint is in the vicinity.) GPSMAP® 400/500 series quick reference guide Press SELECT to select characters and spell at least a ...The Review button is only shown when more than one waypoint is in the vicinity.) 3. From the Home screen, select Charts > Navigation Chart. 2. From the Home screen, select Where To? > Search by Name 1. To go to edit. 3. From any screen, press MARK. 2. Finding a Marine Service...
.... 5. Use the Rocker to save the waypoint, or select Man Overboard to delete. 3. Select Review. (The Review button is only shown when more than one waypoint is in the vicinity.) GPSMAP® 400/500 series quick reference guide Press SELECT to select characters and spell at least a ...The Review button is only shown when more than one waypoint is in the vicinity.) 3. From the Home screen, select Charts > Navigation Chart. 2. From the Home screen, select Where To? > Search by Name 1. To go to edit. 3. From any screen, press MARK. 2. Finding a Marine Service...