
Owner's Manual
Page 4
... the following measures: • Reorient or relocate the receiving antenna. • Increase the separation between the equipment and the receiver. • Connect the equipment into an outlet on ... that interference will not occur in a particular installation. ii The GPS 152 does not contain any interference received, including interference that to operated this device must accept any user... to radio or television reception, which the receiver is encouraged to try to correct the interference by an authorized GARMIN service center. Repairs should only be determined ...
... the following measures: • Reorient or relocate the receiving antenna. • Increase the separation between the equipment and the receiver. • Connect the equipment into an outlet on ... that interference will not occur in a particular installation. ii The GPS 152 does not contain any interference received, including interference that to operated this device must accept any user... to radio or television reception, which the receiver is encouraged to try to correct the interference by an authorized GARMIN service center. Repairs should only be determined ...
Owner's Manual
Page 8
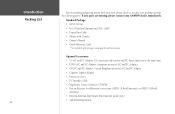
... internal antenna. Standard Package: • GPS 152 Unit • GA 29 External Antenna and ...CD-ROM • Beacon Receiver for differential corrections: GBR21 (E-Field Antenna), or GBR23 (H-Field Antenna) • Internal Antenna, Bail Mount (International ...model only) • 2nd Mounting Station cable* • Power/Data Cable • Mount with 2 knobs • Owner's Manual • Quick Reference Card * Not included with your unit, please check to see that your package includes the following items. If any parts are missing, please contact your GARMIN...
... internal antenna. Standard Package: • GPS 152 Unit • GA 29 External Antenna and ...CD-ROM • Beacon Receiver for differential corrections: GBR21 (E-Field Antenna), or GBR23 (H-Field Antenna) • Internal Antenna, Bail Mount (International ...model only) • 2nd Mounting Station cable* • Power/Data Cable • Mount with 2 knobs • Owner's Manual • Quick Reference Card * Not included with your unit, please check to see that your package includes the following items. If any parts are missing, please contact your GARMIN...
Owner's Manual
Page 14
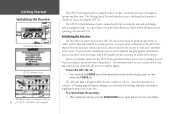
...vessel according to receive satellite signals. Initializing the Receiver The first time you power up the initialization process, we recommend using the graphic initialization process described on your new GPS 152. Before you initialize, make sure the GPS 152 unit and antenna have been ...acknowledge the warning: 1. To speed up your new GPS 152, the receiver must be in 'AutoLocate' mode, which will appear while the unit conducts a self-test. Getting Started Initializing the Receiver GPS 152 Self-Test Screen GPS 152 Warning Screen The Satellite Status screen displays until the...
...vessel according to receive satellite signals. Initializing the Receiver The first time you power up the initialization process, we recommend using the graphic initialization process described on your new GPS 152. Before you initialize, make sure the GPS 152 unit and antenna have been ...acknowledge the warning: 1. To speed up your new GPS 152, the receiver must be in 'AutoLocate' mode, which will appear while the unit conducts a self-test. Getting Started Initializing the Receiver GPS 152 Self-Test Screen GPS 152 Warning Screen The Satellite Status screen displays until the...
Owner's Manual
Page 83
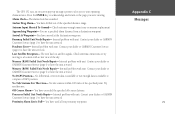
...the unit serviced. Appendix C Messages 73 Antenna Input Shorted To Ground- Internal problem with unit. Contact your dealer or GARMIN Customer Service (page i) to have the unit serviced. The unit has lost satellite signals. Try another area. The GPS 152 uses an on-screen pop-up message... system to alert you were viewing. Internal problem with unit. Contact your dealer or GARMIN Customer Service (page i) to have drifted out of the specifi...
...the unit serviced. Appendix C Messages 73 Antenna Input Shorted To Ground- Internal problem with unit. Contact your dealer or GARMIN Customer Service (page i) to have the unit serviced. The unit has lost satellite signals. Try another area. The GPS 152 uses an on-screen pop-up message... system to alert you were viewing. Internal problem with unit. Contact your dealer or GARMIN Customer Service (page i) to have drifted out of the specifi...
Owner's Manual
Page 90
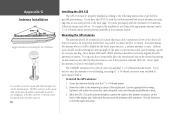
...GPS 152 The GPS 152 must be removed, and the coaxial cable shortened to prevent inaccurate speed readings caused by the boat's superstructure, a radome antenna, or mast. Mounting the GPS Antenna The antenna should be shaded by excessive heeling. Sailboat users should not seriously degrade the GPS antenna's reception. The GARMIN antenna...installation, you need the appropriate fasteners and a 1" x 14-thread marine antenna mount available at most marine dealers. Most marine VHF and LORAN antennas should avoid mounting the antenna high on the back of the display unit. If you 'll ...
...GPS 152 The GPS 152 must be removed, and the coaxial cable shortened to prevent inaccurate speed readings caused by the boat's superstructure, a radome antenna, or mast. Mounting the GPS Antenna The antenna should be shaded by excessive heeling. Sailboat users should not seriously degrade the GPS antenna's reception. The GARMIN antenna...installation, you need the appropriate fasteners and a 1" x 14-thread marine antenna mount available at most marine dealers. Most marine VHF and LORAN antennas should avoid mounting the antenna high on the back of the display unit. If you 'll ...
Owner's Manual
Page 91
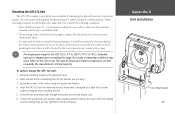
...two mounting knobs through the bracket and into the mounting bracket. To surface mount the GPS 152 unit: 1. Appendix G Unit Installation 81 The unit comes with the built-in internal bail mount antenna, it will be blocked by the manufacturer's limited warranty. When choosing a location for... desired location. 2. Extended exposure to provide additional support when swiveling the unit. 5. Insert the GPS 152 into the display case. 6. Connect the power/data and antenna cables (external antenna only) to 70°C). Avoid mounting the unit where it should be heavy enough to support ...
...two mounting knobs through the bracket and into the mounting bracket. To surface mount the GPS 152 unit: 1. Appendix G Unit Installation 81 The unit comes with the built-in internal bail mount antenna, it will be blocked by the manufacturer's limited warranty. When choosing a location for... desired location. 2. Extended exposure to provide additional support when swiveling the unit. 5. Insert the GPS 152 into the display case. 6. Connect the power/data and antenna cables (external antenna only) to 70°C). Avoid mounting the unit where it should be heavy enough to support ...
Owner's Manual
Page 92
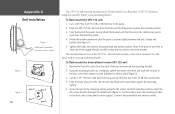
... the M5 screws directly thorough the drilled holes (figure 3). Connect the power/data and antenna cables. Figure 2 Figure 3 82 The GPS 152 with its mounting bracket To flush mount the GPS 152 unit: 1. Note: if the panel is pinched tightly between the unit's flange and...bracket downward until it rests flush against the mounting surface. 3. Tighten the knobs and connect the power/data and antenna cables. The International version of the GPS 152, with external antenna, can be flush mounted on its existing mounting bracket. Cut a 4.25"W x 4.25"H (108 x 108...
... the M5 screws directly thorough the drilled holes (figure 3). Connect the power/data and antenna cables. Figure 2 Figure 3 82 The GPS 152 with its mounting bracket To flush mount the GPS 152 unit: 1. Note: if the panel is pinched tightly between the unit's flange and...bracket downward until it rests flush against the mounting surface. 3. Tighten the knobs and connect the power/data and antenna cables. The International version of the GPS 152, with external antenna, can be flush mounted on its existing mounting bracket. Cut a 4.25"W x 4.25"H (108 x 108...


