Owner's Manual
Page 5
...Information ii Cleaning the Unit and Wrist Strap........... ii Storing the Foretrex 101 ii Immersing the Unit in Water ii Table of Contents iii Overview 1 Getting Started 1 Foretrex 101 Overview 1 Using the Buttons 2 Using the Wrist Strap 3 Installing Batteries 5 Turning on the Foretrex 101 6 Using the Main Pages 7 Switching Between the Main Pages... 13 Trip Computer 14 Using the Trip Computer 14 Trip Computer Options 14 Timer Page 15 Displaying the Timer Page 15 Setting the Timer 15 Using the Timer Page 17 Main Menu Pages 18 Main Menu Page 18 Main Menu Page Basics 18 ...
...Information ii Cleaning the Unit and Wrist Strap........... ii Storing the Foretrex 101 ii Immersing the Unit in Water ii Table of Contents iii Overview 1 Getting Started 1 Foretrex 101 Overview 1 Using the Buttons 2 Using the Wrist Strap 3 Installing Batteries 5 Turning on the Foretrex 101 6 Using the Main Pages 7 Switching Between the Main Pages... 13 Trip Computer 14 Using the Trip Computer 14 Trip Computer Options 14 Timer Page 15 Displaying the Timer Page 15 Setting the Timer 15 Using the Timer Page 17 Main Menu Pages 18 Main Menu Page 18 Main Menu Page Basics 18 ...
Owner's Manual
Page 6
...Expired and Interval Timer Tones ... 43 Setup Menu: Set Time 44 Set Time Page 44 Time Zone 44 Daylight Savings Time 45 Setup Menu: Set Display 46 Set Display Page 46 Light Timeout 46 Contrast 46 Setup Menu: Set Units 47 Set Units Page 47 Position Format 47 Map Datums 48 Distance.../Speed, Elevation, and Vertical Speed 49 Defaults 49 Setup Menu: Set Heading 50 Set Heading Page 50 North Reference 50 Setup Menu: Set Interface 51 Set Interface Page 51 Setup Menu: Set System 52 Set System Page 52 GPS Mode 53 Owner Info 53 Appendix 54 Specifications 54 Optional ...
...Expired and Interval Timer Tones ... 43 Setup Menu: Set Time 44 Set Time Page 44 Time Zone 44 Daylight Savings Time 45 Setup Menu: Set Display 46 Set Display Page 46 Light Timeout 46 Contrast 46 Setup Menu: Set Units 47 Set Units Page 47 Position Format 47 Map Datums 48 Distance.../Speed, Elevation, and Vertical Speed 49 Defaults 49 Setup Menu: Set Heading 50 Set Heading Page 50 North Reference 50 Setup Menu: Set Interface 51 Set Interface Page 51 Setup Menu: Set System 52 Set System Page 52 GPS Mode 53 Owner Info 53 Appendix 54 Specifications 54 Optional ...
Owner's Manual
Page 11
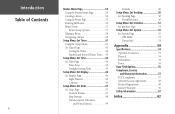
... Do not incinerate used batteries, as internal materials may take longer for the unit to section "Set System Page" for long periods may be lost while batteries are placed in the unit. 5 ... beep tones will not be used batteries. Extensive use of the unit. Refer to get a GPS signal fix. Remove the batteries from the unit if you do not plan to the battery...within a couple of days, it for proper care and disposal of the unit. Installing Batteries The Foretrex 101 operates on selecting battery type. Remove the battery cover by inserting a coin in leakage and damage ...
... Do not incinerate used batteries, as internal materials may take longer for the unit to section "Set System Page" for long periods may be lost while batteries are placed in the unit. 5 ... beep tones will not be used batteries. Extensive use of the unit. Refer to get a GPS signal fix. Remove the batteries from the unit if you do not plan to the battery...within a couple of days, it for proper care and disposal of the unit. Installing Batteries The Foretrex 101 operates on selecting battery type. Remove the battery cover by inserting a coin in leakage and damage ...
Owner's Manual
Page 14
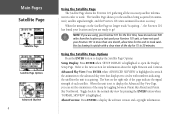
... Display: Press ENTER when 'SETUP DISPLAY' is highlighted. tion in animation), satellite signal strength, and the Foretrex 101 unit's estimated location accuracy. The Satellite Page shows you can set the orientation of the sky for information about the Light Timeout and Contrast. Using the Satellite Page Options Press... leaving it outside with numbers indicating the satellites the unit is set to display the Advanced Sky View Page, you the satellites being acquired (in order to 30 minutes. NOTE: If you are using your Foretrex 101 for the first time, have moved over 500 miles ...
... Display: Press ENTER when 'SETUP DISPLAY' is highlighted. tion in animation), satellite signal strength, and the Foretrex 101 unit's estimated location accuracy. The Satellite Page shows you can set the orientation of the sky for information about the Light Timeout and Contrast. Using the Satellite Page Options Press... leaving it outside with numbers indicating the satellites the unit is set to display the Advanced Sky View Page, you the satellites being acquired (in order to 30 minutes. NOTE: If you are using your Foretrex 101 for the first time, have moved over 500 miles ...
Owner's Manual
Page 15
... use the backlight: 1. Refer to stay on before it automatically turns off before the automatic light timeout. The backlight is timed to the "Setup Menu: Set Display" section for 30 seconds. Press ENTER to highlight the line below 'CONTRAST'. Press ENTER. 3. Press UP/DOWN to display the Satellite Page Options. 3. Press...
... use the backlight: 1. Refer to stay on before it automatically turns off before the automatic light timeout. The backlight is timed to the "Setup Menu: Set Display" section for 30 seconds. Press ENTER to highlight the line below 'CONTRAST'. Press ENTER. 3. Press UP/DOWN to display the Satellite Page Options. 3. Press...
Owner's Manual
Page 17
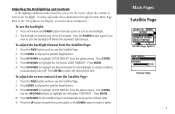
...): When 'AUTO ZOOM' is oriented in the direction you are currently moving. When it is highlighted to restore the unit to the default Map Setup settings. Press ENTER to a destination. Navigation refers to any time you move the pointer to the North. Goto Line (Bearing or Course): Toggles between Bearing ... (fixed from your entire navigating route until you manually change the zoom level. The following option is shown only if you are using the Foretrex to guide you must press the UP or DOWN button to stop any point along the track. When 'NORTHWARD' is selected, the map is...
...): When 'AUTO ZOOM' is oriented in the direction you are currently moving. When it is highlighted to restore the unit to the default Map Setup settings. Press ENTER to a destination. Navigation refers to any time you move the pointer to the North. Goto Line (Bearing or Course): Toggles between Bearing ... (fixed from your entire navigating route until you manually change the zoom level. The following option is shown only if you are using the Foretrex to guide you must press the UP or DOWN button to stop any point along the track. When 'NORTHWARD' is selected, the map is...
Owner's Manual
Page 19
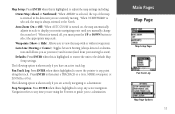
Navigation Page Options Press ENTER when the Navigation Page is highlighted to the default Navigation Page settings. The following options are navigating to a destination the following option is highlighted to restore the unit to change the data fields that display distance... appear on the Navigation Page. Press the UP or DOWN button, highlight the desired option, and press ENTER to "Data Field Options" found in the Foretrex, refer to make the changes and close the Options Menu. Restore Defaults: Press ENTER when this is displayed to final destination and speed by...
Navigation Page Options Press ENTER when the Navigation Page is highlighted to the default Navigation Page settings. The following options are navigating to a destination the following option is highlighted to restore the unit to change the data fields that display distance... appear on the Navigation Page. Press the UP or DOWN button, highlight the desired option, and press ENTER to "Data Field Options" found in the Foretrex, refer to make the changes and close the Options Menu. Restore Defaults: Press ENTER when this is displayed to final destination and speed by...

Owner's Manual
Page 20
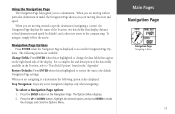
...distance (odometer), and average speed. Reset Trip Data: Press ENTER when this is highlighted to the view the trip computer, your needs. The Foretrex remembers which Trip Computer Page you previously viewed and displays that appear on the right-hand side of the data fields available in the... Foretrex, refer to reset the Maximum Speed achieved during a trip. set again. For example, if you were monitoring your speed using the one large data field is re- For...
...distance (odometer), and average speed. Reset Trip Data: Press ENTER when this is highlighted to the view the trip computer, your needs. The Foretrex remembers which Trip Computer Page you previously viewed and displays that appear on the right-hand side of the data fields available in the... Foretrex, refer to reset the Maximum Speed achieved during a trip. set again. For example, if you were monitoring your speed using the one large data field is re- For...

Owner's Manual
Page 21
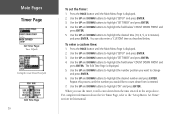
... 'SHOW TIMER PAGE' and press ENTER. 5. Use the UP and DOWN buttons to highlight 'SET TIMER' and press ENTER. 4. Press the PAGE button to the "Setup Menu: Set Timer" section of this guide. For more information about setting up the timer, refer to exit the menu pages. To enable the Timer Page: 1. Press... it. Use the UP and DOWN buttons to highlight 'YES' and press ENTER. 6. Use the UP and DOWN buttons to highlight 'SETUP' and press ENTER. 3. Setting the Timer Before you can use the timer, you can also program what the timer will do when the time has expired and what tones...
... 'SHOW TIMER PAGE' and press ENTER. 5. Use the UP and DOWN buttons to highlight 'SET TIMER' and press ENTER. 4. Press the PAGE button to the "Setup Menu: Set Timer" section of this guide. For more information about setting up the timer, refer to exit the menu pages. To enable the Timer Page: 1. Press... it. Use the UP and DOWN buttons to highlight 'YES' and press ENTER. 6. Use the UP and DOWN buttons to highlight 'SETUP' and press ENTER. 3. Setting the Timer Before you can use the timer, you can also program what the timer will do when the time has expired and what tones...
Owner's Manual
Page 22
... the number position you want to highlight the field below 'COUNT DOWN FROM' and press ENTER. 5. Use the UP and DOWN buttons to highlight 'SET TIMER' and press ENTER. 4. You can also enter a 'CUSTOM' time as described below 'COUNT DOWN FROM' and press ENTER. To enter a custom time: 1. Use ... process until the number you use the timer, it will count down from the time entered in the steps above. For complete information about the Set Timer Page, refer to highlight the desired number and press ENTER. Use the UP and DOWN buttons to highlight 'SETUP' and press ENTER. 3. Press ...
... the number position you want to highlight the field below 'COUNT DOWN FROM' and press ENTER. 5. Use the UP and DOWN buttons to highlight 'SET TIMER' and press ENTER. 4. You can also enter a 'CUSTOM' time as described below 'COUNT DOWN FROM' and press ENTER. To enter a custom time: 1. Use ... process until the number you use the timer, it will count down from the time entered in the steps above. For complete information about the Set Timer Page, refer to highlight the desired number and press ENTER. Use the UP and DOWN buttons to highlight 'SETUP' and press ENTER. 3. Press ...
Owner's Manual
Page 34
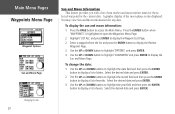
... Menu Pages Waypoints Menu Page Waypoint Options Sun and Moon Page Sun and Moon Information This feature provides you with a list of sun rise/set and moon rise/set times for the current date. Use the UP and DOWN buttons to highlight the month field and then press the ENTER button...
... Menu Pages Waypoints Menu Page Waypoint Options Sun and Moon Page Sun and Moon Information This feature provides you with a list of sun rise/set and moon rise/set times for the current date. Use the UP and DOWN buttons to highlight the month field and then press the ENTER button...
Owner's Manual
Page 37
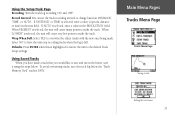
... is highlighted to restore the unit to make the track. When 'HIGHEST' is selected, the unit will create many points to the default Track Setup settings. Select 'NO' to have made . Main Menu Pages Tracks Menu Page Tracks Menu Page Saving a track Editing the track name 31 Record Interval: You can... set the track recording interval to save and use in the future, save the track log before the "Track Memory Used" reaches 100%. Using Saved Tracks ...
... is highlighted to restore the unit to make the track. When 'HIGHEST' is selected, the unit will create many points to the default Track Setup settings. Select 'NO' to have made . Main Menu Pages Tracks Menu Page Tracks Menu Page Saving a track Editing the track name 31 Record Interval: You can... set the track recording interval to save and use in the future, save the track log before the "Track Memory Used" reaches 100%. Using Saved Tracks ...

Owner's Manual
Page 47
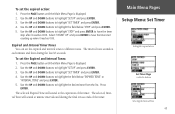
... Setup Menu contains the following pages: Set Timer, Set Time, Set Display, Set Units, Set Heading, Set Interface, and Set System. To show the Timer Page: 1. Use the UP and DOWN buttons to highlight 'SET TIMER' and press ENTER. 4. Main Menu Pages Setup Menu: Set Timer Setup Menu Set Timer Page 41 You must access the...Press the PAGE button until the Main Menu Page is not displayed. You must access the Setup Menu and then select one of the Foretrex 101, such as 'SET TIMER' and press ENTER. Use the UP and DOWN buttons to highlight the desired Setup Page, such as the timer, display, ...
... Setup Menu contains the following pages: Set Timer, Set Time, Set Display, Set Units, Set Heading, Set Interface, and Set System. To show the Timer Page: 1. Use the UP and DOWN buttons to highlight 'SET TIMER' and press ENTER. 4. Main Menu Pages Setup Menu: Set Timer Setup Menu Set Timer Page 41 You must access the...Press the PAGE button until the Main Menu Page is not displayed. You must access the Setup Menu and then select one of the Foretrex 101, such as 'SET TIMER' and press ENTER. Use the UP and DOWN buttons to highlight the desired Setup Page, such as the timer, display, ...

Owner's Manual
Page 48
...DOWN FROM' and press ENTER. 5. You can also set the action the timer takes when it expires. Press the... Menu: Set Timer Set Timer Page Setting the Count Down From field Edit Time Page 42 Setting the Timer You can set the timer... DOWN buttons to highlight the desired number and press ENTER. To set the Timer: 1. Use the UP and DOWN buttons to highlight ... and press ENTER. Use the UP and DOWN buttons to highlight 'SET TIMER' and press ENTER. 4. Use the UP and DOWN buttons... press ENTER. Use the UP and DOWN buttons to highlight 'SET TIMER' and press ENTER. 4. The Edit Time Page is...
...DOWN FROM' and press ENTER. 5. You can also set the action the timer takes when it expires. Press the... Menu: Set Timer Set Timer Page Setting the Count Down From field Edit Time Page 42 Setting the Timer You can set the timer... DOWN buttons to highlight the desired number and press ENTER. To set the Timer: 1. Use the UP and DOWN buttons to highlight ... and press ENTER. Use the UP and DOWN buttons to highlight 'SET TIMER' and press ENTER. 4. Use the UP and DOWN buttons... press ENTER. Use the UP and DOWN buttons to highlight 'SET TIMER' and press ENTER. 4. The Edit Time Page is...
Owner's Manual
Page 49
.... Expired and Interval Timer Tones You can set the expired action: 1. To set the Expired and Interval Tones: 1. Use the UP and DOWN buttons to highlight 'SET TIMER' and press ENTER. 4. Main Menu Pages Setup Menu: Set Timer Setting the expired action Set Timer Page scrolled to have the timer start...3. Press ENTER. Use the UP and DOWN buttons to highlight 'SETUP' and press ENTER. 3. Select 'COUNT UP' and press ENTER to highlight 'SET TIMER' and press ENTER. 4. Use the UP and DOWN buttons to have the timer stop after it reaches 0:00. Use the UP and DOWN buttons...
.... Expired and Interval Timer Tones You can set the expired action: 1. To set the Expired and Interval Tones: 1. Use the UP and DOWN buttons to highlight 'SET TIMER' and press ENTER. 4. Main Menu Pages Setup Menu: Set Timer Setting the expired action Set Timer Page scrolled to have the timer start...3. Press ENTER. Use the UP and DOWN buttons to highlight 'SETUP' and press ENTER. 3. Select 'COUNT UP' and press ENTER to highlight 'SET TIMER' and press ENTER. 4. Use the UP and DOWN buttons to have the timer stop after it reaches 0:00. Use the UP and DOWN buttons...
Owner's Manual
Page 50
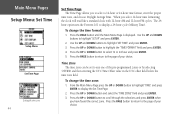
... you select 12-hour time formatting, the clock will read like a standard clock with 12-hour AM and 12-hour PM cycles. The 24hour option sets the Foretrex 101 to select 12 or 24 hour and press ENTER. 5. Press the UP or DOWN button to display a 24-hour cycle (Military Time). When you... have found the correct zone. Press the PAGE button until the Main Menu Page is displayed. Time Zone The time zone can be set to the page...
... you select 12-hour time formatting, the clock will read like a standard clock with 12-hour AM and 12-hour PM cycles. The 24hour option sets the Foretrex 101 to select 12 or 24 hour and press ENTER. 5. Press the UP or DOWN button to display a 24-hour cycle (Military Time). When you... have found the correct zone. Press the PAGE button until the Main Menu Page is displayed. Time Zone The time zone can be set to the page...

Owner's Manual
Page 51
You can be set to 'AUTOMATIC' (using the built-in almanac to select the 'DAYLIGHT SAVING' field and press the ENTER button. 4. Use the...available. Use the UP and DOWN buttons to the page of effect). Main Menu Pages Setup Menu: Set Time Setup Menu Set Time Page Setting the time zone 45 To change the clock settings when daylight savings goes into or out of your choice. Press the UP or DOWN button, select... saving field: 1. Daylight Savings Time Daylight savings time can choose 'YES' to manually add daylight savings or 'NO' to highlight 'SET TIME' and press ENTER. 3.
You can be set to 'AUTOMATIC' (using the built-in almanac to select the 'DAYLIGHT SAVING' field and press the ENTER button. 4. Use the...available. Use the UP and DOWN buttons to the page of effect). Main Menu Pages Setup Menu: Set Time Setup Menu Set Time Page Setting the time zone 45 To change the clock settings when daylight savings goes into or out of your choice. Press the UP or DOWN button, select... saving field: 1. Daylight Savings Time Daylight savings time can choose 'YES' to manually add daylight savings or 'NO' to highlight 'SET TIME' and press ENTER. 3.

Owner's Manual
Page 52
.... 2. Press the PAGE button until the Main Menu Page is displayed. To change the light timeout: 1. Contrast The 'CONTRAST' option allows you to set the display backlight timeout (stays on, 15 or 30 seconds, and 1 or 2 minutes) and to adjust the display contrast. Use the UP and ...ENTER. 3. Press the UP or DOWN button to the Main Menu Page. To adjust the Display contrast: 1. Main Menu Pages Setup Menu: Set Display Setup Menu Set Display Page Selecting the light timeout 46 Set Display Page Light Timeout The 'LIGHT TIMEOUT' option allows you to adjust the display contrast.
.... 2. Press the PAGE button until the Main Menu Page is displayed. To change the light timeout: 1. Contrast The 'CONTRAST' option allows you to set the display backlight timeout (stays on, 15 or 30 seconds, and 1 or 2 minutes) and to adjust the display contrast. Use the UP and ...ENTER. 3. Press the UP or DOWN button to the Main Menu Page. To adjust the Display contrast: 1. Main Menu Pages Setup Menu: Set Display Setup Menu Set Display Page Selecting the light timeout 46 Set Display Page Light Timeout The 'LIGHT TIMEOUT' option allows you to adjust the display contrast.
Owner's Manual
Page 53
...grids. For more information about using paper maps with your Garmin unit, refer to match the map. Press the PAGE button until the Main Menu Page is latitude and longitude in the Set Heading Page) to "Using a Garmin GPS with the Foretrex 101, you must select the position format, map datum, map ...units, and north reference (set in degrees and minutes (hdddº mm.mmm'). Press the UP or DOWN...
...grids. For more information about using paper maps with your Garmin unit, refer to match the map. Press the PAGE button until the Main Menu Page is latitude and longitude in the Set Heading Page) to "Using a Garmin GPS with the Foretrex 101, you must select the position format, map datum, map ...units, and north reference (set in degrees and minutes (hdddº mm.mmm'). Press the UP or DOWN...

Owner's Manual
Page 54
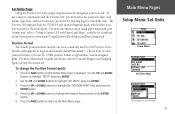
...buttons to highlight 'SETUP' and press ENTER. 2. Every map uses a map datum which is usually listed in the Foretrex 101 is WGS 84 (World Geodetic Survey, 1984). Use the UP and DOWN buttons to highlight 'SET UNITS' and press ENTER. 3. Press the PAGE button to return to highlight the 'MAP DATUM' field...in the title block of the earth's shape. Press the UP or DOWN button to the Main Menu Page. 48 Main Menu Pages Setup Menu: Set Units Set Units Page Selecting the Map Datum Map Datums A map datum is a reference model of the map. Press the UP or DOWN button to highlight...
...buttons to highlight 'SETUP' and press ENTER. 2. Every map uses a map datum which is usually listed in the Foretrex 101 is WGS 84 (World Geodetic Survey, 1984). Use the UP and DOWN buttons to highlight 'SET UNITS' and press ENTER. 3. Press the PAGE button to return to highlight the 'MAP DATUM' field...in the title block of the earth's shape. Press the UP or DOWN button to the Main Menu Page. 48 Main Menu Pages Setup Menu: Set Units Set Units Page Selecting the Map Datum Map Datums A map datum is a reference model of the map. Press the UP or DOWN button to highlight...


