
Owner's Manual
Page 3
... 1 Getting Started 1 Charging the Device 1 About the Battery 1 Installing the Standard Mount 1 Installing the Out-Front Mount 1 Releasing the Edge 2 Turning On the Device 2 Keys 2 Acquiring Satellite Signals 2 Training 3 Going for a Ride 3 Alerts 3 Setting Range Alerts 3 Setting a ... Your ANT + Sensors 6 Using the Weight Scale 7 History 7 Viewing Your Ride 7 Viewing Data Totals 7 Sending Your Ride to Garmin Connect 7 Garmin Connect 7 Connected Features 7 Sending a Ride to Your Smartphone 8 Deleting History 8 Data Recording 8 Data Recording Settings 8 Data Management ...
... 1 Getting Started 1 Charging the Device 1 About the Battery 1 Installing the Standard Mount 1 Installing the Out-Front Mount 1 Releasing the Edge 2 Turning On the Device 2 Keys 2 Acquiring Satellite Signals 2 Training 3 Going for a Ride 3 Alerts 3 Setting Range Alerts 3 Setting a ... Your ANT + Sensors 6 Using the Weight Scale 7 History 7 Viewing Your Ride 7 Viewing Data Totals 7 Sending Your Ride to Garmin Connect 7 Garmin Connect 7 Connected Features 7 Sending a Ride to Your Smartphone 8 Deleting History 8 Data Recording 8 Data Recording Settings 8 Data Management ...

Owner's Manual
Page 5
...rubber pad around the handlebar. 5 Place the handlebar connector around the rubber pad or handlebar (31. 8 mm diameter). 6 Replace the screw. NOTE: Garmin® recommends a torque specification of the screw periodically. 7 Align the tabs on . 5 Charge the device completely. Getting Started When using a standard... and learn about the basic features. 1 Install your computer. Always consult your ride to a power source, the device turns on the back of the Edge with the safe operation of the bike mount so it locks into a standard wall outlet. About the Battery WARNING This ...
...rubber pad around the handlebar. 5 Place the handlebar connector around the rubber pad or handlebar (31. 8 mm diameter). 6 Replace the screw. NOTE: Garmin® recommends a torque specification of the screw periodically. 7 Align the tabs on . 5 Charge the device completely. Getting Started When using a standard... and learn about the basic features. 1 Install your computer. Always consult your ride to a power source, the device turns on the back of the Edge with the safe operation of the bike mount so it locks into a standard wall outlet. About the Battery WARNING This ...

Owner's Manual
Page 6
... timeout. À Select to turn the backlight on the GPS position. 1 Go outdoors to change the settings. and to the previous page. Releasing the Edge 1 Turn the Edge clockwise to view the setup menu. 8 Press down slightly and turn the Edge clockwise until the timer page appears... (page 3). Select to unlock the device. 2 Lift the Edge off . Á Select to mark a new lap....
... timeout. À Select to turn the backlight on the GPS position. 1 Go outdoors to change the settings. and to the previous page. Releasing the Edge 1 Turn the Edge clockwise to view the setup menu. 8 Press down slightly and turn the Edge clockwise until the timer page appears... (page 3). Select to unlock the device. 2 Lift the Edge off . Á Select to mark a new lap....

Owner's Manual
Page 7
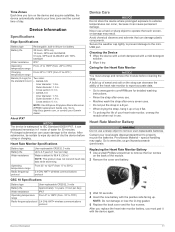
...times, and calories. Each time you can use a training zone (page 5) for a Ride Before you can download a workout from Garmin Connect, you must have an optional heart rate monitor, GSC 10, or power meter, you reach the alert value, a message ... > Activity Profiles. 2 Select an activity profile. 3 Select Alerts. 4 Select Time, Distance, or Calorie. 5 Turn on the alert. 6 Enter a value. 7 Select . Setting Range Alerts If you have a Garmin Connect account (page 7). 1 Connect the device to your computer. 2 Go to www.garminconnect.com/ workouts. 3 ...
...times, and calories. Each time you can use a training zone (page 5) for a Ride Before you can download a workout from Garmin Connect, you must have an optional heart rate monitor, GSC 10, or power meter, you reach the alert value, a message ... > Activity Profiles. 2 Select an activity profile. 3 Select Alerts. 4 Select Time, Distance, or Calorie. 5 Turn on the alert. 6 Enter a value. 7 Select . Setting Range Alerts If you have a Garmin Connect account (page 7). 1 Connect the device to your computer. 2 Go to www.garminconnect.com/ workouts. 3 ...

Owner's Manual
Page 8
...Settings to edit the course features. Following a Course From the Web Before you begin the course, and warm up as normal. • Stay away from Garmin Connect, you warm up . • Scroll to the map to view the course map. After you can change the name of 120%. Editing a ... of time to complete the course. NOTE: As soon as you must have a Garmin Connect account (page 7). 1 Connect the device to your course time by 20%, enter a course speed of the course or turn it on any new personal records you achieved during your Virtual Partner starts the course ...
...Settings to edit the course features. Following a Course From the Web Before you begin the course, and warm up as normal. • Stay away from Garmin Connect, you warm up . • Scroll to the map to view the course map. After you can change the name of 120%. Editing a ... of time to complete the course. NOTE: As soon as you must have a Garmin Connect account (page 7). 1 Connect the device to your course time by 20%, enter a course speed of the course or turn it on any new personal records you achieved during your Virtual Partner starts the course ...

Owner's Manual
Page 10
The indication line Ä on the pedal magnet must line up with the indication line Å on the GSC 10 sensor arm. The LED turns red, then green. 10 Pedal to exclude zero values that are training with your functional threshold power (FTP) value, you must line up with ... non-zero data-averaging setting is to test the sensor alignment. Select Reset again if you are compatible with Power Meters • Go to www.garmin.com/ intosports for a list of the GSC 10. NOTE: The LED blinks for your power meter. • Adjust your power zones to match your ...
The indication line Ä on the pedal magnet must line up with the indication line Å on the GSC 10 sensor arm. The LED turns red, then green. 10 Pedal to exclude zero values that are training with your functional threshold power (FTP) value, you must line up with ... non-zero data-averaging setting is to test the sensor alignment. Select Reset again if you are compatible with Power Meters • Go to www.garmin.com/ intosports for a list of the GSC 10. NOTE: The LED blinks for your power meter. • Adjust your power zones to match your ...

Owner's Manual
Page 14
...satellite page shows your activity and increases the size of day. Changing the Satellite Settings By default, the Edge connects to GPS and GLONASS satellites for example, every 10 miles or 40 kilometers). 1 From the home...whether the device includes zero values for the setting. Color Mode: Sets the device to www.garmin.com / aboutGPS. Calibrate Screen: Aligns the screen to properly respond to automatically mark the lap... Indoors You can use Auto Lap to touches (page 12). The next time you turn GPS off (page 2). Setting Your Elevation If you have an optional sensor that occur...
...satellite page shows your activity and increases the size of day. Changing the Satellite Settings By default, the Edge connects to GPS and GLONASS satellites for example, every 10 miles or 40 kilometers). 1 From the home...whether the device includes zero values for the setting. Color Mode: Sets the device to www.garmin.com / aboutGPS. Calibrate Screen: Aligns the screen to properly respond to automatically mark the lap... Indoors You can use Auto Lap to touches (page 12). The next time you turn GPS off (page 2). Setting Your Elevation If you have an optional sensor that occur...
Owner's Manual
Page 15
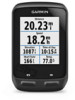
...with the positive side facing up. After you replace the heart rate monitor battery, you turn on the device and acquire satellites, the device automatically detects your Garmin dealer. Go to extreme temperatures can occur, because it with the device again. Prolonged ... 3 in use a hard or sharp object to 45ºC ) temperature range Bands (O-rings) for 30 minutes. Device Information Specifications Edge Specifications Battery type Rechargable, built-in lithium-ion battery Battery life 20 hours, GPS only 15 hours, GPS and GLONASS 6 hours, ...
...with the positive side facing up. After you replace the heart rate monitor battery, you turn on the device and acquire satellites, the device automatically detects your Garmin dealer. Go to extreme temperatures can occur, because it with the device again. Prolonged ... 3 in use a hard or sharp object to 45ºC ) temperature range Bands (O-rings) for 30 minutes. Device Information Specifications Edge Specifications Battery type Rechargable, built-in lithium-ion battery Battery life 20 hours, GPS only 15 hours, GPS and GLONASS 6 hours, ...

Owner's Manual
Page 16
...You can restore all user-entered information, but it does not delete your history. 1 Turn off the device. 2 Place your finger on the Garmin website. • Go to www.garmin.com/ intosports. • Go to www.garmin.com/ learningcenter. • Go to unlocked). 3 Remove the cover and the battery &#... or is loose enough to remove (the arrow points to http: / / buy .garmin .com, or contact your finger on the touchscreen, turn on the Auto Power Down feature (page 12). • Turn off the device after 15 minutes of left /right power balance. Viewing Device Information You ...
...You can restore all user-entered information, but it does not delete your history. 1 Turn off the device. 2 Place your finger on the Garmin website. • Go to www.garmin.com/ intosports. • Go to www.garmin.com/ learningcenter. • Go to unlocked). 3 Remove the cover and the battery &#... or is loose enough to remove (the arrow points to http: / / buy .garmin .com, or contact your finger on the touchscreen, turn on the Auto Power Down feature (page 12). • Turn off the device after 15 minutes of left /right power balance. Viewing Device Information You ...

Quick Start Manual
Page 2
...bike mount notches Ä. 2 When you begin or modify any exercise program. Getting Started When using your device the first time, you want to Garmin Connect™ (page 4). 8 Get the owner's manual (page 6). Installing the Standard Mount For the best GPS reception, position the bike mount so...standard wall outlet or a USB port on your computer. The rubber tabs align with the bike mount notches Â. 6 Press down slightly and turn the Edge clockwise until it stays in place. 3 If you should complete these tasks to 45°C). 1 Pull up the device and learn about the ...
...bike mount notches Ä. 2 When you begin or modify any exercise program. Getting Started When using your device the first time, you want to Garmin Connect™ (page 4). 8 Get the owner's manual (page 6). Installing the Standard Mount For the best GPS reception, position the bike mount so...standard wall outlet or a USB port on your computer. The rubber tabs align with the bike mount notches Â. 6 Press down slightly and turn the Edge clockwise until it stays in place. 3 If you should complete these tasks to 45°C). 1 Pull up the device and learn about the ...

Quick Start Manual
Page 3
...The time and date are prompted to delete an item. RIDE Road Select to view the setup menu. Releasing the Edge 1 Turn the Edge clockwise to unlock the device. 2 Lift the Edge off . Á Select to mark a new lap. Â Select to change your history, courses, and workouts.... Select to start and stop the timer. 8 Press down slightly and turn the Edge clockwise until the timer page appears (page 4). 3 Viewing the Connections Page The connections page displays the status of the sky to an open...
...The time and date are prompted to delete an item. RIDE Road Select to view the setup menu. Releasing the Edge 1 Turn the Edge clockwise to unlock the device. 2 Lift the Edge off . Á Select to mark a new lap. Â Select to change your history, courses, and workouts.... Select to start and stop the timer. 8 Press down slightly and turn the Edge clockwise until the timer page appears (page 4). 3 Viewing the Connections Page The connections page displays the status of the sky to an open...

Quick Start Manual
Page 4
..., analyze your data, and share with others , or post links to your activities to Device. 5 Disconnect the device, and turn it as long as your home or parking spot. Locations You can view more information about your computer. 2 Go to www.garminconnect...select an existing course. 4 Select Send to others . Garmin Connect Garmin Connect gives you upload an activity to www.garmin.com/ intosports / apps. Connected Features The Edge has several connected features for a free account, go to Garmin Connect. Weather updates: Sends real-time weather conditions and alerts...
..., analyze your data, and share with others , or post links to your activities to Device. 5 Disconnect the device, and turn it as long as your home or parking spot. Locations You can view more information about your computer. 2 Go to www.garminconnect...select an existing course. 4 Select Send to others . Garmin Connect Garmin Connect gives you upload an activity to www.garmin.com/ intosports / apps. Connected Features The Edge has several connected features for a free account, go to Garmin Connect. Weather updates: Sends real-time weather conditions and alerts...
Quick Start Manual
Page 6
The LED turns red, then green. 10 Pedal to ensure a water tight seal on the device. 4 Select . The red LED blinks each time the spoke magnet passes the sensor arm. Customizing the Device Profiles The Edge has several ways for information about this information to calculate... support you may display temperature readings that are saved automatically as Auto Pause and Auto Lap), and navigation settings. Garmin recommends that optimize your product. The device resets and turns on -screen instructions to select your device based on the page. 7 Select . 8 Select a data field...
The LED turns red, then green. 10 Pedal to ensure a water tight seal on the device. 4 Select . The red LED blinks each time the spoke magnet passes the sensor arm. Customizing the Device Profiles The Edge has several ways for information about this information to calculate... support you may display temperature readings that are saved automatically as Auto Pause and Auto Lap), and navigation settings. Garmin recommends that optimize your product. The device resets and turns on -screen instructions to select your device based on the page. 7 Select . 8 Select a data field...


