
Owner's Manual
Page 3
... Start Notice 10 System Settings 10 GPS Settings 10 Display Settings 10 Data Recording Settings 10 Changing the Units of Measure 10 Changing the Configuration Settings 10 Changing the Device Language 10 Setting the Device Tones 10 Time Zones 11 Device Information 11 Specifications 11 Edge Specifications 11 Heart Rate Monitor Specifications...
... Start Notice 10 System Settings 10 GPS Settings 10 Display Settings 10 Data Recording Settings 10 Changing the Units of Measure 10 Changing the Configuration Settings 10 Changing the Device Language 10 Setting the Device Tones 10 Time Zones 11 Device Information 11 Specifications 11 Edge Specifications 11 Heart Rate Monitor Specifications...

Owner's Manual
Page 5
...Mount For the best GPS reception, position the bike mount so the front of your bike. 3 If you can install the bike mount on the stem or the handlebars. 1 Select a secure location to mount the Edge where it stays in place. 3 Place the bike mount on the bike stem. 4 Attach the bike mount securely using the...product box for product warnings and other important information. The device is powered by a built-in lithium-ion battery that you want to Garmin Connect™ (page 7). Always consult your ride to change the orientation of 32° to 113°F (0° to mount the...
...Mount For the best GPS reception, position the bike mount so the front of your bike. 3 If you can install the bike mount on the stem or the handlebars. 1 Select a secure location to mount the Edge where it stays in place. 3 Place the bike mount on the bike stem. 4 Attach the bike mount securely using the...product box for product warnings and other important information. The device is powered by a built-in lithium-ion battery that you want to Garmin Connect™ (page 7). Always consult your ride to change the orientation of 32° to 113°F (0° to mount the...

Owner's Manual
Page 6
... set automatically based on the GPS position. 1 Go outdoors to unlock the device. 2 Lift the Edge off . Select to the...search features during configuration. Select to all the features of the Edge. The time and date are prompted to configure system settings and... Â Select to close the page. 8 Press down slightly and turn the Edge clockwise until the timer page appears (page 3). For more information about ANT + sensors...the screen to view the connections page. Select to use the GPS tracking and navigation features, you must acquire satellite signals. Select...
... set automatically based on the GPS position. 1 Go outdoors to unlock the device. 2 Lift the Edge off . Select to the...search features during configuration. Select to all the features of the Edge. The time and date are prompted to configure system settings and... Â Select to close the page. 8 Press down slightly and turn the Edge clockwise until the timer page appears (page 3). For more information about ANT + sensors...the screen to view the connections page. Select to use the GPS tracking and navigation features, you must acquire satellite signals. Select...

Owner's Manual
Page 8
...a warmup, select to begin a workout, the device displays each step of 120%. Creating a Course on Your Device Before you can follow a bike friendly commute to warm up . Following a Course From the Web Before you can save and follow a saved course simply because it on Virtual...a Course 1 Tap the screen to finish a workout step. An audible alarm sounds when you can download a course from Garmin Connect, you select , your course. 3 Enter a name for Training with GPS track data saved to Device. 5 Disconnect the device, and turn on . 6 Select > Courses. 7 Select the course....
...a warmup, select to begin a workout, the device displays each step of 120%. Creating a Course on Your Device Before you can follow a bike friendly commute to warm up . Following a Course From the Web Before you can save and follow a saved course simply because it on Virtual...a Course 1 Tap the screen to finish a workout step. An audible alarm sounds when you can download a course from Garmin Connect, you select , your course. 3 Enter a name for Training with GPS track data saved to Device. 5 Disconnect the device, and turn on . 6 Select > Courses. 7 Select the course....

Owner's Manual
Page 10
...arm. 7 Loosen the screw È on the sensor arm. 8 Move the sensor arm to the manufacturer's instructions. 1 From the home screen, select . 2 Select Bike Profiles. 3 Select a profile. 4 Select > Calibrate. 5 Keep your power meter active by the number of revolutions of your device. • For more information, see... mount and a cable tie Ã. If there is no GSC 10 paired, GPS data is not enough room between the sensor arm and the spoke. Training with Power Meters • Go to www.garmin.com/ intosports for a list of pedaling or "spinning" measured by pedaling until ...
...arm. 7 Loosen the screw È on the sensor arm. 8 Move the sensor arm to the manufacturer's instructions. 1 From the home screen, select . 2 Select Bike Profiles. 3 Select a profile. 4 Select > Calibrate. 5 Keep your power meter active by the number of revolutions of your device. • For more information, see... mount and a cable tie Ã. If there is no GSC 10 paired, GPS data is not enough room between the sensor arm and the spoke. Training with Power Meters • Go to www.garmin.com/ intosports for a list of pedaling or "spinning" measured by pedaling until ...

Owner's Manual
Page 13
... are using a speed and cadence sensor or power sensor, select an option: • Select Wheel Size > Automatic to calculate your wheel size using GPS distance. • Select Crank Length > Custom to change when the timer automatically pauses (page 9). • Select Auto Lap to set how laps ... Auto Lap > Auto Lap Trigger > By Position > Lap At. 4 Select an option: • Select Lap Press Only to the active profile. Updating Your Bike Profile You can use the By Position option to customize the display of a ride (for the profile. 4 Select an option: • Select Training Pages to...
... are using a speed and cadence sensor or power sensor, select an option: • Select Wheel Size > Automatic to calculate your wheel size using GPS distance. • Select Crank Length > Custom to change when the timer automatically pauses (page 9). • Select Auto Lap to set how laps ... Auto Lap > Auto Lap Trigger > By Position > Lap At. 4 Select an option: • Select Lap Press Only to the active profile. Updating Your Bike Profile You can use the By Position option to customize the display of a ride (for the profile. 4 Select an option: • Select Training Pages to...
Owner's Manual
Page 19
...history 8 device care 11 registration 12 resetting 12 display settings 10 distance, alerts 3 E elevation 10 F files, transferring 8 G Garmin Connect 3, 7 storing data 7 GLONASS 10 GPS satellite page 10 signal 2 stopping 10 GSC 10 5, 6, 11, 12 H heart rate alerts 3 zones 5, 14 heart rate ... 6 personal records 4, 8 restoring 5 power alerts 3 zones 6 power meter 6 power meters 6 power save 12 product registration 12 profiles 8, 9 bike 9 user 9 R registering the device 12 replacing battery 11 resetting the device 12 restoring, settings 12 S satellite page 10 satellite signals 2 saving activities...
...history 8 device care 11 registration 12 resetting 12 display settings 10 distance, alerts 3 E elevation 10 F files, transferring 8 G Garmin Connect 3, 7 storing data 7 GLONASS 10 GPS satellite page 10 signal 2 stopping 10 GSC 10 5, 6, 11, 12 H heart rate alerts 3 zones 5, 14 heart rate ... 6 personal records 4, 8 restoring 5 power alerts 3 zones 6 power meter 6 power meters 6 power save 12 product registration 12 profiles 8, 9 bike 9 user 9 R registering the device 12 replacing battery 11 resetting the device 12 restoring, settings 12 S satellite page 10 satellite signals 2 saving activities...

Quick Start Manual
Page 2
...disk À on the back of the bike mount. When you want to change the orientation of the Edge is powered by a built-in lithium-ion battery that you can install the bike mount on the back of your computer. NOTE: Garmin® recommends a torque specification of the ...cable into the AC adapter or a computer USB port. 4 Plug the AC adapter into place. Installing the Standard Mount For the best GPS...
...disk À on the back of the bike mount. When you want to change the orientation of the Edge is powered by a built-in lithium-ion battery that you can install the bike mount on the back of your computer. NOTE: Garmin® recommends a torque specification of the ...cable into the AC adapter or a computer USB port. 4 Plug the AC adapter into place. Installing the Standard Mount For the best GPS...

Quick Start Manual
Page 3
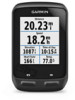
... Page The connections page displays the status of the sky to acquire satellite signals. Home Screen Overview The home screen gives you to use the GPS tracking and navigation features, you turn the device on -screen instructions. 3 If your device included a heart rate monitor and a GSC™ 10,... to change the settings. A flashing icon means the device is running, tap the screen to change your bike profile. Select to unlock the device. 2 Lift the Edge off . Á Select to mark a new lap. Â Select to start and stop the timer. It may need a clear view of the ...
... Page The connections page displays the status of the sky to acquire satellite signals. Home Screen Overview The home screen gives you to use the GPS tracking and navigation features, you turn the device on -screen instructions. 3 If your device included a heart rate monitor and a GSC™ 10,... to change the settings. A flashing icon means the device is running, tap the screen to change your bike profile. Select to unlock the device. 2 Lift the Edge off . Á Select to mark a new lap. Â Select to start and stop the timer. It may need a clear view of the ...


