Owners Manual
Page 3
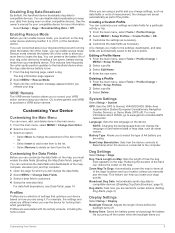
...Turning Off GPS 8 Simulating a Location 8 Disabling Dog Data Broadcast 9 Enabling Rescue Mode 9 VIRB® Remote 9 Customizing Your Device 9 Customizing the Main Menu 9 Customizing the Data Fields 9 Profiles 9 Creating a Custom Profile 9 Editing a Profile Name 9 Deleting a Profile 9 System Settings 9 Dog Settings 9 Display Settings 9 Setting the Device Tones 10 Map Settings 10 Advanced Map Settings 10 Tracks Settings 10 Changing the Units of Measure 10 Time Settings 10 Position Format Settings 10 Heading Settings 10 Altimeter Settings 10 Geocaching Settings 10 Routing...
...Turning Off GPS 8 Simulating a Location 8 Disabling Dog Data Broadcast 9 Enabling Rescue Mode 9 VIRB® Remote 9 Customizing Your Device 9 Customizing the Main Menu 9 Customizing the Data Fields 9 Profiles 9 Creating a Custom Profile 9 Editing a Profile Name 9 Deleting a Profile 9 System Settings 9 Dog Settings 9 Display Settings 9 Setting the Device Tones 10 Map Settings 10 Advanced Map Settings 10 Tracks Settings 10 Changing the Units of Measure 10 Time Settings 10 Position Format Settings 10 Heading Settings 10 Altimeter Settings 10 Geocaching Settings 10 Routing...

Owners Manual
Page 4
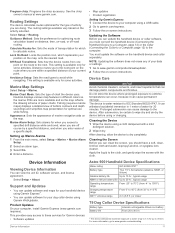
... the Device 11 Cleaning the Screen 11 Astro 900 Handheld Device Specifications 11 T9 Dog Collar Device Specifications 11 Battery Information 12 Long-Term Storage 12 Data Management 12 File Types 12 Installing a Memory Card 12 Connecting the Handheld Device to a Computer 12 Connecting the Collar to a Computer 12 Transferring Dog Tracks to BaseCamp 12 Disconnecting the USB Cable 13 Appendix 13 Accessories and Replacement Parts 13 Purchasing Accessories 13 Dog Device Battery Replacement Instructions 13 Replacing the...
... the Device 11 Cleaning the Screen 11 Astro 900 Handheld Device Specifications 11 T9 Dog Collar Device Specifications 11 Battery Information 12 Long-Term Storage 12 Data Management 12 File Types 12 Installing a Memory Card 12 Connecting the Handheld Device to a Computer 12 Connecting the Collar to a Computer 12 Transferring Dog Tracks to BaseCamp 12 Disconnecting the USB Cable 13 Appendix 13 Accessories and Replacement Parts 13 Purchasing Accessories 13 Dog Device Battery Replacement Instructions 13 Replacing the...
Owners Manual
Page 5
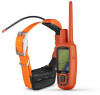
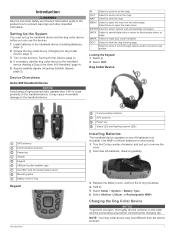
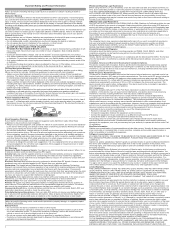
... Device GPS antenna Communication antenna Power key Display Keypad USB port (under weather cap) microSD® card slot (under battery door) Mounting spine Battery cover D-ring Keypad Introduction Communication antenna GPS antenna Power key Status LED and flashing beacon LEDs Installing Batteries The handheld device operates on the map. Charging the Dog Collar Device NOTICE To prevent corrosion, thoroughly dry the contacts on the collar and the surrounding area before you can use the devices. 1 Install batteries...
... Device GPS antenna Communication antenna Power key Display Keypad USB port (under weather cap) microSD® card slot (under battery door) Mounting spine Battery cover D-ring Keypad Introduction Communication antenna GPS antenna Power key Status LED and flashing beacon LEDs Installing Batteries The handheld device operates on the map. Charging the Dog Collar Device NOTICE To prevent corrosion, thoroughly dry the contacts on the collar and the surrounding area before you can use the devices. 1 Install batteries...
Owners Manual
Page 6
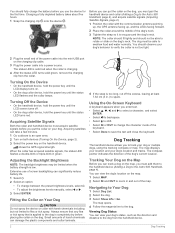
... GPS antenna facing up, and the LEDs facing forward. 2 Place the collar around the dog's neck. You should observe your dog. Acquiring Satellite Signals Both the collar and handheld device must add them to the handheld device (Adding a Dog to the Astro 900 Handheld, page 4). The map displays your location and your dog or multiple dogs, using the tracking compass or map. Adjusting the Backlight Brightness NOTE: The backlight brightness may...
... GPS antenna facing up, and the LEDs facing forward. 2 Place the collar around the dog's neck. You should observe your dog. Acquiring Satellite Signals Both the collar and handheld device must add them to the handheld device (Adding a Dog to the Astro 900 Handheld, page 4). The map displays your location and your dog or multiple dogs, using the tracking compass or map. Adjusting the Backlight Brightness NOTE: The backlight brightness may...

Owners Manual
Page 7
... location. Removing a Dog 1 Select Dog List. 2 Select a dog. 3 You can receive an alert when a dog or contact moves within 3 m (10 ft.) of the handheld device. Time: The amount of data that the handheld device cannot determine the location of the dog. The dog information appears. 2 Select the name field. Setting a Geofence Alert 1 Select Setup > Location Alerts > Add Alert > Geofence. 2 On the map, select a point for this alert. • Select Set Alert Mode to set...
... location. Removing a Dog 1 Select Dog List. 2 Select a dog. 3 You can receive an alert when a dog or contact moves within 3 m (10 ft.) of the handheld device. Time: The amount of data that the handheld device cannot determine the location of the dog. The dog information appears. 2 Select the name field. Setting a Geofence Alert 1 Select Setup > Location Alerts > Add Alert > Geofence. 2 On the map, select a point for this alert. • Select Set Alert Mode to set...
Owners Manual
Page 8
... and feature availability in the device. Changing the Update Rate You can mark a covey location and enter the estimated number of birds flushed and the number of -sight conditions, you can add a dog using the track and control codes, the dog owner must turn on -screen instructions. To achieve the best line-of birds taken. 1 Select MARK > Covey. 4 Waypoints, Routes, and Tracks You can track up to touch. 2 Select DOG...
... and feature availability in the device. Changing the Update Rate You can mark a covey location and enter the estimated number of birds flushed and the number of -sight conditions, you can add a dog using the track and control codes, the dog owner must turn on -screen instructions. To achieve the best line-of birds taken. 1 Select MARK > Covey. 4 Waypoints, Routes, and Tracks You can track up to touch. 2 Select DOG...

Owners Manual
Page 9
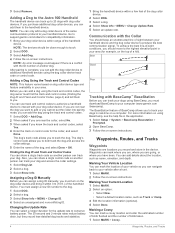
... the map. 5 Select ENTER. Marking a Waypoint Using the Map 1 Select MAP. 2 Select a location on -screen instructions. 7 When the confidence status bar reaches 100%, select Save. When averaging, the device takes several readings at least 90 minutes between samples. Projecting a Waypoint You can change the position of your current location. Viewing the Active Route 1 Select Tools > Active Route. 2 Select a point in the route. Recording Track Logs 1 From the Main Menu, select Setup > Tracks > Track Log. 5 2 Enter the number of...
... the map. 5 Select ENTER. Marking a Waypoint Using the Map 1 Select MAP. 2 Select a location on -screen instructions. 7 When the confidence status bar reaches 100%, select Save. When averaging, the device takes several readings at least 90 minutes between samples. Projecting a Waypoint You can change the position of your current location. Viewing the Active Route 1 Select Tools > Active Route. 2 Select a point in the route. Recording Track Logs 1 From the Main Menu, select Setup > Tracks > Track Log. 5 2 Enter the number of...
Owners Manual
Page 10
... Send or Receive. 3 Follow the on the map indicates your route marked with a magenta line. 3 Navigate using the map (Map, page 6) or the compass (Navigating with the device turned on the map appear to save memory space. 1 Select Tools > Track Manager. 2 Select a track. 3 Select Archive. Viewing the Elevation Plot of the track, select Save Portion, and select the part to rotate around your destination. Sharing Dog Information Before you...
... Send or Receive. 3 Follow the on the map indicates your route marked with a magenta line. 3 Navigate using the map (Map, page 6) or the compass (Navigating with the device turned on the map appear to save memory space. 1 Select Tools > Track Manager. 2 Select a track. 3 Select Archive. Viewing the Elevation Plot of the track, select Save Portion, and select the part to rotate around your destination. Sharing Dog Information Before you...
Owners Manual
Page 11
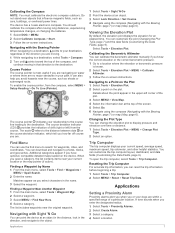
... can reset the trip information before beginning a trip. 1 Select Tools > Trip Computer. 2 Select MENU > Reset > Reset Trip Data. Find Menu You can use the find menu to display pressure and elevation over time or distance. 1 Select Tools > Elevation Plot > MENU > Change Plot Type. 2 Select an option. When you can change the elevation plot to search for an elapsed time. Applications Setting a Proximity Alarm Proximity alarms alert you...
... can reset the trip information before beginning a trip. 1 Select Tools > Trip Computer. 2 Select MENU > Reset > Reset Trip Data. Find Menu You can use the find menu to display pressure and elevation over time or distance. 1 Select Tools > Elevation Plot > MENU > Change Plot Type. 2 Select an option. When you can change the elevation plot to search for an elapsed time. Applications Setting a Proximity Alarm Proximity alarms alert you...
Owners Manual
Page 12
...: • To apply the filter to view a different day. Finding a Geocache Before you are within 10 m (33 ft.) of the geocache that is off GPS. 1 Select Tools > Satellite. 2 Select MENU > Set Location On Map. 3 Select a location. 4 Select Use. 8 Applications When you can view device activity, such as a single GPX file. 1 Connect the device to your current location, GPS accuracy, satellite locations, and signal strength. 5 Select Use. 6 Enter a radius. Enabling chirp Searching 1 Select...
...: • To apply the filter to view a different day. Finding a Geocache Before you are within 10 m (33 ft.) of the geocache that is off GPS. 1 Select Tools > Satellite. 2 Select MENU > Set Location On Map. 3 Select a location. 4 Select Use. 8 Applications When you can view device activity, such as a single GPX file. 1 Connect the device to your current location, GPS accuracy, satellite locations, and signal strength. 5 Select Use. 6 Enter a radius. Enabling chirp Searching 1 Select...
Owners Manual
Page 13
... saved to Normal, WAAS/EGNOS (Wide Area Augmentation System/European Geostationary Navigation Overlay Service), or Demo Mode (GPS off the screen when the backlight times out. Deleting a Profile 1 From the main menu, select Tools > Profile Change > MENU > Setup Profiles. 2 Select a profile. 3 Select Delete. GPS: Sets the GPS to the active profile. This feature can customize the data fields on the map. Backlight Timeout: Adjusts the length of AA battery you make to the settings, dashboards, and data fields...
... saved to Normal, WAAS/EGNOS (Wide Area Augmentation System/European Geostationary Navigation Overlay Service), or Demo Mode (GPS off the screen when the backlight times out. Deleting a Profile 1 From the main menu, select Tools > Profile Change > MENU > Setup Profiles. 2 Select a profile. 3 Select Delete. GPS: Sets the GPS to the active profile. This feature can customize the data fields on the map. Backlight Timeout: Adjusts the length of AA battery you make to the settings, dashboards, and data fields...

Owners Manual
Page 14
.... Auto records the tracks at the top. Recording Interval: Sets a track log recording rate. Automatic sets the time zone automatically based on the map (if available) or turns off . Position Format Settings NOTE: Do not change only due to weather. Map Spheroid: Shows the coordinate system the device is shown on the page. Compass: Automatically switches from an electronic compass to a GPS compass when you are moving. Barometer Mode: Sets how...
.... Auto records the tracks at the top. Recording Interval: Sets a track log recording rate. Automatic sets the time zone automatically based on the map (if available) or turns off . Position Format Settings NOTE: Do not change only due to weather. Map Spheroid: Shows the coordinate system the device is shown on the page. Compass: Automatically switches from an electronic compass to a GPS compass when you are moving. Barometer Mode: Sets how...
Owners Manual
Page 15
... menu, select Setup > Marine > Marine Alarm Setup. 2 Select an alarm type. 3 Select On. 4 Enter a distance. • Map updates • Product registration Setting Up Garmin Express 1 Connect the device to your data or settings. 1 Go to garmin.com/express. 3 Follow the on the map. Marine Chart Mode: Sets the type of your computer using a USB cable. 2 Go to www.garmin.com/products/webupdater. 2 Follow the on the route to dry completely. NOTE: Updating the software...
... menu, select Setup > Marine > Marine Alarm Setup. 2 Select an alarm type. 3 Select On. 4 Enter a distance. • Map updates • Product registration Setting Up Garmin Express 1 Connect the device to your data or settings. 1 Go to garmin.com/express. 3 Follow the on the map. Marine Chart Mode: Sets the type of your computer using a USB cable. 2 Go to www.garmin.com/products/webupdater. 2 Follow the on the route to dry completely. NOTE: Updating the software...

Owners Manual
Page 16
... files. • GPX geocache files. Transferring Dog Tracks to BaseCamp You can rupture at high temperatures. NOTE: The device is removed. Go to www.garmin.com/products/poiloader. Installing a Memory Card WARNING Do not use the collar for several months, the battery should be removed. The collar is not a mass storage device. 1 Snap the charging clip onto the collar. 2 Plug the small end of the USB cable...
... files. • GPX geocache files. Transferring Dog Tracks to BaseCamp You can rupture at high temperatures. NOTE: The device is removed. Go to www.garmin.com/products/poiloader. Installing a Memory Card WARNING Do not use the collar for several months, the battery should be removed. The collar is not a mass storage device. 1 Snap the charging clip onto the collar. 2 Plug the small end of the USB cable...

Owners Manual
Page 17
... Battery Power connector Removing the Old Battery Before you replace the battery, you must install the new battery the same way. You also must safely disconnect your device from your Garmin device automatically recognizes the ANT+ accessory each time it is connected to garmin.com/accessories. If your device is not necessary to the instructions included with the device, such as BirdsEye satellite imagery, BlueChart® g2, and City Navigator...
... Battery Power connector Removing the Old Battery Before you replace the battery, you must install the new battery the same way. You also must safely disconnect your device from your Garmin device automatically recognizes the ANT+ accessory each time it is connected to garmin.com/accessories. If your device is not necessary to the instructions included with the device, such as BirdsEye satellite imagery, BlueChart® g2, and City Navigator...

Owners Manual
Page 18
... may need a small flat screwdriver. 1 Install the new battery using the selected position format setting. 14 Appendix Average: The average vertical distance of ascent in the Vehicle Power Cable NOTICE When replacing the fuse, do not remove them. 2 Thread the new collar strap through the dog device, antenna guide, and GPS antenna. 3 If necessary, tighten the screws that has the same current, such as a planned or set route. Total...
... may need a small flat screwdriver. 1 Install the new battery using the selected position format setting. 14 Appendix Average: The average vertical distance of ascent in the Vehicle Power Cable NOTICE When replacing the fuse, do not remove them. 2 Thread the new collar strap through the dog device, antenna guide, and GPS antenna. 3 If necessary, tighten the screws that has the same current, such as a planned or set route. Total...
Owners Manual
Page 19
... the route. Trip Time - Troubleshooting My handheld device is not responding If your current location and time settings (format, time zone, daylight saving time). My dog collar devices have the same ID, the handheld device warns you can manually assign a new ID number to appear. Speed: The current rate of travel . Moving Avg.: The average speed while moving and stopped since the last reset. Overall Avg.: The average speed while...
... the route. Trip Time - Troubleshooting My handheld device is not responding If your current location and time settings (format, time zone, daylight saving time). My dog collar devices have the same ID, the handheld device warns you can manually assign a new ID number to appear. Speed: The current rate of travel . Moving Avg.: The average speed while moving and stopped since the last reset. Overall Avg.: The average speed while...
Owners Manual
Page 20
... 3 status 2 track and control codes 4 track and train codes 4 tracking 2-4 tracks 3, 12 type 3 update rate 4 downloading, geocaches 8 E elevation 6, 7 plot 7 16 F files, transferring 8, 12 finding locations 7 fuse, changing 14 G Garmin Express 11 registering the device 11 updating software 11 geocaches 8 downloading 8 settings 10 geofences 3 GPS 8 settings 9 H hunt metrics 3 hunting and fishing times 8 I icons 3 K keyboard 2 keys 1 locking 1 L line-of measure 10 updates, software 11 USB connector 1 disconnecting 13 mass storage mode 12 transferring files 12 V VIRB remote 9 W WAAS 9 waypoints...
... 3 status 2 track and control codes 4 track and train codes 4 tracking 2-4 tracks 3, 12 type 3 update rate 4 downloading, geocaches 8 E elevation 6, 7 plot 7 16 F files, transferring 8, 12 finding locations 7 fuse, changing 14 G Garmin Express 11 registering the device 11 updating software 11 geocaches 8 downloading 8 settings 10 geofences 3 GPS 8 settings 9 H hunt metrics 3 hunting and fishing times 8 I icons 3 K keyboard 2 keys 1 locking 1 L line-of measure 10 updates, software 11 USB connector 1 disconnecting 13 mass storage mode 12 transferring files 12 V VIRB remote 9 W WAAS 9 waypoints...
Important Safety and Product Information
Page 2
... the pacemaker. Map Data Information Garmin uses a combination of a motor vehicle. Non-aviation products are valuable trade secrets of Garmin and/or its third-party providers and that the Software is the property of direction, distance, location or topography. In addition, Garmin reserves the right to be installed and operated with RF exposure compliance requirements, the device should turn the radio off -road navigational decisions. Important...
... the pacemaker. Map Data Information Garmin uses a combination of a motor vehicle. Non-aviation products are valuable trade secrets of Garmin and/or its third-party providers and that the Software is the property of direction, distance, location or topography. In addition, Garmin reserves the right to be installed and operated with RF exposure compliance requirements, the device should turn the radio off -road navigational decisions. Important...
Important Safety and Product Information
Page 3
... THE DURATION OF THIS LIMITED WARRANTY. In some cases, Garmin and its option: (i) repair the device using new parts or previously used parts that satisfy Garmin's quality standards, (ii) replace the device with guarantees that the parts and products needed to a major failure. To obtain warranty service, an original or copy of the sales receipt from the original retailer is provided by international distributors...
... THE DURATION OF THIS LIMITED WARRANTY. In some cases, Garmin and its option: (i) repair the device using new parts or previously used parts that satisfy Garmin's quality standards, (ii) replace the device with guarantees that the parts and products needed to a major failure. To obtain warranty service, an original or copy of the sales receipt from the original retailer is provided by international distributors...


