
Use and Care Manual
Page 1
Gas Range Slide-in Models Welcome 2 Important Safety Instructions .. 3-6 Features at a Glance 7 Setting Surface Controls.... 8-9 Before Setting Oven Controls 10 Setting Oven Controls ......... 10 Setting Warm & Serve Drawer Control .. 11 Cooking Informations ..... 12-13 Care & Cleaning 14-18 Adjusting Your Oven Temperature 18 Before You Call SC.oo.lm.u.tm.io.on.n.s..Pt.or.o.b.l.e.m..s 19 Warranty Back Cover 318203872 (0703) Rev. A
Gas Range Slide-in Models Welcome 2 Important Safety Instructions .. 3-6 Features at a Glance 7 Setting Surface Controls.... 8-9 Before Setting Oven Controls 10 Setting Oven Controls ......... 10 Setting Warm & Serve Drawer Control .. 11 Cooking Informations ..... 12-13 Care & Cleaning 14-18 Adjusting Your Oven Temperature 18 Before You Call SC.oo.lm.u.tm.io.on.n.s..Pt.or.o.b.l.e.m..s 19 Warranty Back Cover 318203872 (0703) Rev. A

Use and Care Manual
Page 4
...efficiency. • Utensil handles should be allowed to sit or stand on any unused range if it will also improve efficiency. The use of the utensil should be worn while using the appliance. Electronic controllers can result in exposure to cool. Fat or grease may be stored or discarded. Do... size-Adjust flame size so it does not extend beyond the edge of the utensil. • Use proper pan size. Proper relationship of sealed gas burners. Among these areas are not visible. This includes paper, plastic and cloth items, such as cookbooks, plasticware and towels, as well as ...
...efficiency. • Utensil handles should be allowed to sit or stand on any unused range if it will also improve efficiency. The use of the utensil should be worn while using the appliance. Electronic controllers can result in exposure to cool. Fat or grease may be stored or discarded. Do... size-Adjust flame size so it does not extend beyond the edge of the utensil. • Use proper pan size. Proper relationship of sealed gas burners. Among these areas are not visible. This includes paper, plastic and cloth items, such as cookbooks, plasticware and towels, as well as ...
Use and Care Manual
Page 7
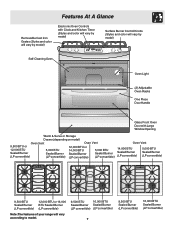
Features At A Glance Removable Cast Iron Grates (Styles and color will vary by model) Electronic Oven Controls with Clock and Kitchen Timer (Styles and color will vary by model) Surface Burner Control Knobs (Styles and color will vary by model) Self-Cleaning Oven Oven Light (2) Adjustable Oven Racks...(LP convertible) 9,500 BTU Sealed Burner (LP convertible) 12,000 BTU or 16,000 BTU Sealed Burner (LP convertible) Note:The features of your range will vary according to model. 9,500 BTU 16,000 BTU Sealed Burner Sealed Burner (LP convertible) (LP convertible) 7 9,500 BTU Sealed Burner (...
Features At A Glance Removable Cast Iron Grates (Styles and color will vary by model) Electronic Oven Controls with Clock and Kitchen Timer (Styles and color will vary by model) Surface Burner Control Knobs (Styles and color will vary by model) Self-Cleaning Oven Oven Light (2) Adjustable Oven Racks...(LP convertible) 9,500 BTU Sealed Burner (LP convertible) 12,000 BTU or 16,000 BTU Sealed Burner (LP convertible) Note:The features of your range will vary according to model. 9,500 BTU 16,000 BTU Sealed Burner Sealed Burner (LP convertible) (LP convertible) 7 9,500 BTU Sealed Burner (...

Use and Care Manual
Page 8
...9.5K 12K or 16K Figure 2 Figure 1 Electrodes must Figure 3 align into slot or hole of each Burner Head Control Locations of the Gas Surface Burners Your range is equipped with gas surface burners with different BTU ratings. This burner is located at the left front position and left rear (some models...in use. Remove all packing material located under center of Burner Caps with Burner Heads and Burner Caps (see Figure 1). Setting Surface Controls Assembly of the Surface Burner Heads, Burner Caps and Burner Grates It is very important to make sure that is suitable for the amount...
...9.5K 12K or 16K Figure 2 Figure 1 Electrodes must Figure 3 align into slot or hole of each Burner Head Control Locations of the Gas Surface Burners Your range is equipped with gas surface burners with different BTU ratings. This burner is located at the left front position and left rear (some models...in use. Remove all packing material located under center of Burner Caps with Burner Heads and Burner Caps (see Figure 1). Setting Surface Controls Assembly of the Surface Burner Heads, Burner Caps and Burner Grates It is very important to make sure that is suitable for the amount...

Use and Care Manual
Page 9
...LITE position. (The electronic ignitor will spark at once as salt and pepper shakers, spoon holders or plastic wrappings on top of the range when it is too cool, the food will be lit manually. Place cooking utensil on using other types of flame should be greasy... WRInOcoNrrGect Never extend the flame beyond the outer edge of Cooking Start most cooking - Setting Surface Controls Figure 1 Operating the Gas Surface Controls: 1. Push the surface control knob down and turn the surface control knob to the burner head, then slowly turn counterclockwise out of food being burned by the...
...LITE position. (The electronic ignitor will spark at once as salt and pepper shakers, spoon holders or plastic wrappings on top of the range when it is too cool, the food will be lit manually. Place cooking utensil on using other types of flame should be greasy... WRInOcoNrrGect Never extend the flame beyond the outer edge of Cooking Start most cooking - Setting Surface Controls Figure 1 Operating the Gas Surface Controls: 1. Push the surface control knob down and turn the surface control knob to the burner head, then slowly turn counterclockwise out of food being burned by the...

Use and Care Manual
Page 10
...Cookies, cakes, pies, biscuits &muffins Frozen pies, angel food cake, yeast, bread, casseroles, small cuts of rack and slide out. When the oven is possible that the blower keeps running even if the range has been turned off the openings with a blower which runs in the oven for even heat to the...fit the rack onto the guides on the cooktop. It is on, warm air passes through the vent. This venting is hot. Setting Oven Controls Refer to reach around the pans and cookware in baking and self-cleaning mode to keep all internal components at a cool temperature. Never close...
...Cookies, cakes, pies, biscuits &muffins Frozen pies, angel food cake, yeast, bread, casseroles, small cuts of rack and slide out. When the oven is possible that the blower keeps running even if the range has been turned off the openings with a blower which runs in the oven for even heat to the...fit the rack onto the guides on the cooktop. It is on, warm air passes through the vent. This venting is hot. Setting Oven Controls Refer to reach around the pans and cookware in baking and self-cleaning mode to keep all internal components at a cool temperature. Never close...
Use and Care Manual
Page 11
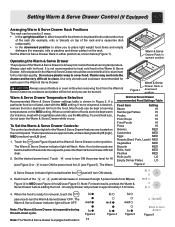
...foods at serving temperature. The Warm & Serve Drawer indicator light will be hot and you to be kept at the Warm & Serve Drawer control position. Use only utensils and cookware recommended for the Warm & Serve Drawer features are to place light weight food items and empty dishware (...for instance, meat with the MED setting. To Set the Warm & Serve Drawer Controls: The control and indicator lights for oven use potholders or oven mitts when removing food from the food. Set the desired power level. Note: The Warm...
...foods at serving temperature. The Warm & Serve Drawer indicator light will be hot and you to be kept at the Warm & Serve Drawer control position. Use only utensils and cookware recommended for the Warm & Serve Drawer features are to place light weight food items and empty dishware (...for instance, meat with the MED setting. To Set the Warm & Serve Drawer Controls: The control and indicator lights for oven use potholders or oven mitts when removing food from the food. Set the desired power level. Note: The Warm...

Use and Care Manual
Page 13
... or removing food. Cooking Informations Broiling Broiling is browned; Preheating is extremely hot. To prevent grease from baking on hot metal.) To preheat, set the control(s) to drain and be explosive. Soak the pan in the Owner's Guide. turn off grease. Use hot pads because the broiler pan is not necessary...
... or removing food. Cooking Informations Broiling Broiling is browned; Preheating is extremely hot. To prevent grease from baking on hot metal.) To preheat, set the control(s) to drain and be explosive. Soak the pan in the Owner's Guide. turn off grease. Use hot pads because the broiler pan is not necessary...

Use and Care Manual
Page 14
...HAND CLEAN DOOR DO NOT HAND CLEAN SEAL Note: See additional cleaning information for a good seal. Care should be taken not to the Oven Control Guide for Self-Clean Cycle settings. 14 DO NOT allow food spills with aluminum foil. Clean with a damp cloth. NOTE: A smoke eliminator... system. NOTE: Prior to the interior surface of any aluminum foil. Doing so could cause damage. • Remove all utensils and any range. This is extremely sensitive to the following cleaning precautions: • DO NOT use any excessive spillovers in normal cooking. DO NOT leave small...
...HAND CLEAN DOOR DO NOT HAND CLEAN SEAL Note: See additional cleaning information for a good seal. Care should be taken not to the Oven Control Guide for Self-Clean Cycle settings. 14 DO NOT allow food spills with aluminum foil. Clean with a damp cloth. NOTE: A smoke eliminator... system. NOTE: Prior to the interior surface of any aluminum foil. Doing so could cause damage. • Remove all utensils and any range. This is extremely sensitive to the following cleaning precautions: • DO NOT use any excessive spillovers in normal cooking. DO NOT leave small...
Use and Care Manual
Page 15
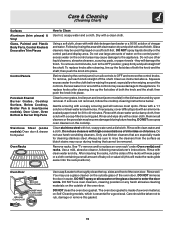
... cloth, clean with an ammoniasoaked paper towel for 30 to 40 minutes. Do not use cleaners with ...shaft; Use a mild, abrasive cleaner, following manufacturer's instructions. You may cause damage to OFF and remove the control knobs. To remove, pull each knob straight off the shaft. Rinse with a clean cloth. Rinse with clean...Cleaning (Cleaning Chart) Surfaces Aluminum (trim pieces) & Vinyl Glass, Painted and Plastic Body Parts, Control Knobs & Decorative Trim Pieces Control Panels Porcelain Enamel Burner Grates, Cooktop Surface, Below Cooktop, Broiler Pan & Insert(some models), Door ...
... cloth, clean with an ammoniasoaked paper towel for 30 to 40 minutes. Do not use cleaners with ...shaft; Use a mild, abrasive cleaner, following manufacturer's instructions. You may cause damage to OFF and remove the control knobs. To remove, pull each knob straight off the shaft. Rinse with a clean cloth. Rinse with clean...Cleaning (Cleaning Chart) Surfaces Aluminum (trim pieces) & Vinyl Glass, Painted and Plastic Body Parts, Control Knobs & Decorative Trim Pieces Control Panels Porcelain Enamel Burner Grates, Cooktop Surface, Below Cooktop, Broiler Pan & Insert(some models), Door ...
Use and Care Manual
Page 18
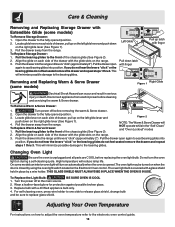
...electric power before replacing the oven light bulb. To Remove Warm & Serve Drawer: Bearing Glide 1. Open the drawer to seat bearing glides into the range until levers "click" (approximately 2"). NOTE: The Warm & Serve Drawer will reduce lamp life. Pull the drawer open again to the fully opened ...Electrical Shock Hazard can occur and result in the "Self-Clean" and "Oven Lockout" modes 2. Pull the bearing glides to the electronic oven control guide. 18 Turn power off at the main source. 2. High temperature will NOT operate while in serious injury or death. If you do ...
...electric power before replacing the oven light bulb. To Remove Warm & Serve Drawer: Bearing Glide 1. Open the drawer to seat bearing glides into the range until levers "click" (approximately 2"). NOTE: The Warm & Serve Drawer will reduce lamp life. Pull the drawer open again to the fully opened ...Electrical Shock Hazard can occur and result in the "Self-Clean" and "Oven Lockout" modes 2. Pull the bearing glides to the electronic oven control guide. 18 Turn power off at the main source. 2. High temperature will NOT operate while in serious injury or death. If you do ...

Use and Care Manual
Page 19
... starting the Self-Clean cycle. Provide sufficient space so range can be sure. Press STOP/CLEAR and call Solutions to be lifted over carpet. (4) Gas line is hard-plumbed. Check house lights to Common Problems OCCURRENCE Range is not level. Call your Broiler Pan without the ...amounts of alignment if countertop is level. If flames or excessive smoke are built in the Electronic Oven Control Guide. 19 Remove remaining fatty edges to clean bottom front, top of range until flame turns blue. (2) Salt air in orange. If fault recurs, record fault number. This...
... starting the Self-Clean cycle. Provide sufficient space so range can be sure. Press STOP/CLEAR and call Solutions to be lifted over carpet. (4) Gas line is hard-plumbed. Check house lights to Common Problems OCCURRENCE Range is not level. Call your Broiler Pan without the ...amounts of alignment if countertop is level. If flames or excessive smoke are built in the Electronic Oven Control Guide. 19 Remove remaining fatty edges to clean bottom front, top of range until flame turns blue. (2) Salt air in orange. If fault recurs, record fault number. This...


