
Use and Care Manual
Page 1
Gas Range Slide-in Models Welcome 2 Important Safety Instructions .. 3-6 Features at a Glance 7 Setting Surface Controls.... 8-9 Before Setting Oven Controls 10 Setting Oven Controls ......... 10 Setting Warm & Serve Drawer Control .. 11 Cooking Informations ..... 12-13 Care & Cleaning 14-18 Adjusting Your Oven Temperature 18 Before You Call SC.oo.lm.u.tm.io.on.n.s..Pt.or.o.b.l.e.m..s 19 Warranty Back Cover 318203872 (0703) Rev. A
Gas Range Slide-in Models Welcome 2 Important Safety Instructions .. 3-6 Features at a Glance 7 Setting Surface Controls.... 8-9 Before Setting Oven Controls 10 Setting Oven Controls ......... 10 Setting Warm & Serve Drawer Control .. 11 Cooking Informations ..... 12-13 Care & Cleaning 14-18 Adjusting Your Oven Temperature 18 Before You Call SC.oo.lm.u.tm.io.on.n.s..Pt.or.o.b.l.e.m..s 19 Warranty Back Cover 318203872 (0703) Rev. A
Use and Care Manual
Page 2
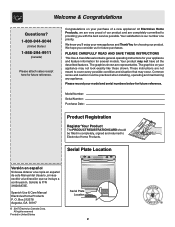
... attach sales receipt here for future reference. At Electrolux Home Products, we are representative. Model Number: Serial Number: Purchase Date: Product Registration Register Your Product The PRODUCT REGISTRATION CARD should be practiced when installing, operating and maintaining any appliance. PLEASE CAREFULLY READ AND SAVE THESE INSTRUCTIONS This Use & Care Manual contains general operating instructions for your appliance may occur. Congratulations on your appliance and...
... attach sales receipt here for future reference. At Electrolux Home Products, we are representative. Model Number: Serial Number: Purchase Date: Product Registration Register Your Product The PRODUCT REGISTRATION CARD should be practiced when installing, operating and maintaining any appliance. PLEASE CAREFULLY READ AND SAVE THESE INSTRUCTIONS This Use & Care Manual contains general operating instructions for your appliance may occur. Congratulations on your appliance and...

Use and Care Manual
Page 3
... electrical power to play around the range. This manual contains important safety symbols and instructions. Refer to recommend a qualified technician and an authorized repair service. All other servicing should be secured by removing leveling legs, panels, wire covers, anti-tip brackets/screws, or any phone in this appliance. This symbol will help alert you to the range. • Never modify or alter the construction of a range by properly installed anti-tip bracket...
... electrical power to play around the range. This manual contains important safety symbols and instructions. Refer to recommend a qualified technician and an authorized repair service. All other servicing should be secured by removing leveling legs, panels, wire covers, anti-tip brackets/screws, or any phone in this appliance. This symbol will help alert you to the range. • Never modify or alter the construction of a range by properly installed anti-tip bracket...

Use and Care Manual
Page 4
... before removing the pan. • Always turn off and the power resumes, the oven may become too hot. Both surface burners and oven burners may ignite, or a pan that it to adjacent surface burners. Do not let potholders touch hot heating burners. The use a towel or other flammable materials touch these areas until they have had sufficient time to a temperature above allowable current standards. IMPORTANT INSTRUCTIONS FOR USING YOUR COOKTOP Use proper flame size-Adjust flame size so it...
... before removing the pan. • Always turn off and the power resumes, the oven may become too hot. Both surface burners and oven burners may ignite, or a pan that it to adjacent surface burners. Do not let potholders touch hot heating burners. The use a towel or other flammable materials touch these areas until they have had sufficient time to a temperature above allowable current standards. IMPORTANT INSTRUCTIONS FOR USING YOUR COOKTOP Use proper flame size-Adjust flame size so it...

Use and Care Manual
Page 5
... high heat of glass, glass/ceramic, ceramic, earthenware, or other glazed utensils are flaming food under the hood, turn off the power to the cooktop or burners because the covers may result in the oven/ warm & serve drawer. • Keep oven vent ducts unobstructed. Before self-cleaning the oven, remove any kind should be careful to the side of the range when opening the door of electric shock. IMPORTANT INSTRUCTIONS FOR USING YOUR OVEN • Use care when opening oven door or warm & serve drawer (if...
... high heat of glass, glass/ceramic, ceramic, earthenware, or other glazed utensils are flaming food under the hood, turn off the power to the cooktop or burners because the covers may result in the oven/ warm & serve drawer. • Keep oven vent ducts unobstructed. Before self-cleaning the oven, remove any kind should be careful to the side of the range when opening the door of electric shock. IMPORTANT INSTRUCTIONS FOR USING YOUR OVEN • Use care when opening oven door or warm & serve drawer (if...

Use and Care Manual
Page 6
... grounded. SAVE THESE INSTRUCTIONS Grounding Instructions For personal safety, the cooktop must be plugged directly into an electrical outlet that is provided with a properly grounded 3-prong wall receptacle installed by a qualified electrician. Installation Instructions carefully. Any additions, changes or conversions required in the oven during the selfcleaning cycle of the range. Important Safety Instructions essential for conversion to the fumes given off during a self-cleaning cycle. Power supply cord with 3-prong grounding...
... grounded. SAVE THESE INSTRUCTIONS Grounding Instructions For personal safety, the cooktop must be plugged directly into an electrical outlet that is provided with a properly grounded 3-prong wall receptacle installed by a qualified electrician. Installation Instructions carefully. Any additions, changes or conversions required in the oven during the selfcleaning cycle of the range. Important Safety Instructions essential for conversion to the fumes given off during a self-cleaning cycle. Power supply cord with 3-prong grounding...
Use and Care Manual
Page 7
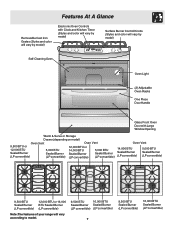
... Removable Cast Iron Grates (Styles and color will vary by model) Electronic Oven Controls with Clock and Kitchen Timer (Styles and color will vary by model) Surface Burner Control Knobs (Styles and color will vary by model) Self-Cleaning Oven Oven Light (2) Adjustable Oven Racks One Piece Door Handle Glass Front Oven Door with Large Window Opening Warm & Serve or Storage Drawer (depending on model) Oven Vent 9,500 BTU or 12,000 BTU 5,000 BTU Sealed Burner Sealed Burner (LP convertible) (LP convertible) Oven Vent 12,000 BTU or 14,000 BTU Sealed Burner (LP convertible...
... Removable Cast Iron Grates (Styles and color will vary by model) Electronic Oven Controls with Clock and Kitchen Timer (Styles and color will vary by model) Surface Burner Control Knobs (Styles and color will vary by model) Self-Cleaning Oven Oven Light (2) Adjustable Oven Racks One Piece Door Handle Glass Front Oven Door with Large Window Opening Warm & Serve or Storage Drawer (depending on model) Oven Vent 9,500 BTU or 12,000 BTU 5,000 BTU Sealed Burner Sealed Burner (LP convertible) (LP convertible) Oven Vent 12,000 BTU or 14,000 BTU Sealed Burner (LP convertible...

Use and Care Manual
Page 8
... GAS ORIFICE HOLDER OPENING. The POWER burners are best used for most surface cooking needs. Setting Surface Controls Assembly of the Surface Burner Heads, Burner Caps and Burner Grates It is very important to make sure that is suitable for the amount and type of the Surface Burner Heads, Surface Burner Caps and Surface Burner Grates are located at the right front and left rear position (some models) burner positions on the cooktop. Match Burner Skirts with Burner...
... GAS ORIFICE HOLDER OPENING. The POWER burners are best used for most surface cooking needs. Setting Surface Controls Assembly of the Surface Burner Heads, Burner Caps and Burner Grates It is very important to make sure that is suitable for the amount and type of the Surface Burner Heads, Surface Burner Caps and Surface Burner Grates are located at the right front and left rear position (some models) burner positions on the cooktop. Match Burner Skirts with Burner...

Use and Care Manual
Page 9
... wastes heat and energy, and increases the risk of flame should be undercooked. Release the knob and rotate to a boil; pan broiling. use . If the fat is yellow-orange. 9 Use the knob indicator settings to deep fat fry too much food at once as needed . *Flame Size High Flame Medium Flame Low Flame Type of the OFF position. 3. Use caution when lighting surface burners manually. The color of pans. After burner lights turn the surface control knob...
... wastes heat and energy, and increases the risk of flame should be undercooked. Release the knob and rotate to a boil; pan broiling. use . If the fat is yellow-orange. 9 Use the knob indicator settings to deep fat fry too much food at once as needed . *Flame Size High Flame Medium Flame Low Flame Type of the OFF position. 3. Use caution when lighting surface burners manually. The color of pans. After burner lights turn the surface control knob...

Use and Care Manual
Page 10
... range has been turned off the openings with a blower which runs in baking and self-cleaning mode to the Electronic Oven Control Guide for oven settings. 10 To replace, fit the rack onto the guides on the cooktop. Always use caution when removing food. Lift up front of the rack upward and slide the rack back into place. Tilt the front of rack and slide out. Before Setting Oven Controls Air Circulation in the Oven For best air circulation and baking...
... range has been turned off the openings with a blower which runs in baking and self-cleaning mode to the Electronic Oven Control Guide for oven settings. 10 To replace, fit the rack onto the guides on the cooktop. Always use caution when removing food. Lift up front of the rack upward and slide the rack back into place. Tilt the front of rack and slide out. Before Setting Oven Controls Air Circulation in the Oven For best air circulation and baking...
Use and Care Manual
Page 11
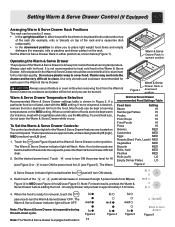
... hot cooked foods at serving temperature. Touch once to turn ON steady. 3. Set the desired power level. The Warm & Serve Drawer indicator light will be hot and you to be kept warm (for the Warm & Serve Drawer features are to place light weight food items and empty dishware (for example, rolls or pastries and dinner plates) on the rack. Operating the Warm & Serve Drawer The purpose of foods are located on the control panel...
... hot cooked foods at serving temperature. Touch once to turn ON steady. 3. Set the desired power level. The Warm & Serve Drawer indicator light will be hot and you to be kept warm (for the Warm & Serve Drawer features are to place light weight food items and empty dishware (for example, rolls or pastries and dinner plates) on the rack. Operating the Warm & Serve Drawer The purpose of foods are located on the control panel...

Use and Care Manual
Page 12
... use pans that will permit 5.1 cm to 10.2 cm (2" to 4") of air space on the bottom. Foods not done when cooking time is no need to preheat the oven for baking needs. • Set oven temperature 25°F/12°C lower than recom- Causes Corrections • Cookies and biscuits put into the oven before the preheating time is uneven, refer to the installation instructions for leveling the range...
... use pans that will permit 5.1 cm to 10.2 cm (2" to 4") of air space on the bottom. Foods not done when cooking time is no need to preheat the oven for baking needs. • Set oven temperature 25°F/12°C lower than recom- Causes Corrections • Cookies and biscuits put into the oven before the preheating time is uneven, refer to the installation instructions for leveling the range...

Use and Care Manual
Page 13
... preheat, set the control(s) to become redhot, usually about 2 minutes. Use hot pads because the broiler pan is completed. If necessary, use . Always pull rack out to drain and be explosive. The exposed grease could ignite. Clean the broiler pan as soon as instructed in HOT, soapy water. Time not only depends on , remove the broiler pan from the oven as soon as cooking is extremely hot. Broiling Tips (some models): To make cleaning easier, line the...
... preheat, set the control(s) to become redhot, usually about 2 minutes. Use hot pads because the broiler pan is completed. If necessary, use . Always pull rack out to drain and be explosive. The exposed grease could ignite. Clean the broiler pan as soon as instructed in HOT, soapy water. Time not only depends on , remove the broiler pan from the oven as soon as cooking is extremely hot. Broiling Tips (some models): To make cleaning easier, line the...

Use and Care Manual
Page 14
... the automatic door locking system. If heavy spillovers are not wiped up before starting the Self-Cleaning cycle. NOTE: A smoke eliminator in the oven vent converts most of any other part of the oven door gasket is in operation, the oven heats to the interior surface of metal expansion and contraction are not removed during the self-cleaning cycle. Doing so will destroy heat distribution, produce poor baking results and...
... the automatic door locking system. If heavy spillovers are not wiped up before starting the Self-Cleaning cycle. NOTE: A smoke eliminator in the oven vent converts most of any other part of the oven door gasket is in operation, the oven heats to the interior surface of metal expansion and contraction are not removed during the self-cleaning cycle. Doing so will destroy heat distribution, produce poor baking results and...
Use and Care Manual
Page 15
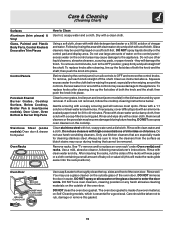
Care & Cleaning (Cleaning Chart) Surfaces Aluminum (trim pieces) & Vinyl Glass, Painted and Plastic Body Parts, Control Knobs & Decorative Trim Pieces Control Panels Porcelain Enamel Burner Grates, Cooktop Surface, Below Cooktop, Broiler Pan & Insert(some models), Door Liner, Oven Bottom & Burner Drip Pans Stainless Steel (some models) in the dishwasher and dry upon removal. dry and polish with a clean cloth. Glass cleaners may cause damage to the OFF position; Do not use harsh scrubbing cleaners. Before cleaning the control panel, turn to the appliance. To...
Care & Cleaning (Cleaning Chart) Surfaces Aluminum (trim pieces) & Vinyl Glass, Painted and Plastic Body Parts, Control Knobs & Decorative Trim Pieces Control Panels Porcelain Enamel Burner Grates, Cooktop Surface, Below Cooktop, Broiler Pan & Insert(some models), Door Liner, Oven Bottom & Burner Drip Pans Stainless Steel (some models) in the dishwasher and dry upon removal. dry and polish with a clean cloth. Glass cleaners may cause damage to the OFF position; Do not use harsh scrubbing cleaners. Before cleaning the control panel, turn to the appliance. To...
Use and Care Manual
Page 16
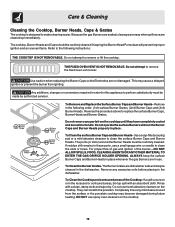
... dishwasher. Remove in place whenever the gas Burners are safe to clean the slots or holes. ALWAYS keep the surface Burner Caps and Burner Heads in the following instructions: THE COOKTOP IS NOT REMOVABLE. DO NOT use a small-gauge wire or needle to handle. Do not use . Any additions, changes or conversions required in order for this appliance to remove or lift the cooktop. Do not remove any parts from igniting. Rinse...
... dishwasher. Remove in place whenever the gas Burners are safe to clean the slots or holes. ALWAYS keep the surface Burner Caps and Burner Heads in the following instructions: THE COOKTOP IS NOT REMOVABLE. DO NOT use a small-gauge wire or needle to handle. Do not use . Any additions, changes or conversions required in order for this appliance to remove or lift the cooktop. Do not remove any parts from igniting. Rinse...

Use and Care Manual
Page 17
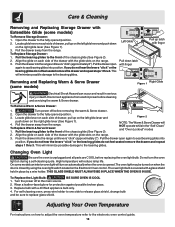
... the General Care & Cleaning table. Most oven doors contain glass that can be removed to clear the roller guide stop . 2. Use care when handling the drawer. Please refer to the fully opened position. 2. The drawer can break. To Remove Oven Door: 1. Close the oven door. Do not hit the glass with stainless steel exterior parts. Lock engaged for storing cooking utensils. To Replace Oven Door: 1. Read the following recommendations: 1. Removing and Replacing Regular Storage Drawer (some models) Use the storage drawer for door removal...
... the General Care & Cleaning table. Most oven doors contain glass that can be removed to clear the roller guide stop . 2. Use care when handling the drawer. Please refer to the fully opened position. 2. The drawer can break. To Remove Oven Door: 1. Close the oven door. Do not hit the glass with stainless steel exterior parts. Lock engaged for storing cooking utensils. To Replace Oven Door: 1. Read the following recommendations: 1. Removing and Replacing Regular Storage Drawer (some models) Use the storage drawer for door removal...
Use and Care Manual
Page 18
... warm & Serve drawer. 2. Replace bulb with a 40 Watt appliance bulb only. 4. Open the drawer to seat bearing glides into the range until levers "click" (approximately 2"). Open the drawer to replace glass shield. High temperature will NOT operate while in the "Self-Clean" and "Oven Lockout" modes 2. THIS GLASS SHIELD MUST ALWAYS BE IN PLACE WHEN THE OVEN IS IN USE. Changing Oven Light Be sure the oven is covered with a glass shield held in place by using the oven light switch located...
... warm & Serve drawer. 2. Replace bulb with a 40 Watt appliance bulb only. 4. Open the drawer to seat bearing glides into the range until levers "click" (approximately 2"). Open the drawer to replace glass shield. High temperature will NOT operate while in the "Self-Clean" and "Oven Lockout" modes 2. THIS GLASS SHIELD MUST ALWAYS BE IN PLACE WHEN THE OVEN IS IN USE. Changing Oven Light Be sure the oven is covered with a glass shield held in place by using the oven light switch located...

Use and Care Manual
Page 19
... manually. *Oven control beeps and (1) Electronic control has detected a fault condition. Dry the burners thoroughly following instructions under General Cleaning. (3) Range power is caused by buildup of grease on and off to operate until flame turns blue. (2) Salt air in the Electronic Oven Control Guide. 19 Make sure the proper rack position is not level. If you call an authorized error (for example F11) servicer for service. Set self-clean cycle for a longer cleaning time. (2) Excessive spillovers in this Use & Care Guide. (2) Electrical power...
... manually. *Oven control beeps and (1) Electronic control has detected a fault condition. Dry the burners thoroughly following instructions under General Cleaning. (3) Range power is caused by buildup of grease on and off to operate until flame turns blue. (2) Salt air in the Electronic Oven Control Guide. 19 Make sure the proper rack position is not level. If you call an authorized error (for example F11) servicer for service. Set self-clean cycle for a longer cleaning time. (2) Excessive spillovers in this Use & Care Guide. (2) Electrical power...
Use and Care Manual
Page 20
... not limited to change without notice. or external causes such as described or illustrated are not a part of the appliance when it is in the USA and Canada. Product features or specifications as abuse, misuse, inadequate power supply, accidents, fires, or acts of the unit. 4. Service calls to repair or replace appliance light bulbs, air filters, water filters, other consumables, or knobs, handles, or other...
... not limited to change without notice. or external causes such as described or illustrated are not a part of the appliance when it is in the USA and Canada. Product features or specifications as abuse, misuse, inadequate power supply, accidents, fires, or acts of the unit. 4. Service calls to repair or replace appliance light bulbs, air filters, water filters, other consumables, or knobs, handles, or other...


