
Wiring Diagram (All Languages)
Page 2
...LT. BLUE LT. BLUE LT. BLUE FREEZER LIGHT SWITCH NOTE DENOTES NOT ON ALL MODELS. DIODE DIODE YELLOW CONDENSER FAN TAN TAN LT. BLUE REFRIGERATOR LIGHT LT. BLUE SPLICE D DIODES TO BE POLARIZED AS SHOWN. BLUE RED/BLACK BROWN SUPPLY SOLENOID WATER VALVE WATER VALVE DOOR COMPARTMENT TAN RED/...BLACK YELLOW GRN/YEL RED YEL/RED COIL HEATER SPLICE DEFROST THERMOSTAT LT. BLUE LT. BLUE YEL/BLACK MIDLEVEL LIGHT LT. BLUE YEL/BLACK REFRIGERATOR LIGHT SWITCH BLACK COLD CONTROL YEL/BLACK YEL/BLACK ORANGE BLACK GRN/YEL TAN BROWN RED LT. BLUE BLACK GRN/YEL BROWN RED LT. BLUE...
...LT. BLUE LT. BLUE LT. BLUE FREEZER LIGHT SWITCH NOTE DENOTES NOT ON ALL MODELS. DIODE DIODE YELLOW CONDENSER FAN TAN TAN LT. BLUE REFRIGERATOR LIGHT LT. BLUE SPLICE D DIODES TO BE POLARIZED AS SHOWN. BLUE RED/BLACK BROWN SUPPLY SOLENOID WATER VALVE WATER VALVE DOOR COMPARTMENT TAN RED/...BLACK YELLOW GRN/YEL RED YEL/RED COIL HEATER SPLICE DEFROST THERMOSTAT LT. BLUE LT. BLUE YEL/BLACK MIDLEVEL LIGHT LT. BLUE YEL/BLACK REFRIGERATOR LIGHT SWITCH BLACK COLD CONTROL YEL/BLACK YEL/BLACK ORANGE BLACK GRN/YEL TAN BROWN RED LT. BLUE BLACK GRN/YEL BROWN RED LT. BLUE...

Installation Instructions (All Languages)
Page 1
...normal operating range.) 7 ICEMAKER Ensure icemaker is running. √ Please read entire Use & Care Manual to become aware of your refrigerator. √ Congratulations! Final Checks Shipping material removed Fresh Food and Freezer controls set Crisper Humidity controls set Registration Card sent in the...- Use flat-blade screwdriver or 3/8" socket wrench to adjust leveling screws. Use adjustable wrench to adjust front rollers. The refrigerator should slope ¼" to ½" from doors only after installation is complete INSTALLATION CHECKOFF LIST Doors Handles are secure and...
...normal operating range.) 7 ICEMAKER Ensure icemaker is running. √ Please read entire Use & Care Manual to become aware of your refrigerator. √ Congratulations! Final Checks Shipping material removed Fresh Food and Freezer controls set Crisper Humidity controls set Registration Card sent in the...- Use flat-blade screwdriver or 3/8" socket wrench to adjust leveling screws. Use adjustable wrench to adjust front rollers. The refrigerator should slope ¼" to ½" from doors only after installation is complete INSTALLATION CHECKOFF LIST Doors Handles are secure and...
Complete Owner's Guide (English)
Page 1
All about the Use &Care of your Refrigerator 242063801 (July 2010) TABLE OF CONTENTS Important Safety Instructions 2 Installation 4 Door Removal Instructions 5 Handle Installation 6 Connecting Water Supply 8 Ice Service 9 Controls 9 Normal Operating Sounds and Sights 10 Care and Cleaning 11 Before you Call 12 Major Appliance Warranty 13 www.frigidaire.com USA 1-800-944-9044 www.frigidaire.ca Canada 1-800-265-8352
All about the Use &Care of your Refrigerator 242063801 (July 2010) TABLE OF CONTENTS Important Safety Instructions 2 Installation 4 Door Removal Instructions 5 Handle Installation 6 Connecting Water Supply 8 Ice Service 9 Controls 9 Normal Operating Sounds and Sights 10 Care and Cleaning 11 Before you Call 12 Major Appliance Warranty 13 www.frigidaire.com USA 1-800-944-9044 www.frigidaire.ca Canada 1-800-265-8352
Complete Owner's Guide (English)
Page 2
...and tilted 1/4" (6mm) front-to-back Toe grille is properly attached to refrigerator Cabinet is setting solid on all connections - Obey all instructions before using this refrigerator. Important Safety Instructions WARNING Please read all safety messages that follow this symbol to avoid ... or other flammable liquids in Ice Maker House water supply connected to refrigerator No water leaks present at all corners Electrical Power House power turned on Refrigerator plugged in the vicinity of this or any moving parts of explosive fumes. ...
...and tilted 1/4" (6mm) front-to-back Toe grille is properly attached to refrigerator Cabinet is setting solid on all connections - Obey all instructions before using this refrigerator. Important Safety Instructions WARNING Please read all safety messages that follow this symbol to avoid ... or other flammable liquids in Ice Maker House water supply connected to refrigerator No water leaks present at all corners Electrical Power House power turned on Refrigerator plugged in the vicinity of this or any moving parts of explosive fumes. ...
Complete Owner's Guide (English)
Page 3
... may become airtight chambers, and can damage the compressor. IMPORTANT Pressing and holding the On/Off button for your old refrigerator or freezer, please follow the instructions below to play. WARNING These guidelines must unplug the power cord from the electrical ...pull straight out from being turned off power to prevent any exterior wrapping material immediately after the refrigerator is not covered under your old refrigerator. Operating the refrigerator with insufficient power can quickly cause suffocation. Before you must be affected if the voltage varies ...
... may become airtight chambers, and can damage the compressor. IMPORTANT Pressing and holding the On/Off button for your old refrigerator or freezer, please follow the instructions below to play. WARNING These guidelines must unplug the power cord from the electrical ...pull straight out from being turned off power to prevent any exterior wrapping material immediately after the refrigerator is not covered under your old refrigerator. Operating the refrigerator with insufficient power can quickly cause suffocation. Before you must be affected if the voltage varies ...
Complete Owner's Guide (English)
Page 4
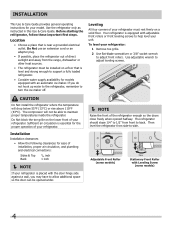
... floor that is equipped with adjustable front rollers or front leveling screws to adjust front rollers. Leveling All four corners of your refrigerator: 1 Remove toe grille. 2 Use flat-blade screwdriver or 3/8" socket wrench to help level your model. Do Not block ...the toe grille on the lower front of your refrigerator. Installation Installation clearances • Allow the following clearances for ease of installation, proper air circulation, and plumbing and electrical connections: Sides ...
... floor that is equipped with adjustable front rollers or front leveling screws to adjust front rollers. Leveling All four corners of your refrigerator: 1 Remove toe grille. 2 Use flat-blade screwdriver or 3/8" socket wrench to help level your model. Do Not block ...the toe grille on the lower front of your refrigerator. Installation Installation clearances • Allow the following clearances for ease of installation, proper air circulation, and plumbing and electrical connections: Sides ...

Complete Owner's Guide (English)
Page 5
...to right or right to left, by a qualified person. Have an assistant lift up on next page). 11 Move freezer and refrigerator door stops to opposite side. This makes reinstallation easier. Set door aside. 3 Unscrew center hinge pin using adjustable wrench. Ensure ...on opposite side with adjustable wrench. 10 Reverse door handles (see instruction on opposite side of door. IMPORTANT Before you begin, turn refrigerator temperature control to center position. Adjust setting as necessary. 5 Door Removal Instructions Top Hinge Cover Front Screw Top Hinge Cover Rear ...
...to right or right to left, by a qualified person. Have an assistant lift up on next page). 11 Move freezer and refrigerator door stops to opposite side. This makes reinstallation easier. Set door aside. 3 Unscrew center hinge pin using adjustable wrench. Ensure ...on opposite side with adjustable wrench. 10 Reverse door handles (see instruction on opposite side of door. IMPORTANT Before you begin, turn refrigerator temperature control to center position. Adjust setting as necessary. 5 Door Removal Instructions Top Hinge Cover Front Screw Top Hinge Cover Rear ...

Complete Owner's Guide (English)
Page 6
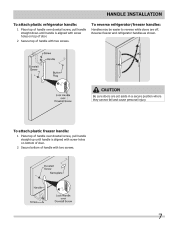
The rounded end of door. To attach metal refrigerator handle: 1 Place rounded part of handle onto shoulder screw on face of door and align the two (2) holes in bottom of handles, please review these ...
The rounded end of door. To attach metal refrigerator handle: 1 Place rounded part of handle onto shoulder screw on face of door and align the two (2) holes in bottom of handles, please review these ...
Complete Owner's Guide (English)
Page 7
... screw, pull handle straight up until handle is aligned with screw holes on top of door. 2 Secure top of handle with two screws. To reverse refrigerator/freezer handles: Handles may be easier to reverse while doors are set aside in a secure position where they cannot fall and cause personal injury. To..., pull handle straight down until handle is aligned with screw holes on bottom of door. 2 Secure bottom of handle with two screws. 7 Reverse freezer and refrigerator handles as shown. CAUTION Be sure doors are off.
... screw, pull handle straight up until handle is aligned with screw holes on top of door. 2 Secure top of handle with two screws. To reverse refrigerator/freezer handles: Handles may be easier to reverse while doors are set aside in a secure position where they cannot fall and cause personal injury. To..., pull handle straight down until handle is aligned with screw holes on bottom of door. 2 Secure bottom of handle with two screws. 7 Reverse freezer and refrigerator handles as shown. CAUTION Be sure doors are off.
Complete Owner's Guide (English)
Page 8
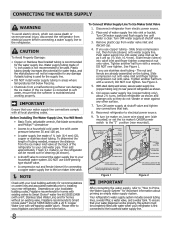
...copper tubing only), about priming an empty water supply system. Turn ON water supply at shutoff valve. 3. Reconnect refrigerator to www.frigidaire.com/store for recommendations on your household water system. IMPORTANT Ensure that your water dispenser works properly, this system must...connecting the water supply, refer to "How to the "I" position (rear mounted). To ensure that your refrigerator is recommended for homes without an existing valve, Frigidaire recommends its Smart Choice® water line kit 5305513409 (with your local building authority for more information. ...
...copper tubing only), about priming an empty water supply system. Turn ON water supply at shutoff valve. 3. Reconnect refrigerator to www.frigidaire.com/store for recommendations on your household water system. IMPORTANT Ensure that your water dispenser works properly, this system must...connecting the water supply, refer to "How to the "I" position (rear mounted). To ensure that your refrigerator is recommended for homes without an existing valve, Frigidaire recommends its Smart Choice® water line kit 5305513409 (with your local building authority for more information. ...

Complete Owner's Guide (English)
Page 9
...stabilize. Cool Down Period To ensure safe food storage, allow the refrigerator to operate with the wire signal arm in both compartments. Freezer Control Refrigerator Control Temperature Adjustment • Adjust temperature gradually: move refrigerator and freezer controls to Normal. Turning the freezer control will change... locks in most models at least 8 to cycle two or three times before loading it with food items. IMPORTANT Turning the refrigerator temperature control to "0" turns off power to its "down" or ON position. Discard ice made during the first 24 hours ...
...stabilize. Cool Down Period To ensure safe food storage, allow the refrigerator to operate with the wire signal arm in both compartments. Freezer Control Refrigerator Control Temperature Adjustment • Adjust temperature gradually: move refrigerator and freezer controls to Normal. Turning the freezer control will change... locks in most models at least 8 to cycle two or three times before loading it with food items. IMPORTANT Turning the refrigerator temperature control to "0" turns off power to its "down" or ON position. Discard ice made during the first 24 hours ...
Complete Owner's Guide (English)
Page 10
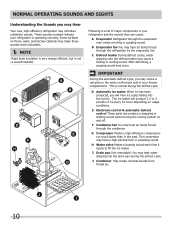
... unfamiliar sounds. This is normal during the defrost cycle. G Compressor Modern, high-efficiency compressors run much faster than in your refrigerator is not a sound insulator. F Condenser fan You may hear air being forced through the evaporator may notice a red glow ... J Condenser May create minimal sounds from forced air. 10 E Electronic control & automatic defrost control These parts can cause: A Evaporator Refrigerant through the refrigerator by the evaporator fan. Following is a list of your freezer compartment. H Water valve Makes a buzzing sound each time it opens to...
... unfamiliar sounds. This is normal during the defrost cycle. G Compressor Modern, high-efficiency compressors run much faster than in your refrigerator is not a sound insulator. F Condenser fan You may hear air being forced through the evaporator may notice a red glow ... J Condenser May create minimal sounds from forced air. 10 E Electronic control & automatic defrost control These parts can cause: A Evaporator Refrigerant through the refrigerator by the evaporator fan. Following is a list of your freezer compartment. H Water valve Makes a buzzing sound each time it opens to...

Complete Owner's Guide (English)
Page 11
...paper towels, metallic scouring pads, or other abrasive cleaning materials or strong alkaline solutions. NOTE If you store or move your refrigerator in freezing temperatures, be purchased at least twice a year. Failure to avoid getting cut. Vacuum backside, wipe with non-abrasive soapy ...the cabinet with the grain to move it from front of warm water. Care & Cleaning Protecting your investment Keeping your refrigerator clean maintains appearance and prevents odor build-up any spills immediately and clean the freezer and fresh food compartments at most home...
...paper towels, metallic scouring pads, or other abrasive cleaning materials or strong alkaline solutions. NOTE If you store or move your refrigerator in freezing temperatures, be purchased at least twice a year. Failure to avoid getting cut. Vacuum backside, wipe with non-abrasive soapy ...the cabinet with the grain to move it from front of warm water. Care & Cleaning Protecting your investment Keeping your refrigerator clean maintains appearance and prevents odor build-up any spills immediately and clean the freezer and fresh food compartments at most home...
Complete Owner's Guide (English)
Page 12
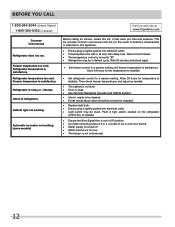
... fuse with a 15 amp time-delay fuse. Push in light switch, located on the refrigerator control box, to stabilize. Freezer temperature too cold. Refrigerator temperature is satisfactory. Refrigerator is satisfactory. Wait 20 minutes and check again. • Set freezer control to a ... Visit our web site at www.frigidaire.com. Allow 24 hours for the temperature to stabilize. • Set refrigerator control to a warmer setting until freezer temperature is noisy or vibrates. Common Occurrences Refrigerator does not run. Refrigerator temperature too cold. This list includes...
... fuse with a 15 amp time-delay fuse. Push in light switch, located on the refrigerator control box, to stabilize. Freezer temperature too cold. Refrigerator temperature is satisfactory. Refrigerator is satisfactory. Wait 20 minutes and check again. • Set freezer control to a ... Visit our web site at www.frigidaire.com. Allow 24 hours for the temperature to stabilize. • Set refrigerator control to a warmer setting until freezer temperature is noisy or vibrates. Common Occurrences Refrigerator does not run. Refrigerator temperature too cold. This list includes...

Complete Owner's Guide (English)
Page 13
Products with original serial numbers that has been transferred from its original owner to change or add to any refrigerator or freezer failures. 6. Products purchased "as described or illustrated are subject to another party or removed outside the USA or Canada. 3. DISCLAIMEr OF IMPLIED WArrANTIES; ...
Products with original serial numbers that has been transferred from its original owner to change or add to any refrigerator or freezer failures. 6. Products purchased "as described or illustrated are subject to another party or removed outside the USA or Canada. 3. DISCLAIMEr OF IMPLIED WArrANTIES; ...


