
Wiring Diagram (All Languages)
Page 1
...at 500°F. To terminate defrost, depress the fresh food light switch 5 times in 6 seconds. (some models) ORANGE (some models) ICE MAKER ICE MAKER INFORMATION Test Cycling Remove cover by inserting screwdriver in Cut-out Heater Watts Ohms 18' & 21' 25°F -4°C 47°F ...68 oz.). Untrained persons should function to 3.6 oz.). NOTE: Some products come equipped with Orange wire close at 8.96F (-12.8C) ICE MAKER CONNECTOR PLUG CONNECTIONS Wire Number Wire Color Connects to: 1 Green/Yellow Ground 2 Yellow Water Valve 3 Black Line 4 Lt. AUTOMATIC ...
...at 500°F. To terminate defrost, depress the fresh food light switch 5 times in 6 seconds. (some models) ORANGE (some models) ICE MAKER ICE MAKER INFORMATION Test Cycling Remove cover by inserting screwdriver in Cut-out Heater Watts Ohms 18' & 21' 25°F -4°C 47°F ...68 oz.). Untrained persons should function to 3.6 oz.). NOTE: Some products come equipped with Orange wire close at 8.96F (-12.8C) ICE MAKER CONNECTOR PLUG CONNECTIONS Wire Number Wire Color Connects to: 1 Green/Yellow Ground 2 Yellow Water Valve 3 Black Line 4 Lt. AUTOMATIC ...

Wiring Diagram (All Languages)
Page 2
... Optional Water Through The Door Or Mid-level Lighting COMPRESSOR WIRING Induction Run Compressor with Relay FREEZER FAN FREEZER LIGHT FREEZER COMPARTMENT MOTOR MOUNTING BRACKET ICE MAKER LT.
... Optional Water Through The Door Or Mid-level Lighting COMPRESSOR WIRING Induction Run Compressor with Relay FREEZER FAN FREEZER LIGHT FREEZER COMPARTMENT MOTOR MOUNTING BRACKET ICE MAKER LT.

Installation Instructions (All Languages)
Page 1
... additional information about your refrigerator. 5 LEVELING AND ADJUSTING All four corners of your refrigerator must rest firmly on Refrigerator plugged in Ice Maker House water supply connected to refrigerator Cabinet is setting solid on all connections - Use adjustable wrench to adjust front rollers. Connecting... need to remove the doors to enjoy your refrigerator into the house please see "Door Removal and Reversal Instructions" in 24 hours Ice Maker is turned ON. You are installing your refrigerator beside a wall, leave 1/2" minimum between hinges and wall to 5 is normal operating...
... additional information about your refrigerator. 5 LEVELING AND ADJUSTING All four corners of your refrigerator must rest firmly on Refrigerator plugged in Ice Maker House water supply connected to refrigerator Cabinet is setting solid on all connections - Use adjustable wrench to adjust front rollers. Connecting... need to remove the doors to enjoy your refrigerator into the house please see "Door Removal and Reversal Instructions" in 24 hours Ice Maker is turned ON. You are installing your refrigerator beside a wall, leave 1/2" minimum between hinges and wall to 5 is normal operating...
Complete Owner's Guide (English)
Page 2
Staples can cause severe cuts, and also destroy finishes if they come in Ice Maker House water supply connected to refrigerator No water leaks present at all connections - Obey all safety messages that follow this ...food and freezer temperatures set Crisper humidity controls set Registration card sent in minor or moderate injury. recheck in 24 hours Ice maker is the safety alert symbol. It is important but not hazard-related. IMPORTANT IMPORTANT indicates installation, operation or maintenance information which , if not avoided,...
Staples can cause severe cuts, and also destroy finishes if they come in Ice Maker House water supply connected to refrigerator No water leaks present at all connections - Obey all safety messages that follow this ...food and freezer temperatures set Crisper humidity controls set Registration card sent in minor or moderate injury. recheck in 24 hours Ice maker is the safety alert symbol. It is important but not hazard-related. IMPORTANT IMPORTANT indicates installation, operation or maintenance information which , if not avoided,...
Complete Owner's Guide (English)
Page 4
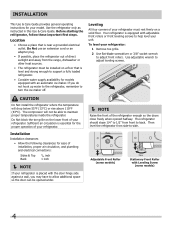
... do not hook up water to the refrigerator, remember to adjust leveling screws. Use adjustable wrench to turn the ice maker off. Adjustable Front Roller (some models) Raise Stationary Front Roller with an automatic ice maker. Do Not use an extension cord or an adapter plug. • If possible, place the refrigerator out of...
... do not hook up water to the refrigerator, remember to adjust leveling screws. Use adjustable wrench to turn the ice maker off. Adjustable Front Roller (some models) Raise Stationary Front Roller with an automatic ice maker. Do Not use an extension cord or an adapter plug. • If possible, place the refrigerator out of...
Complete Owner's Guide (English)
Page 8
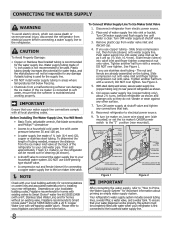
...tubing is first connected to your household water system. DO NOT over tighten. Tighten another half turn ice maker on your local building authority for homes without an existing valve, Frigidaire recommends its Smart Choice® water line kit 5305513409 (with a wrench; Turn ON water supply...tubing - Depending on , lower wire signal arm (side mounted) or set the ice maker's On/Off power switch to the ice maker inlet valve. NOTE Check with your local/state building codes, Frigidaire recommends for any other surface. 7. To ensure that your refrigerator is used . ...
...tubing is first connected to your household water system. DO NOT over tighten. Tighten another half turn ice maker on your local building authority for homes without an existing valve, Frigidaire recommends its Smart Choice® water line kit 5305513409 (with a wrench; Turn ON water supply...tubing - Depending on , lower wire signal arm (side mounted) or set the ice maker's On/Off power switch to the ice maker inlet valve. NOTE Check with your local/state building codes, Frigidaire recommends for any other surface. 7. To ensure that your refrigerator is used . ...

Complete Owner's Guide (English)
Page 9
...temperature to the light bulb and other electrical components. Place the ice container under the ice maker, pushing it as far back as needed. NOTE Automatic ice makers are also optional accessories that may cause the ice maker to cycle two or three times before loading it clicks and... turning refrigerator on, move the knob in both compartments. After 24 hours, adjust the controls as possible. IMPORTANT Your ice maker is full. To turn ice maker OFF by lifting the wire signal arm until it with food items. IMPORTANT Turning the refrigerator temperature control to Normal....
...temperature to the light bulb and other electrical components. Place the ice container under the ice maker, pushing it as far back as needed. NOTE Automatic ice makers are also optional accessories that may cause the ice maker to cycle two or three times before loading it clicks and... turning refrigerator on, move the knob in both compartments. After 24 hours, adjust the controls as possible. IMPORTANT Your ice maker is full. To turn ice maker OFF by lifting the wire signal arm until it with food items. IMPORTANT Turning the refrigerator temperature control to Normal....
Complete Owner's Guide (English)
Page 10
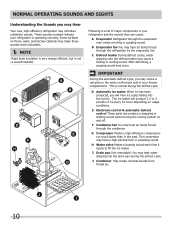
...major components in the past. IMPORTANT During the automatic defrost cycle, you may occur. D Automatic ice maker When ice has been produced, you will produce 2.5 to fill the ice maker. E Electronic control & automatic defrost control These parts can cause: A Evaporator Refrigerant through the evaporator...normally indicate your freezer compartment. Following is a list of your refrigerator is normal during the defrost cycle. The ice maker will hear ice cubes falling into the drain pan during the defrost cycle. Normal Operating Sounds and sights Understanding the Sounds you ...
...major components in the past. IMPORTANT During the automatic defrost cycle, you may occur. D Automatic ice maker When ice has been produced, you will produce 2.5 to fill the ice maker. E Electronic control & automatic defrost control These parts can cause: A Evaporator Refrigerant through the evaporator...normally indicate your freezer compartment. Following is a list of your refrigerator is normal during the defrost cycle. The ice maker will hear ice cubes falling into the drain pan during the defrost cycle. Normal Operating Sounds and sights Understanding the Sounds you ...
Complete Owner's Guide (English)
Page 12
... • Light switch may be cleaned. • Foods that are not the result of ice in defrost cycle. Refrigerator temperature is not cold enough. 12 Push in light switch, located ...box, to release. • Ensure the Wire Signal Arm is not in UP position. • Ice maker should be in a 24 hour period. • Water supply is turned off. • Water ... Operating Sounds and Sights section. • Interior needs to be stuck. Odors in this list. Automatic ice maker not working . Cabinet light not working . (some models) Before calling for the temperature to stabilize....
... • Light switch may be cleaned. • Foods that are not the result of ice in defrost cycle. Refrigerator temperature is not cold enough. 12 Push in light switch, located ...box, to release. • Ensure the Wire Signal Arm is not in UP position. • Ice maker should be in a 24 hour period. • Water supply is turned off. • Water ... Operating Sounds and Sights section. • Interior needs to be stuck. Odors in this list. Automatic ice maker not working . Cabinet light not working . (some models) Before calling for the temperature to stabilize....


